
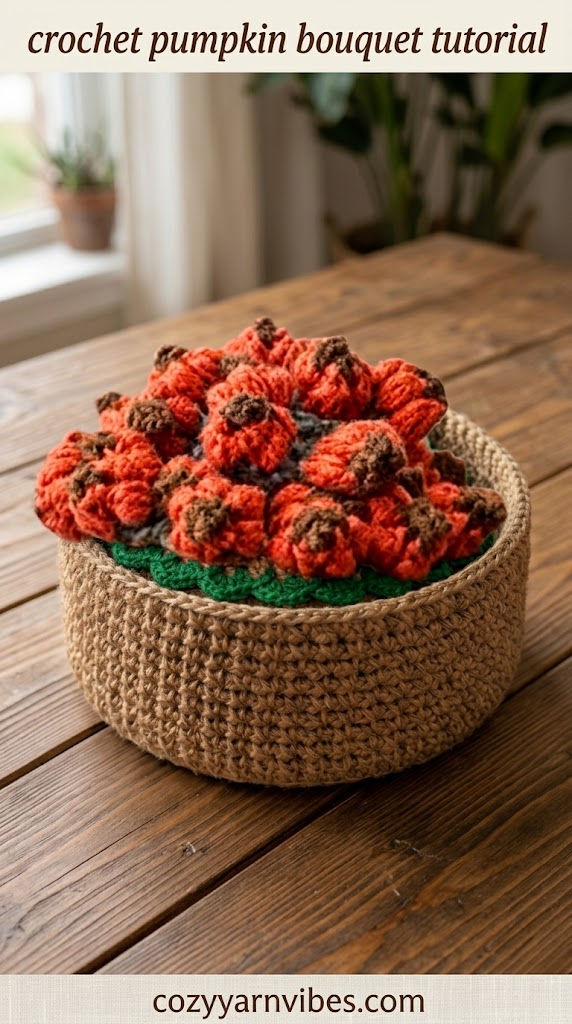
Looking for a cute handmade decoration for the fall season? This Crochet Pumpkin Bouquet is a fun and versatile project that can be displayed in different ways. The pumpkins can be arranged as a beautiful bouquet, placed on a crochet mat, or displayed inside a handmade basket for a cozy autumn look.
What makes this project special is its convertible design. Instead of making a decoration that can only be used in one way, you can rearrange the pumpkins and mat to create different seasonal displays. The Crochet Pumpkin Bouquet can become a centerpiece, tabletop decoration, or a charming fall gift.
Easy Crochet Pumpkin Bouquet Tutorial
This Crochet Pumpkin Bouquet combines several small crochet pumpkins with a handmade mat and basket to create a versatile fall decoration. Each component can be used separately, or everything can be arranged together for a complete autumn display.
The pumpkins form the main part of the bouquet. Once they are finished, you can add stems and arrange them together using crochet stems or yarn. The finished bouquet can then be placed inside the crochet basket or displayed on the accompanying mat.
The project is also easy to customize. You can make pumpkins in different sizes and autumn colors to create a fuller and more interesting Crochet Pumpkin Bouquet.
Why You’ll Love This Pattern
- Perfect for fall and Thanksgiving décor
- Creates a reusable seasonal decoration
- The pumpkins can be rearranged in different ways
- Includes a decorative crochet mat and basket
- Great for using leftover yarn
- Easy to customize with different colors
- Makes a thoughtful handmade gift
- Can be displayed as a centerpiece
- Works well with other crochet fall decorations
Skill Level
Beginner to Easy Intermediate
This project is suitable for crocheters who are comfortable with basic crochet stitches. The pumpkin shapes, mat, and basket can be worked separately and assembled after the individual pieces are complete.
Finished Size
The finished size of your Crochet Pumpkin Bouquet will depend on the yarn weight, crochet hook, pumpkin size, and number of pumpkins you make.
You can make a small arrangement for a shelf or side table, or create a larger bouquet for a dining table or fall centerpiece.
Materials Needed
Yarn
Choose a yarn that gives your pumpkins enough structure to hold their shape. Cotton yarn is a good option for the pumpkins, mat, and decorative pieces because it provides clear stitch definition.
You will need yarn for the pumpkins, stems, mat, and basket. The exact amount will depend on the size and number of pieces you make.
Color
Traditional autumn shades work beautifully for this project. Try pumpkin orange, rust, mustard, cream, brown, olive green, or burgundy.
You can also use neutral shades such as beige, ivory, tan, and muted brown for a modern farmhouse-style Crochet Pumpkin Bouquet.
Additional Supplies
- Crochet hook suitable for your yarn
- Yarn needle
- Scissors
- Stuffing for the pumpkins
- Stitch marker, if needed
- A small amount of green or brown yarn for stems
Stitches & Abbreviations (US Terms)
- ch = chain
- sc = single crochet
- hdc = half double crochet
- dc = double crochet
- sl st = slip stitch
- st = stitch
- sp = space
- rep = repeat
How to Make These Stitches
Chain (ch)
Make a slip knot and place it on your hook. Yarn over and pull through the loop on your hook. Continue making chains until you reach the required number.
Single Crochet (sc)
Insert the hook into the stitch, yarn over, and pull up a loop. Yarn over again and pull through both loops on the hook.
Half Double Crochet (hdc)
Yarn over and insert the hook into the stitch. Pull up a loop so that you have three loops on your hook. Yarn over and pull through all three loops.
Double Crochet (dc)
Yarn over and insert the hook into the stitch. Pull up a loop. Yarn over and pull through two loops. Yarn over again and pull through the remaining two loops.
Slip Stitch (sl st)
Insert the hook into the stitch, yarn over, and pull the yarn through both the stitch and the loop already on your hook.
Pattern Notes
The Crochet Pumpkin Bouquet is made from several individual components. The pumpkins are crocheted separately and stuffed before being shaped. The mat and basket are also worked separately so they can be used with the pumpkins or displayed on their own.
Keep your tension even, especially when making the pumpkins. Consistent tension helps the pumpkins maintain a neat and rounded shape.
The number of pumpkins can also be changed according to the size of your bouquet. Make fewer pumpkins for a small arrangement or add more for a fuller display.
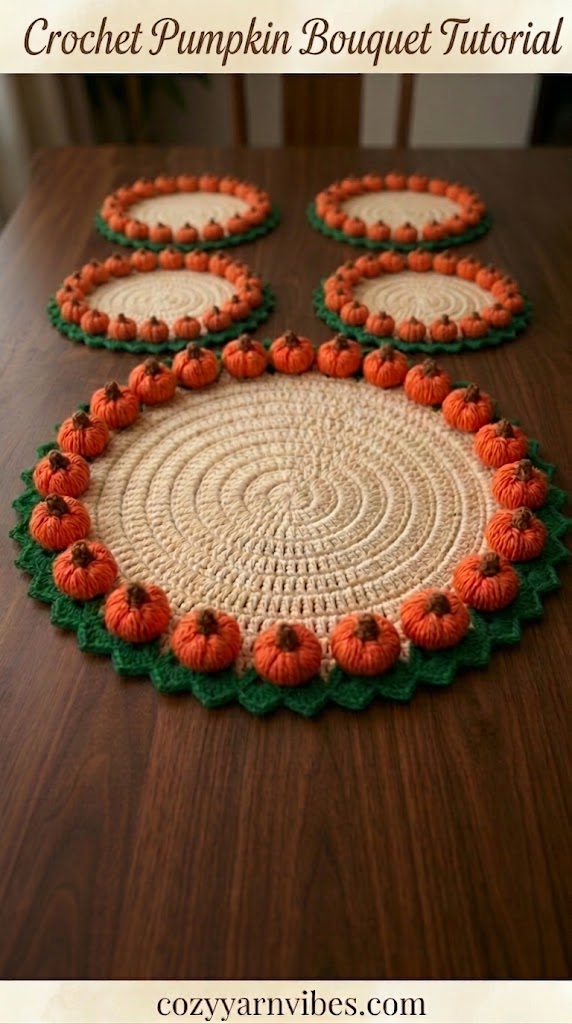
Crochet Pumpkin Bouquet/Mat: Step-by-Step
Making The Crochet bouquet/Mat Base
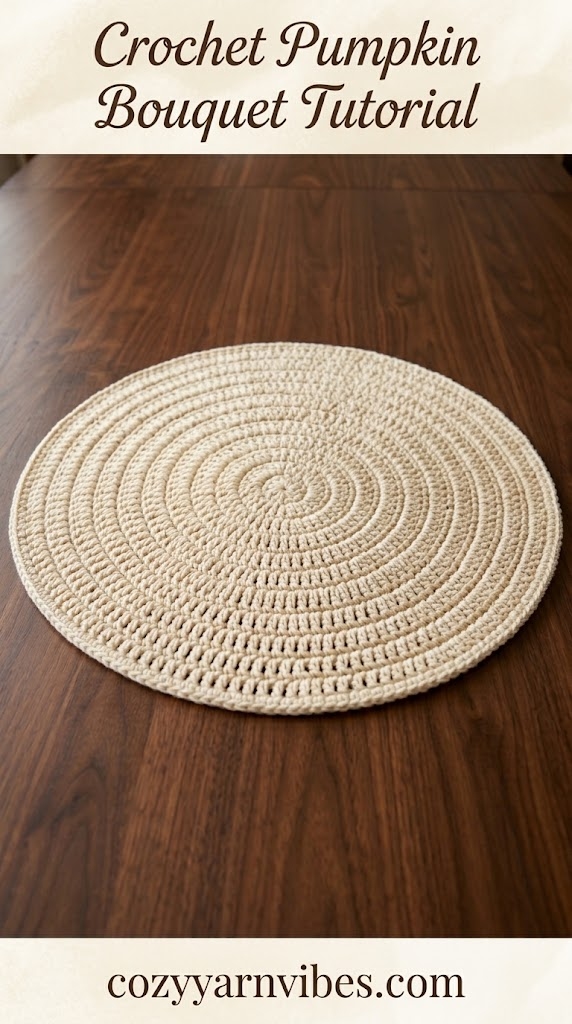
Round 1
Make a Magic Ring.
Chain 3. The chain 3 counts as the first double crochet.
Work 11 double crochets into the Magic Ring.
Join with a slip stitch to the top of the beginning chain 3.
Total: 12 double crochets
Round 2
Chain 3.
Work 2 double crochets in each stitch around.
Join with a slip stitch to the top of the beginning chain 3.
Total: 24 double crochets
Round 3
Chain 3.
Repeat the following sequence around:
1 double crochet in the next stitch, 2 double crochets in the next stitch.
Join with a slip stitch to the beginning chain 3.
Total: 36 double crochets
Round 4
Chain 3.
Repeat around:
2 double crochets in the next stitch, 2 double crochets in the following stitch.
Join with a slip stitch to the beginning chain 3.
Total: 48 double crochets
Round 5
Chain 3.
Repeat around:
3 double crochets in the next 3 stitches, 2 double crochets in the next stitch.
Join with a slip stitch to the beginning chain 3.
Total: 60 double crochets
Round 6
Chain 3.
Repeat around:
4 double crochets in the next 4 stitches, 2 double crochets in the next stitch.
Join with a slip stitch to the beginning chain 3.
Total: 72 double crochets
Round 7
Chain 3.
Repeat around:
5 double crochets in the next 5 stitches, 2 double crochets in the next stitch.
Join with a slip stitch to the beginning chain 3.
Total: 84 double crochets
Round 8
Chain 1.
Work 1 single crochet in each stitch around.
Join with a slip stitch to the first single crochet.
Total: 84 single crochets
At this point, change to green yarn.
Measure the center of your table mat. It should be approximately 12–15 inches in diameter, depending on your yarn weight, hook size, and tension.
Do not fasten off if the next part of the pattern will continue directly from this round.
Leaf Edging
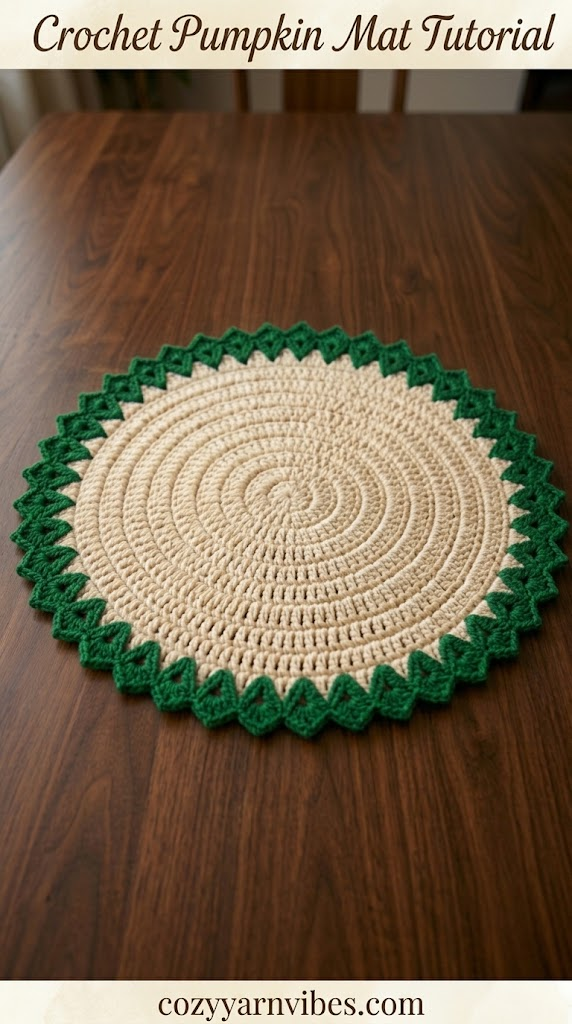
After completing Round 8 of the table mat, change to green yarn. The leaves are worked around the outer edge of the mat.
For this round, work into the back loop only (BLO) of the stitches.
Leaf Edging Round
- In the next stitch, work the following stitches together in the same stitch:
1 single crochet, 1 half double crochet, 1 double crochet, 1 half double crochet, 1 single crochet.
This creates one small leaf. - Skip the next stitch.
- Work 1 slip stitch in the next stitch.
- Skip the next stitch.
- Repeat the following sequence around the entire edge:
Work 1 single crochet, 1 half double crochet, 1 double crochet, 1 half double crochet, and 1 single crochet in the next stitch. Skip the next stitch. Slip stitch in the next stitch. Skip the next stitch.
Continue this pattern until you reach the beginning of the round.
Join with a slip stitch to the first stitch of the round.
Fasten off and weave in the loose end.
Leaf Shape
Each group of single crochet, half double crochet, double crochet, half double crochet, single crochet creates one rounded, pointed leaf. The slip stitches between the leaves keep the edging neat and help separate each leaf.
Color: Green yarn
Placement: Around the entire outer edge of the table mat
Stitch placement: Back loop only (BLO)
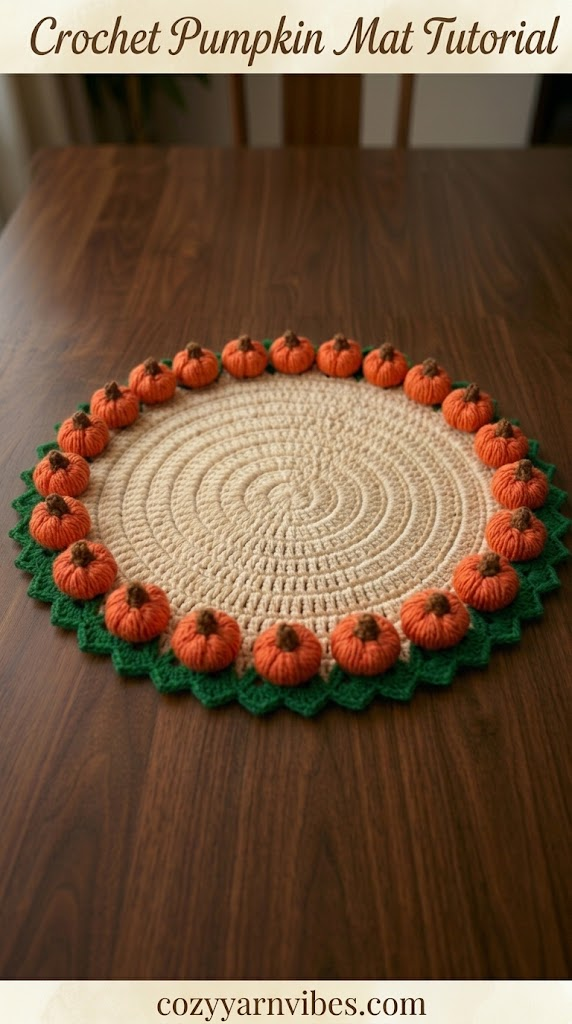
Crochet Pumpkin for the Table Mat
Step 1: Attach Your Yarn
Make a slip knot with your orange yarn and place it on your hook.
Attach your yarn with a standing double crochet:
- Yarn over, insert hook into the stitch
- Yarn over, pull through (3 loops on hook)
- Yarn over, pull through 2 loops (2 loops on hook)
- Yarn over, pull through 2 loops (1 loop on hook)
Tip: If a standing dc feels tricky, you can simply join your yarn with a slip stitch and chain 2 instead — it works the same way, just slightly less clean-looking.
Step 2: Puff Stitch #1 (9-loop puff)
Work this puff stitch into the same stitch you just attached your yarn to:
- Yarn over, insert hook into stitch, yarn over, pull up a loop → 3 loops on hook
- Yarn over, insert hook into same stitch, yarn over, pull up a loop → 5 loops on hook
- Yarn over, insert hook into same stitch, yarn over, pull up a loop → 7 loops on hook
- Yarn over, insert hook into same stitch, yarn over, pull up a loop → 9 loops on hook
- Yarn over and pull through the first 8 loops on your hook
- Yarn over and pull through the last 2 loops
That’s one complete puff stitch! You should have 1 loop left on your hook.
Step 3: Repeat for Remaining Puffs
Move to the next stitch of your popcorn base and repeat Step 2 (the full 9-loop puff stitch) in each remaining stitch.
You’ll make 5 puff stitches total — one in every stitch of your 5-stitch HDC popcorn base.
Once all 5 puffs are done, add a stitch marker to hold your last loop (or just let the yarn hang loose — you’ll come back to it).
Step 4: Join the Puffs (Create the Ring for Your Stem)
Make a new slip knot and place it on your hook.
- Insert your hook into the gap between your starting dc/ch-2 and the first puff stitch
- Yarn over and pull the loop up through — this anchors your new yarn
- Move to the gap between the next two puffs, insert hook, yarn over, pull up a loop → 3 loops on hook
- Repeat this in each remaining gap between puffs (4 gaps total):
- Gap 2: pull up a loop → 4 loops on hook
- Gap 3: pull up a loop → 5 loops on hook
- Gap 4 (last one): pull up a loop → 6 loops on hook
Once you have 6 loops on your hook, yarn over and pull through all 6 loops at once.
Chain 1 to close.
Step 5: Make the Stem
Grab the yarn tail from this last step (your stem tail).
- Pinch your fingers into the middle of the active loop
- Grab the tail and pull to tighten the loop closed around your fingers
- Tie an extra knot for security
Your stem is done!
Step 6: Close Up the Pumpkin
- Remove your stitch marker from Step 3
- Grab that active loop (same technique as the stem)
- Find the original yarn tail from when you first started the pumpkin, and tuck your stem yarn ends down toward it
- Loop the active loop through that starting tail and pull tight to close everything up
- Tie one more knot for extra security
Step 7: Finish
Cut your yarn and weave in all the loose ends with your tapestry needle.
Repeat this entire pattern for each pumpkin you want to add to your project.
Adding the Pumpkins to Your Table Mat
Repeat this pumpkin wherever you want one around the edge of the mat. Since your mat already has crocheted leaves around the border, you can place the pumpkins between the leaves to create an alternating leaf-and-pumpkin autumn border.
Making Other 5 Crochet Pumpkin Bouquet/Mats
The other 5 crochet mats will be made using all the same steps as stated above. Make the center base, then attach leaves and pumpkins at the edges. Make sure the size of all 6 mats remains the same.
Making the Crochet Basket
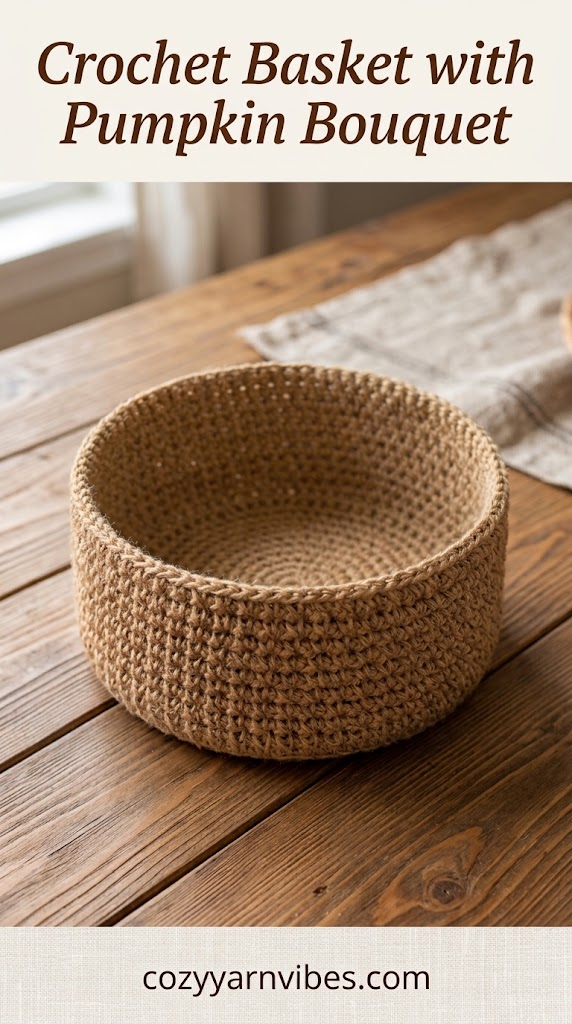
Basket Bottom
Keep two strands of yarn together for the entire basket.
Round 1
Make a Magic Circle.
- Chain 1.
- Work 10 half double crochets into the Magic Circle.
- Pull the Magic Circle tight to close the center.
- Join with a slip stitch to the top of the first half double crochet.
Total: 10 stitches
Round 2
- Chain 1.
- Do not turn.
- Work 2 half double crochets in each stitch around.
- Join with a slip stitch to the top of the first half double crochet.
Total: 20 stitches
Round 3
- Chain 1.
- Do not turn.
- Repeat the following sequence around:
2 half double crochets in the next stitch, 1 half double crochet in the next stitch.
- Join with a slip stitch to the top of the first half double crochet.
Total: 30 stitches
The base should measure approximately 3.75 inches across.
Round 4
- Chain 1.
- Do not turn.
- Repeat around:
2 half double crochets in the next stitch, 1 half double crochet in each of the next 2 stitches.
- Join with a slip stitch to the first half double crochet.
Total: 40 stitches
The base should measure approximately 5 inches across.
Round 5
- Chain 1.
- Do not turn.
- Repeat around:
2 half double crochets in the next stitch, 1 half double crochet in each of the next 3 stitches.
- Join with a slip stitch to the first half double crochet.
Total: 50 stitches
Round 6
- Chain 1.
- Do not turn.
- Repeat around:
2 half double crochets in the next stitch, 1 half double crochet in each of the next 4 stitches.
- Join with a slip stitch to the first half double crochet.
Total: 60 stitches
Round 7
- Chain 1.
- Do not turn.
- Repeat around:
2 half double crochets in the next stitch, 1 half double crochet in each of the next 5 stitches.
- Join with a slip stitch to the first half double crochet.
Total: 70 stitches
The base should measure approximately 8.25 inches across.
Round 8
- Chain 1.
- Do not turn.
- Repeat around:
2 half double crochets in the next stitch, 1 half double crochet in each of the next 6 stitches.
- Join with a slip stitch to the first half double crochet.
Total: 80 stitches
Round 9
- Chain 1.
- Do not turn.
- Repeat around:
2 half double crochets in the next stitch, 1 half double crochet in each of the next 7 stitches.
- Join with a slip stitch to the first half double crochet.
Total: 90 stitches
Round 10
- Chain 1.
- Do not turn.
- Repeat around:
2 half double crochets in the next stitch, 1 half double crochet in each of the next 8 stitches.
- Join with a slip stitch to the first half double crochet.
Total: 100 stitches
The finished basket bottom should measure approximately 12 inches across.
Do not fasten off. Continue directly to the basket sides.
Basket Sides
The round numbers now restart at Round 1.
Keep the right side of the basket bottom facing upward.
The basket sides are worked using single crochet and chain-1 spaces. These chain spaces help the sides stand upright instead of becoming too loose or caving inward.
Round 1
- Chain 1 and turn.
- Your first stitch is the top of the last half double crochet from the previous round. Do not work into the slip stitch.
- Work single crochet through the back loop only of each stitch around.
- Join with a slip stitch through both loops of the first single crochet.
Total: 100 single crochets
The back loop is the loop that is farthest away from you when you look at the top of the stitch.
Round 2
This is a right-side round.
- Chain 1.
- Do not turn.
- Skip the first stitch, which is attached to the chain.
- Work 1 single crochet into the next stitch.
- Place a stitch marker in the top of this first single crochet.
Now work the following sequence:
Chain 1, single crochet in the next stitch.
Then:
Ch 1, skip the next stitch, single crochet in the next stitch.
Repeat that sequence 2 times.
Next:
Chain 1, single crochet in the next stitch.
Then:
Ch 1, skip the next stitch, single crochet in the next stitch.
Now repeat the following larger sequence around:
Chain 1, skip the next stitch, single crochet in the next stitch.
Ch 1, single crochet in the next stitch.
Chain 1, skip the next stitch, single crochet in the next stitch. Repeat this last instruction 2 times.
Ch 1, single crochet in the next stitch.
Chain 1, skip the next stitch, single crochet in the next stitch.
Continue repeating the larger sequence around the basket until you reach the beginning.
Total: 60 single crochets
Only count the single crochets. Do not count the chains or chain-1 spaces as stitches.
At the end:
- Chain 1.
- Join with a slip stitch into the first chain-1 space made in this round.
- Do not remove the stitch marker.
From this point forward, turn after every round.
Round 3
This is a wrong-side round.
- Chain 1 and turn.
- Work 1 single crochet into the first chain-1 space, which is the space between the turning chain and the last single crochet of the previous round.
- Move the stitch marker to the top of this first single crochet.
Now repeat:
Chain 1, single crochet in the next chain-1 space.
Continue around the basket.
The final single crochet should be worked into the last chain-1 space. Do not work into the chain-1 space containing the stitch marker from the previous round.
Total: 60 single crochets
Remove the old stitch marker and keep the new marker in the first single crochet of this round.
Then:
- Chain 1.
- Join with a slip stitch into the first chain-1 space of the round.
- Keep the stitch marker in place.
Rounds 4–16
From this point forward, the instructions are very simple.
For every round:
- Chain 1 and turn.
- Work 1 single crochet into the first chain-1 space.
- Place or move the stitch marker into the first single crochet.
- Repeat chain 1, single crochet in the next chain-1 space around.
- Do not work into the marked chain-1 space from the previous round.
- Chain 1.
- Join with a slip stitch into the first chain-1 space.
Maintain 60 single crochets in every round.
Round 4 – RS
Repeat Round 3.
Round 5 – WS
Repeat Round 3.
Round 6 – RS
Repeat Round 3.
After Round 6, the basket sides should measure approximately 2.25 inches high.
Round 7 – WS
Repeat Round 3.
Round 8 – RS
Repeat Round 3.
Round 9 – WS
Repeat Round 3.
Round 10 – RS
Repeat Round 3.
Round 11 – WS
Repeat Round 3.
Round 12 – RS
Repeat Round 3.
After Round 12, the basket sides should measure approximately 4 inches high.
Round 13 – WS
Repeat Round 3.
Round 14 – RS
Repeat Round 3.
Round 15 – WS
Repeat Round 3.
Round 16 – RS
Repeat Round 3.
After Round 16, the basket sides should measure approximately 5.5 inches high.
Finishing
- Fasten off the yarn.
- Cut the yarn, leaving a long enough tail for weaving.
- Use a yarn needle to weave in all loose ends securely.
- Gently shape the basket so the base remains flat and the sides stand upright.
Finished Large Basket
- Base diameter: approximately 12 inches
- Side height: approximately 5.5 inches
- Bottom stitches: 100 half double crochets
- Side stitches: 60 single crochets per round
- Yarn: two strands held together throughout
For your table-mat project, this basket can be made as the large centerpiece basket, while the six table mats can be made separately at approximately 12–15 inches in diameter, with small crochet pumpkins attached around their edges.
Assembling the Convertible Decoration
The best part of this project is that the individual pieces can be rearranged.
For a traditional Crochet Pumpkin Bouquet, place the pumpkins together and arrange them like a small flower bouquet. Place these 6 bouquets inside the basket to make a beautiful pumpkin basket.
You can also separate the mats and use the basket separately. The mat can be placed underneath the basket or used on another table.
This makes the project easy to change throughout the fall season without needing to make a completely new decoration.
Other Variations to Try
Once you finish your first Crochet Pumpkin Bouquet, try experimenting with different pumpkin sizes and colors.
- Make pumpkins in three or more sizes.
- Use several shades of orange.
- Add cream and beige pumpkins for a neutral look.
- Create green pumpkin stems and leaves.
- Add crochet acorns or leaves to the arrangement.
- Make a longer mat for a dining table.
- Create a deeper basket for a fuller bouquet.
Customization Ideas
Traditional Fall Pumpkin Bouquet
Use orange, rust, mustard, brown, and green yarn to create a classic autumn arrangement. Add several pumpkin sizes to make the bouquet look full and natural.
Neutral Pumpkin Bouquet
Choose cream, beige, taupe, light brown, and muted green. This color palette works especially well with farmhouse, rustic, and minimalist décor.
Colorful Pumpkin Bouquet
For a brighter display, combine orange, yellow, burgundy, dark green, and cream pumpkins. Different colors make each pumpkin stand out.
Mini Pumpkin Bouquet
Use thinner yarn and a smaller hook to create miniature pumpkins. A small Crochet Pumpkin Bouquet is perfect for a shelf, desk, bedside table, or small centerpiece.
Large Pumpkin Display
Use thicker yarn and a larger hook to make oversized pumpkins. Arrange several large pumpkins in a wide basket for a statement fall decoration.
Where to Use Your Crochet Pumpkin Bouquet
There are many places where you can display your Crochet Pumpkin Bouquet. Place it on a dining table as a fall centerpiece or use it on a coffee table, entryway table, shelf, mantel, or kitchen counter.
The crochet mat can be used separately under candles, small decorations, vases, or other seasonal items.
The basket can also be used throughout the year for storing yarn, craft supplies, small accessories, or household items.
Because the pieces can be separated, this project is useful beyond the fall season. You can remove the pumpkins and continue using the basket and mat in other ways.
Care Instructions
Gently hand wash the crochet pieces when necessary using cool water and mild detergent.
Avoid twisting or stretching the pumpkins, mat, or basket while wet. Instead, gently press them between clean towels to remove excess water.
Allow each piece to dry flat or reshape it carefully while damp. Keep the stuffed pumpkins away from high heat because heat can affect some yarn fibers and alter their shape.
Store the pumpkins in a dry place when they are not being used.
Frequently Asked Questions
Is this Crochet Pumpkin Bouquet suitable for beginners?
Yes. The project can be suitable for beginners who are comfortable with basic crochet stitches. The pumpkins, mat, and basket are made separately, making the project easier to manage one section at a time.
How many pumpkins should I make for a Crochet Pumpkin Bouquet?
The number depends on the size of your bouquet. A small arrangement can use just a few pumpkins, while a larger bouquet can include several pumpkins in different sizes.
Can I make the pumpkins different sizes?
Yes. Changing your yarn weight, hook size, or the number of rounds allows you to create pumpkins in different sizes. Mixing sizes makes the Crochet Pumpkin Bouquet look fuller and more natural.
Can I make the basket separately?
Yes. The basket can be used independently from the pumpkins. It can hold other crochet projects, craft supplies, or seasonal decorations.
Can I use the mat without the pumpkin bouquet?
Absolutely. The crochet mat can be used as a small table mat or decorative base for candles, vases, bowls, and other fall decorations.
What colors work best for a Crochet Pumpkin Bouquet?
Orange, rust, mustard, brown, cream, burgundy, olive green, and golden yellow are excellent choices for a fall-inspired Crochet Pumpkin Bouquet. You can also use neutral shades for a softer modern look.
Conclusion
This Crochet Pumpkin Bouquet is a creative fall project that gives you several decoration options in one handmade set. The pumpkins can be arranged into a bouquet, displayed on the crochet mat, or placed inside the basket for a completely different look.
Experiment with different pumpkin sizes, autumn colors, and decorative details to create an arrangement that matches your home. Whether you make a small Crochet Pumpkin Bouquet for a shelf or a larger centerpiece for your dining table, this project is a lovely way to bring handmade warmth into your fall décor.
The convertible design also means you can use the basket and mat separately, making this more than just a seasonal decoration.
learn more cozy crochet ideas like Crochet Simple Leaf Tutorial.