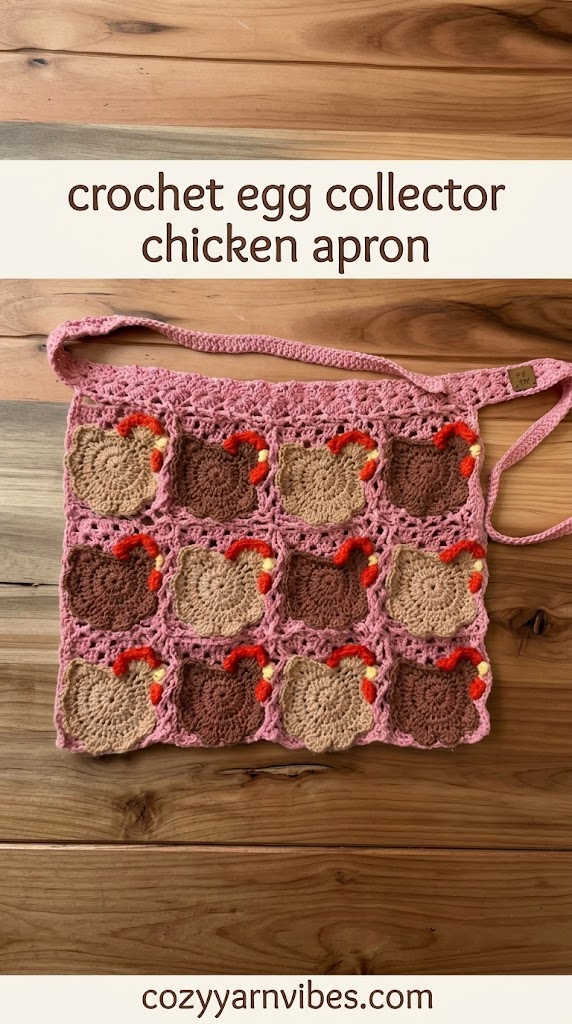
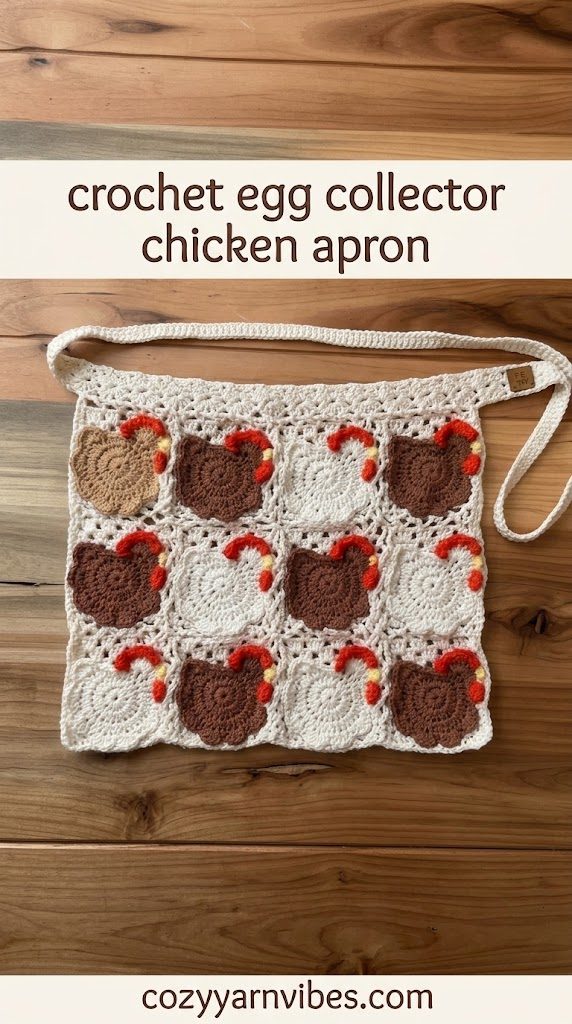
Make collecting fresh eggs a little more fun with this adorable Crochet Chicken Apron. Designed with practical egg pockets across the front, this handmade apron gives you a convenient place to safely carry eggs while adding a playful touch to your farm or garden routine.
This Crochet Chicken Apron is a fun and useful project for crocheters who enjoy making handmade items for the homestead. The apron is worked with basic crochet stitches and features multiple rounded pockets designed to hold eggs individually.
Easy Crochet Chicken Apron
This Crochet Chicken Apron is designed as a practical farm-style apron with several individual pockets across the front. Each pocket is large enough to hold an egg securely while you move around the chicken coop or garden.
The apron begins with a simple rectangular body. After the main panel is finished, individual egg pockets are crocheted separately and sewn onto the front. Long crochet ties are then added so you can comfortably secure the apron around your waist.
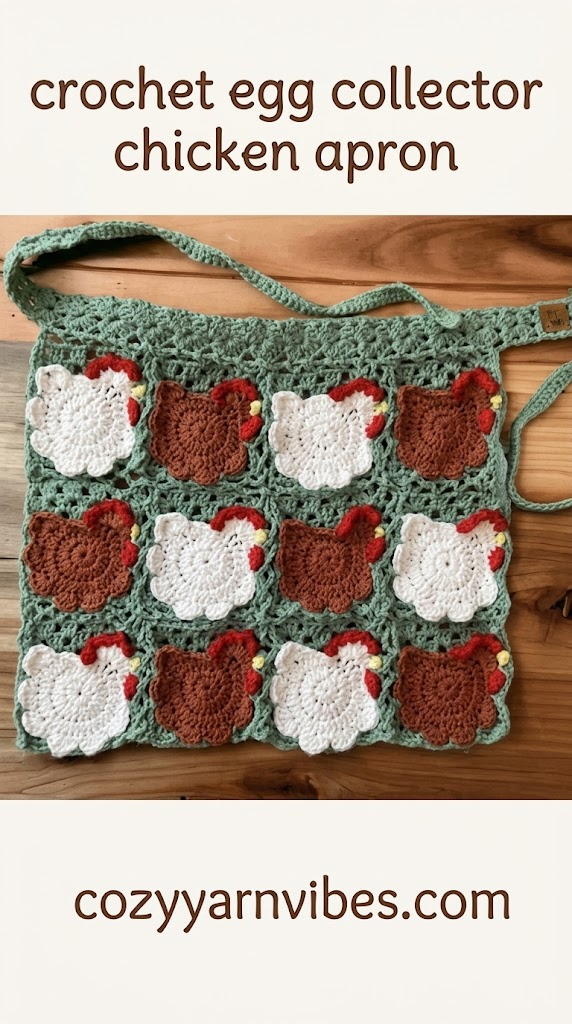
You can make the apron in classic farmhouse colors such as cream, white, brown, mustard, red, or soft green. Add a small crochet chicken, flower, or heart to the center for an extra decorative touch.
Why You’ll Love This Pattern
Practical crochet project for chicken keepers
Designed with individual egg pockets
Uses simple and beginner-friendly stitches
Easy to customize with different colors
Great handmade gift for gardeners and homesteaders
Can be adjusted for different waist sizes
Fun alternative to a traditional kitchen apron
Perfect for collecting fresh eggs from the coop
Skill Level
Beginner to Easy Intermediate
If you are comfortable making chain, single crochet, half double crochet, double crochet, and slip stitches, you should be able to follow this Crochet Chicken Apron pattern.
Finished Size
Approximately:
Apron body width: 16 inches
Apron body height: 12 inches
Egg pocket width: 3.5 inches each
Egg pocket height: 4 inches each
Waist ties: approximately 24 inches on each side
The finished measurements may vary depending on your yarn, crochet hook, and individual tension.
For a larger or smaller apron, you can adjust the foundation chain and the number of rows used for the body.
Materials Needed
Yarn
Medium-weight cotton yarn (#4)
Approximately 250–350 yards
Cotton yarn is a good choice for this project because it is durable, washable, and comfortable to wear. It also provides enough structure for the egg pockets.
Color
Main color: approximately 200–250 yards
Pocket color: approximately 50–75 yards
Optional accent color for the border and decorations
Cream, white, tan, brown, sage green, mustard, red, and soft yellow all work beautifully for a farmhouse-inspired Crochet Chicken Apron.
Additional Supplies
5 mm crochet hook
Yarn needle
Scissors
Measuring tape
Stitch markers
Stitches & Abbreviations (US Terms)
ch = chain
sc = single crochet
hdc = half double crochet
dc = double crochet
sl st = slip stitch
st = stitch
sp = space
rep = repeat
sk = skip
How to Make These Stitches
Chain (ch)
Make a slip knot on your hook. Yarn over and pull the yarn through the loop on your hook. Continue making chains until you have the required number.
Single Crochet (sc)
Insert your hook into the indicated stitch and pull up a loop. You will have two loops on your hook. Yarn over and pull through both loops to complete the single crochet.
Half Double Crochet (hdc)
Yarn over and insert your hook into the indicated stitch. Pull up a loop so you have three loops on your hook. Yarn over again and pull through all three loops.
Double Crochet (dc)
Yarn over and insert your hook into the indicated stitch. Pull up a loop. Yarn over and pull through two loops, then yarn over again and pull through the remaining two loops.
Slip Stitch (sl st)
Insert your hook into the indicated stitch, yarn over, and pull the yarn through both the stitch and the loop already on your hook.
Pattern Notes for Crochet Chicken Apron
The Crochet Chicken Apron is worked in separate sections. First, crochet the main apron body, then make the individual egg pockets and attach them to the front.
Keep your stitches fairly firm when making the pockets. A firm fabric helps the pockets maintain their shape and prevents the eggs from stretching the crochet too much.
The number of pockets can also be changed. The sample design uses five pockets across the front, but you can make fewer or more depending on the width of your apron.
Before using the finished apron for collecting eggs, make sure all pocket seams and waist ties are securely attached.
Crochet Chicken Apron: Step-by-Step
Crochet Granny Square Pockets
Step 1: Make the Center
Begin with a magic circle. Chain 3, then work 2 dc into the ring.
Chain 2 and work 3 dc into the ring. Repeat this two more times, adding ch 2 between each group.
Join to the top of the beginning chain 3 with a slip stitch to close the round. Tighten the magic circle and secure the yarn.
Step 2: Work Round 2
Join your main pocket color in any chain-2 corner space. Chain 3, then work 2 dc, ch 2, and 3 dc in the same space.
Chain 1 and move to the next corner. Repeat 3 dc, ch 2, 3 dc in each corner, with ch 1 between the corners.
Join with a slip stitch to the beginning chain 3.
Step 3: Work Round 3
Slip stitch to a corner space and begin with ch 3, 2 dc, ch 2, and 3 dc.
Chain 1, then work 3 dc into each chain-1 space along the side. Continue working 3 dc, ch 2, and 3 dc in each corner.
Repeat around the square and join with a slip stitch.
Step 4: Work Round 4
Repeat the same granny square pattern, working 3 dc into each chain-1 space and 3 dc, ch 2, 3 dc into every corner.
After completing the round, join with a slip stitch, fasten off, and leave a long tail for sewing.
Step 5: Secure the Ends
Weave each yarn tail securely through the back of several stitches. Change direction while weaving to prevent the ends from coming loose, then trim the excess yarn.
Make the required number of granny squares for the apron pockets.
Crochet the Waistband
Step 1: Begin the Waistband
Using the same color as the back of the granny square pockets, make a slip knot and chain 4.
Join the first and last chains with a slip stitch to create a small ring.
Chain 3, then work 2 dc into the ring. Chain 2 and work 3 dc into the same ring.
Step 2: Continue the Rows
Chain 3 and turn. Work 3 dc, ch 2, and 3 dc into the chain-2 space.
Skip the first two double crochet stitches and work 1 dc into the top of the beginning chain 3 from the previous row.
Chain 3 and turn.
Repeat this same pattern until you have completed 35 rows.
Step 3: Finish the Waistband
On Row 35, complete the final 3 dc, ch 2, and 3 dc corner, then work the final double crochet into the last stitch.
Chain 2, fasten off, and leave a long tail.
Weave the tail securely through the back of the waistband, changing direction several times to reinforce the end. This is especially important because the waistband will be pulled and tied around the waist.
Crochet Chicken Body
The first round is worked in the round. After that, the main body is worked in rows. Each beginning ch 3 counts as a double crochet.
Round 1
Using the magic circle method, ch 3 and work 11 dc into the ring.
Slip stitch into the top of the beginning ch 3 to close the round.
You should have 12 stitches.
Row 2
Ch 3, work 2 dc in the next stitch.
Repeat the sequence of 1 dc in the next stitch, 2 dc in the following stitch around the row.
Turn your work.
You should have 30 stitches, with 3 stitches remaining unworked at the end.
The next row is worked in the front loops only.
Row 2: Front Loops Only
Ch 3, work 2 dc in the next stitch.
Repeat the same sequence of 1 dc in the next stitch, 2 dc in the following stitch across the row.
Turn your work.
The next row is also worked in the front loops only.
Row 3
Ch 3, work 1 dc in the next stitch, then 2 dc in the following stitch.
Repeat this sequence across the row.
Work 1 dc in the next stitch and finish by working 1 dc into the top of the beginning ch 3 from the previous row.
Turn your work.
You should have 40 stitches.
Row 4: Shell Edge
Ch 1.
Skip the next stitch, then work 6 dc in the following stitch to create a shell.
Skip the next stitch and slip stitch into the following stitch.
Repeat this shell sequence across the row.
At the end, work a single crochet into the next 5 stitches, followed by 6 dc in the next stitch, skip the next stitch, and slip stitch into the top of the beginning ch 3 from the previous row.
You should have 9 shells and 5 single crochet stitches along the edge.
Fasten off, leaving a yarn tail, and weave in the end securely.
Crochet the Wattle
With the right side of the chicken facing you, join red yarn at the first single crochet of the last row, after the slip stitch where the eighth shell ends.
Ch 1.
Work 3 sc in the row below the next stitch.
Skip the next stitch and slip stitch into the following stitch.
Fasten off, pull the yarn through the final stitch, and weave in the ends.
Crochet the Comb
With the right side of the chicken facing you, join red yarn at the 3rd and 9th shells.
At each joining point, work: ch 1, 2 dc, ch 1, 2 dc in the next stitch.
Repeat the same sequence two more times.
Slip stitch into the next stitch.
Fasten off and weave in the ends securely.
Crochet the Beak
With the right side facing you, join yellow yarn at the last sc of the 5th sc in the last row of the main body.
Ch 1, work 1 sc in the next 2 stitches.
Turn your work.
Sc2tog over the next 2 stitches.
Fasten off and weave in the ends.
Repeat once more by joining yellow yarn as directed, ch 1, sc in the next 2 stitches, turn, and sc2tog over the next 2 stitches.
Make 12 Crochet Chickens
Repeat the complete chicken pattern until you have 12 identical chicken motifs.
These 12 chickens will be attached individually to the 12 granny square pockets of the finished apron. You can use the same colors for all 12 chickens or vary the body, comb, wattle, and beak colors for a more playful design.
How to Assemble the Apron
Once you have completed the granny square pockets, waistband, and 12 chicken motifs, it is time to join the three main components of the apron.
1. Attach the Granny Square Pockets to the Waistband
Arrange the 12 granny squares evenly along the crocheted waistband. Use the chain spaces in the waistband as joining points.
Secure each granny square to the waistband with a yarn needle and matching yarn. Make sure all squares are evenly positioned before sewing them permanently in place.
2. Attach the Chickens to the Granny Squares
Place one finished chicken in the center of each granny square, with the chicken facing upward and the decorative comb and beak positioned correctly.
Use a yarn needle and matching yarn to sew around the outer edges of each chicken. Secure the body firmly to the granny square, paying particular attention to the top and bottom edges.
Do not sew the chicken only through loose surface loops. Work the needle through several stitches of both the chicken and granny square to create a durable attachment.
Repeat until all 12 chickens are securely attached.
3. Secure and Finish the Apron
After all 12 pockets and chickens have been attached, check the entire apron for loose yarn ends or weak seams.
Weave in any remaining tails securely on the back of the work and trim the excess yarn.
Finally, check that the waistband is firmly connected to all the granny squares and that each chicken is securely sewn to its pocket. The finished apron will now have 12 granny square pockets, 12 crocheted chickens, and the crocheted waistband ready to be tied around the waist.
Customization Ideas
Farmhouse Chicken Colors
Use cream, white, tan, brown, and soft yellow to create a traditional farmhouse look. Red accents can also give the apron a classic country-kitchen appearance.
Colorful Egg Pockets
Make each egg pocket a different color. Pastel pink, blue, yellow, green, and lavender can create a playful spring-inspired apron.
Crochet Chicken Appliqué
Add a small crochet chicken appliqué to the center of the apron. A white or cream chicken with a red comb and yellow beak can create a cute focal point.
Flower Details
Crochet small flowers and sew them around the upper edge or beside the pockets. This works especially well for a spring or garden-themed apron.
More Egg Pockets
If you collect several eggs at once, increase the width of the apron and add additional pockets. Make sure there is enough space between the pockets so the eggs do not press against one another.
Smaller Apron
For a smaller apron, reduce the number of foundation chains and work fewer rows for the body. You can also make three pockets instead of five.
Styling Ideas
Wear your Crochet Chicken Apron over everyday clothes while collecting eggs from the chicken coop.
The apron can also be useful while gardening. The pockets can hold small gardening tools, seed packets, gloves, or other lightweight items.
For a farmhouse-inspired look, pair the apron with a simple cotton shirt, jeans, gardening boots, and a straw hat.
You can also make matching aprons for family members who enjoy helping with the chickens or gardening.
Care Instructions
Wash your Crochet Chicken Apron according to the care instructions recommended for your yarn.
If you use cotton yarn, gently hand wash the apron in cool or lukewarm water with mild detergent.
Avoid twisting or wringing the apron because this can stretch the stitches and change the shape of the pockets.
After washing, gently squeeze out excess water and lay the apron flat to dry.
Reshape the pockets while the apron is damp so they return to their original shape.
Frequently Asked Questions
Is this Crochet Chicken Apron suitable for beginners?
Yes. The apron uses basic stitches including chain, single crochet, half double crochet, and slip stitch. Beginners who are comfortable working simple rows should be able to follow the pattern.
How many eggs can the apron hold?
The standard design has five individual pockets, with one egg intended for each pocket. The exact capacity depends on the size and firmness of your finished pockets.
Can I make more pockets?
Yes. You can make additional pockets if you create a wider apron. Keep the pockets evenly spaced and securely sewn to the apron body.
What yarn works best for a Crochet Chicken Apron?
Medium-weight cotton yarn is a good choice because it is durable, washable, and provides enough structure for the egg pockets. Avoid very stretchy yarn if you want the pockets to maintain their shape.
Can I make the apron larger?
Yes. Add more chains to the foundation and work additional rows to create a larger apron. You can also increase the length of the waist ties for a more comfortable fit.
Can I use this apron for gardening?
Yes. The pockets can be useful for carrying lightweight gardening supplies such as seed packets, plant labels, or small tools. Avoid placing sharp or heavy objects in the crochet pockets.
Can I make this Crochet Chicken Apron as a gift?
Absolutely. It makes a thoughtful handmade gift for someone who keeps chickens, enjoys gardening, or loves farmhouse-style crafts. Personalize the colors and add a small chicken or flower appliqué to make it extra special.
Conclusion
This Crochet Chicken Apron is a fun and practical project for anyone who enjoys crochet, gardening, and keeping chickens. The individual egg pockets make collecting fresh eggs more convenient while giving the apron its unique handmade design.
You can easily customize the apron by changing the colors, adding more pockets, adjusting the waist ties, or decorating it with crochet chickens, flowers, hearts, or other farmhouse-inspired details.
Choose your favorite cotton yarn, grab your crochet hook, and make this charming Crochet Chicken Apron for your next trip to the chicken coop. Try more amazing ideas by reading our latest post about mapleleaf table mat for fall season.