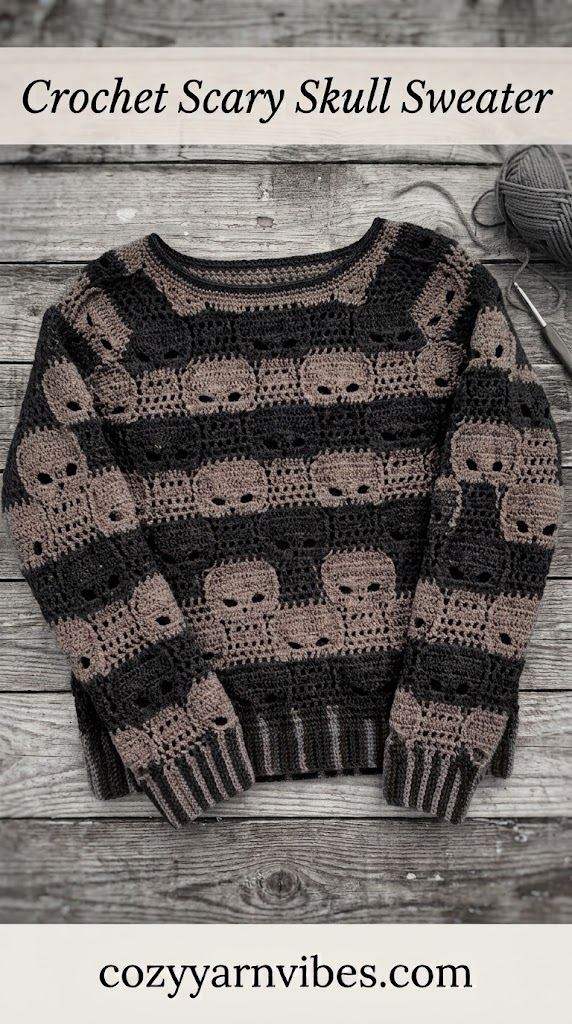
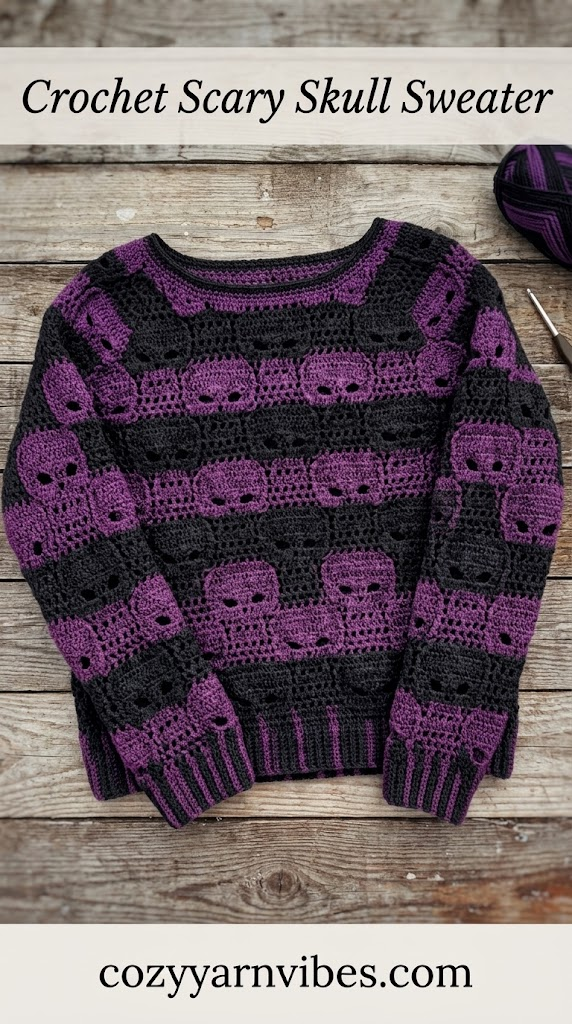
Are you looking for a fun and spooky crochet project to make for Halloween? This Crochet Scary Skull sweater is a stylish way to bring a little creepy charm to your handmade wardrobe. The sweater features a bold filetstyle skull motif created with double crochet stitches, chain spaces, and single crochet fillins.
The Crochet Scary Skull design is worked in four separate panels: one front panel, one back panel, and two sleeves. Each piece is crocheted flat and then joined together with slip stitches. This construction makes the sweater relatively easy to customize for different body measurements, sleeve lengths, and overall fit.
Whether you wear it for a Halloween party, a chilly October evening, or simply enjoy spookyinspired clothing throughout the season, this Crochet Scary Skull sweater makes a fun handmade statement piece.
Easy Crochet Scary Skull Sweater For Halloween
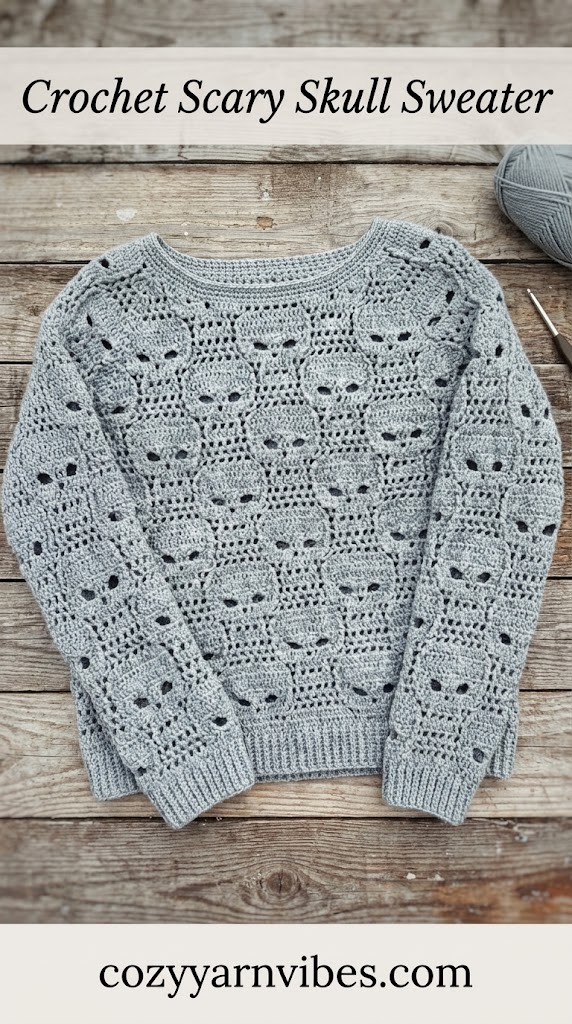
This Crochet Scary Skull sweater is made from four separate panels that are crocheted flat and joined together after all the pieces are finished. The front and back panels create the main body, while two matching sleeve panels complete the garment.
The standout feature is the filetstyle skull motif. The skull gradually appears across the rows through a combination of double crochet stitches, chain spaces, and single crochet fillins. The open spaces and filled sections work together to create the recognizable Halloween skull design.
The sweater has a lightweight construction, making it suitable for layering over a tank top, camisole, or fitted shirt. Simple single crochet edging around the neckline and sleeve cuffs keeps the finished garment comfortable without adding too much bulk.
Why You’ll Love This Pattern
Spooky Halloween-inspired design
Bold Crochet Scary Skull motif
Worked in four simple panels
Uses familiar crochet stitches
Lightweight filet-style construction
Easy to customize for different sizes
Great for Halloween parties and fall outfits
Can be made in different colors
Perfect for crocheters who enjoy wearable projects
Skill Level
Easy to Intermediate
This Crochet Scary Skull sweater uses basic stitches such as single crochet, double crochet, chain stitches, and simple decreases. The main challenge is following the skull chart carefully so that the open and filled sections remain in the correct positions.
If you are comfortable reading a crochet chart and working basic shaping, you should be able to follow this project.
Finished Size
The finished size will depend on your gauge, foundation chain, and the number of rows you work.
For the sample construction, the front and back panels begin with approximately 64–72 chains, while each sleeve begins with approximately 30–40 chains.
Adjust the foundation chain and number of rows to achieve your desired width, length, and sleeve fit.
Materials Needed
Yarn
Choose a lightweight to mediumweight yarn that gives good stitch definition. Cotton, cotton blends, or soft acrylic yarn can work well for this project.
For a classic Halloween appearance, black yarn with a contrasting white, cream, or gray skull motif can create a striking effect. You can also make the entire sweater in one color for a more subtle design.
Color
Black, charcoal, cream, white, orange, purple, or any Halloweeninspired combination can be used.
For a traditional Crochet Scary Skull look, use a dark main color and a light contrasting shade for the skull sections if your chart or colorwork technique calls for it.
Additional Supplies
Crochet hook suitable for your chosen yarn
Stitch markers
Yarn needle
Scissors
Measuring tape
Blocking mats or a clean flat surface for blocking
Buttons or other embellishments if desired
Stitches & Abbreviations (US Terms)
Ch chain
Sc single crochet
Dc double crochet
Dc2tog double crochet two together
sl st slip stitch
Chsp chain space
St stitch
Sk skip
Rep repeat
How to Make These Stitches
Chain (ch)
Begin with a slip knot on your hook. Yarn over and pull the yarn through the loop on your hook. Continue making chains until you reach the required number.
Single Crochet (sc)
Insert the hook into the indicated stitch, yarn over, and pull up a loop. Yarn over again and pull through both loops on the hook. Single crochet creates a firm stitch that works particularly well for neckline and cuff edging.
Double Crochet (dc)
Yarn over and insert the hook into the next stitch. YO and pull up a loop. Yarn over and pull through two loops, then yarn over again and pull through the remaining two loops.
Double crochet creates the open, lightweight fabric needed for the filetstyle Crochet Scary Skull motif.
Double Crochet Two Together (dc2tog)
Yarn over and insert the hook into the first stitch. Pull up a loop, yarn over, and pull through two loops. Yarn over again and insert the hook into the next stitch. Pull up a loop, yarn over, and pull through two loops. Yarn over once more and pull through all remaining loops.
This decrease helps shape the skull motif and other sections of the design.
Chain Space (chsp)
A chain space is the opening created by one or more chain stitches. In this sweater, chain spaces are an important part of the filetstyle skull design.
Pattern Notes for Crochet Scary Skull Sweater
The Crochet Scary Skull sweater is worked as four separate panels: one front panel, one back panel, and two sleeves.
The front and back panels use the same basic stitch techniques, while the front includes neckline shaping. The back neckline remains shallower and simpler.
The skull motif is created gradually across the rows. Because the placement of the chain spaces and double crochet stitches creates the skull image, it is important to follow the chart carefully, particularly from the eye and facial sections onward.
The exact stitch count may vary depending on your yarn, hook size, gauge, and desired size. When adjusting the foundation chain, make sure the stitch repeat remains consistent with the chart.
Lightly block each panel before assembly. This helps straighten the chain spaces and makes it easier to match the shoulder, side, and sleeve seams.
Crochet Scary Skull Sweater: Step-by-Step
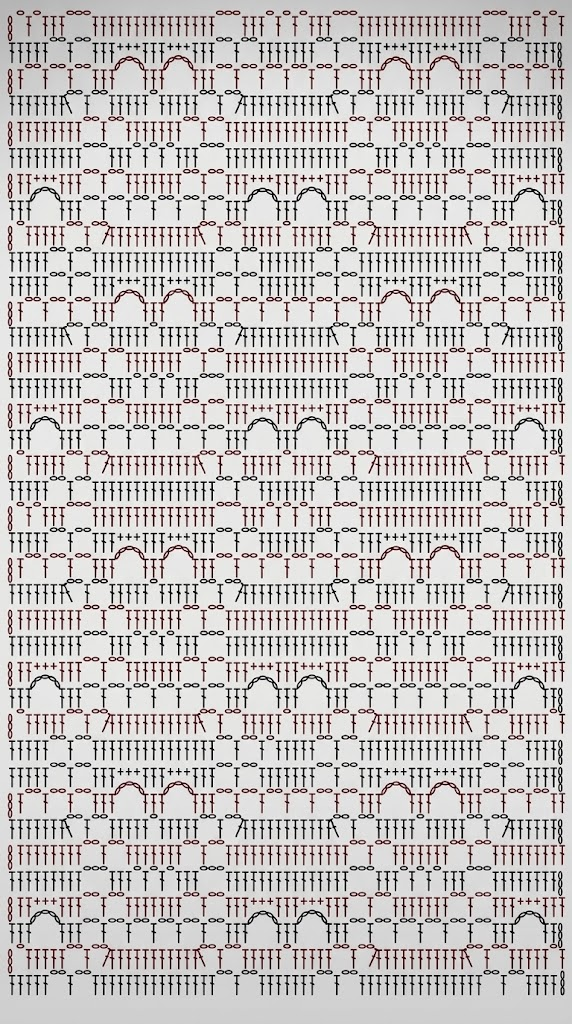
This sweater is worked in four separate panels two sleeves, one front panel, and one back panel — which are crocheted flat and then joined together with slip stitch. The filetstyle skull motif is built up gradually across the rows using double crochet (dc), chain spaces (ch), and single crochet (sc) fillins, following the accompanying stitch chart. The neckline and sleeve cuffs are finished with a few simple rows of single crochet to keep them light rather than bulky.
Front Panel
We will make the front panel first.
Foundation Chain
Chain 64–72. The number of stitches in your foundation chain determines the width of the garment at the waist, so adjust up or down within this range to suit your measurements.
Row 1
Work 1 sc in each chain across. This row is optional, but it stabilizes the foundation edge and gives the piece a cleaner shape to build on.
Row 2
Turn. Ch 3 (does not count as a stitch). Work 1 dc in each of the next 4 sts (5 dc total including the space taken by the turning chain’s position). Ch 2, skip 2 sts, 1 dc in the next st, ch 2, skip 2 sts. Work 1 dc in each of the next 15 sts. Repeat this sequence — [ch 2, skip 2, 1 dc, ch 2, skip 2, 15 dc] — across the row to complete it.
Row 3
Turn. Ch 3, ch 1, skip 1 st, then work 1 dc in each of the next 5 sts.
Ch 2, skip 2 sts, 1 dc in the next st, ch 2, skip 2 sts.
Work dc2tog, then 1 dc in each of the next 10 sts, then dc2tog (across 14 sts total).
Ch 2, skip 2 sts, 1 dc in the next st, ch 2, skip 2 sts.
Work 1 dc in each of the next 5 sts, ch 1, skip 1 st, 1 dc in each of the next 5 sts.
Ch 2, skip 2 sts, 1 dc in the next st, ch 2, skip 2 sts.
Work dc2tog, 1 dc in each of the next 10 sts, dc2tog (across 14 sts total).
Ch 2, skip 2 sts, 1 dc in the next st, ch 2, skip 2 sts.
Work 1 dc in each of the next 5 sts, ch 1, skip 1 st, and end the row with 1 dc in the last stitch.
Row 4
Turn. Ch 3. Work 1 dc in each of the next 2 sts. Ch 5, skipping 3 sts, then work 1 dc in each of the next 3 sts.
Ch 2, skip 2 sts, 1 dc in the next st, ch 2, skip 2 sts, 1 dc in the next st — repeat this [ch 2, skip 2, 1 dc] sequence until you have 5 dc stitches, each separated by a ch2 space, as shown on the chart.
Following the chart, work 1 dc in each of the next 3 sts, ch 5 (skipping 3 sts), 1 dc in each of the next 3 sts, ch 5 (skipping 3 sts), then 1 dc in each of the next 3 sts.
Repeat the [ch 2, skip 2, 1 dc] sequence again until you have 5 dc stitches separated by ch2 spaces, per the chart.
Following the chart, finish with 1 dc in each of the next 3 sts, ch 5 (skipping 3 sts), and 1 dc in each of the next 3 sts.
Row 5
Turn. Ch 3. Work 1 dc in each of the next 2 sts, then work 3 sc into the ch5 space from the row below. Work 1 dc in each of the 3 dc sts from the row below.
Ch 2, skip 2 sts, 1 dc in the next st, ch 2, skip 2 sts. Work 1 dc in each of the next 7 sts. Ch 2, skip 2 sts, 1 dc in the next st, ch 2, skip 2 sts.
Work 1 dc in each of the next 3 sts, then 3 sc into the ch5 space below. Work 1 dc in each of the next 3 sts, then 3 sc into the next ch5 space below, then 1 dc in each of the next 3 sts. For this section, work a dc into every dc stitch from the row below, and work 3 sc into every ch5 space from the row below, following the chart.
Ch 2, skip 2 sts, 1 dc in the next st, ch 2, skip 2 sts. Work 1 dc in each of the next 7 sts. Ch 2, skip 2 sts, 1 dc in the next st, ch 2, skip 2 sts.
Work 1 dc in each of the next 3 sts, 3 sc into the ch5 space below, and end the row with 1 dc in each of the last 3 sts.
Row 6
Turn. Ch 3. Work 1 dc in each of the next 8 sts. Ch 3, skip 3 sts, 1 dc in each of the next 3 sts. Then Ch 1, skip 1 st, 1 dc in the next st; ch 1, skip 1 st, 1 dc in the next st; ch 1, skip 1 st. Work 1 dc in each of the next 3 sts. Then Ch 3, skip 3 sts.
Work 1 dc in each of the next 15 sts. Ch 3, skip 3 sts, 1 dc in each of the next 3 sts. Then Ch 1, skip 1 st, 1 dc in the next st; ch 1, skip 1 st, 1 dc in the next st; ch 1, skip 1 st. Work 1 dc in each of the next 3 sts. Ch 3, skip 3 sts.
End the row with 1 dc in each of the last 8 sts.
Row 7
Turn. Ch 3. Work 1 dc in each of the next 8 sts. Ch 2, skip 2 sts, 1 dc in the next st, skip 2 sts. Work 1 dc in each of the next 7 sts. Ch 2, skip 2 sts, 1 dc in the next st, ch 2, skip 2 sts.
Work 1 dc in each of the next 15 sts. Ch 2, skip 2 sts, 1 dc in the next st, skip 2 sts. Work 1 dc in each of the next 7 sts. Ch 2, skip 2 sts, 1 dc in the next st, ch 2, skip 2 sts.
End the row with 1 dc in each of the last 9 sts.
Row 8
Work this row following the same stitch sequence as Row 2, matching the stitch placement shown on the chart.
Row 9
Work this row following the same stitch sequence as Row 3, matching the stitch placement shown on the chart. Note that the stitch positions shift slightly compared to Row 3 — Rows 3 and 9 together form the eyes of the skull motif, so follow the chart closely to keep the design accurate.
Row 10 Onward
Continue working all remaining rows according to the chart, repeating the same stitch techniques established in Rows 2–9 to build up the full skull repeat pattern.
Neckline Shaping
Once the front panel reaches shoulder height, shape the neckline as follows:
Divide for the neckline. Work across the row to the center of the panel, then stop at the point indicated on the chart where the neckline opening begins. Leave the center stitches unworked for now — this is the width of the neck opening, and the exact stitch count depends on your foundation chain, so use the chart’s proportions as your guide.
Work each shoulder separately. Turn and work each side of the neckline as its own smaller section from this point up, so the two shoulder pieces are shaped independently rather than continuing as one flat piece.
Taper the inner edge. At the start of each row on the neckline side, skip 1–2 stitches (rather than working all the way to the edge) to angle the neckline inward as you climb toward the shoulder. Repeat this tapering for 2–3 rows, following the curve shown on the chart.
Finish the raw edge. Once the shoulder height is reached, work 2–3 rows of sc evenly around the entire neckline opening — across the back of the neck, up one side, and down the other. Keep the sc rows shallow (2–3 rows only) so the trim stays soft and lightweight rather than forming a thick, stiff collar.
Even out stitch spacing. If the neckline edge looks uneven after shaping (a common result of working over a mix of dc, chspaces, and mesh from the motif rows), use your first sc row to normalize the stitch count — work 1 sc into each dc, and 1–2 sc into each chain space — so the following rows sit flat.
Back Panel
The back panel mirrors the front panel in construction, with one difference: it is typically worked as a plain piece up to the shoulder, without the front’s neckline split, then finished with a simple straight neckline trim.
Foundation and body. Chain the same number of stitches used for the front panel (64–72, adjusted to your waist measurement) and repeat Rows 1 through the final motif row exactly as written for the front panel, so the skull motif spacing lines up when the panels are seamed together.
Back neckline. Work the back panel straight up to shoulder height. For the back neckline, skip fewer stitches than you did on the front (a shallow scoop or straightacross edge is standard for a back neckline), following the chart’s backneckline guide if provided, or simply leaving the centerback stitches unworked for 1 row before finishing.
Trim. Finish the back neckline edge with 2–3 rows of sc, matching the front panel’s trim so the two edges join seamlessly at the shoulders.
Shoulder stitches. Leave the shoulder stitches on each side unworked in sc — these will be joined directly to the front panel’s shoulder stitches during assembly.
Sleeves
Make two identical sleeve panels.
Foundation chain. Chain a smaller foundation than the front/back panels — roughly 30–40 stitches, adjusted to your desired sleeve width (measure around the fullest part of your upper arm and add ease, then convert to your gauge).
Body of the sleeve. Work the same stitch sequence used for the front and back panels (Rows 1 onward), centering the skull motif repeat within the narrower sleeve width. You may need to work a partial motif repeat at each side edge rather than a full repeat, depending on how the chart divides across your stitch count.
Sleeve shaping (optional). If you want a tapered sleeve rather than a straight tube, increase 1 stitch at each end every few rows as you work from the cuff toward the underarm, keeping increases outside the motif pattern so the skull shapes aren’t distorted.
Cuff. At the lower edge of the sleeve (the wrist end), work 2–3 rows of sc rather than continuing the motif pattern all the way down. This keeps the cuff soft and closefitting instead of thick and stiff, matching the look of the neckline trim.
Underarm edge. At the top of the sleeve where it will meet the front and back panels at the underarm, finish with a straight edge (no shaping needed) unless your chart indicates an armhole curve — in that case, taper the last 2–3 rows the same way you tapered the neckline.
Finishing
Block the panels. Before joining, lightly steam or wetblock all four panels to the same finished dimensions. This evens out the motif’s chspaces and dc columns so the seams line up cleanly.
Join the shoulders. With right sides together (or your preferred seam orientation), join the front and back panels at the shoulders using slip stitch, working through both shoulder edges together.
Set in the sleeves. Align the top edge of each sleeve with the corresponding armhole opening on the joined front/back piece. Slip stitch the sleeve into place, easing any small difference in stitch count evenly around the armhole rather than bunching it at one point.
Join the side and sleeve seams. Starting from the cuff, slip stitch up the underarm and side seam in one continuous seam, from the sleeve cuff, through the underarm, and down to the hem of the front/back panels.
Repeat for the second side. Join the second sleeve and side seam the same way.
Weave in ends. Secure and weave in all remaining yarn tails on the wrong side of the work.
Final light block. Once fully assembled, give the sweater a final light steam or block so the seams settle and the motif pattern lies flat across the panel joins.
Other Variations to Try
Use a traditional black and white Halloween color combination.
Try purple and black for a darker gothicinspired sweater.
Use orange and black for a classic Halloween look.
Make the sleeves shorter for a warmweather version.
Extend the sleeves for a cozy fall sweater.
Add small crochet bats, pumpkins, or spider motifs around the skull.
Turn the skull into a repeating pattern across the entire sweater.
Make the skull larger or smaller by changing the motif repeat.
Customization Ideas
Classic Halloween Colors
Use black as the main sweater color with a white or cream skull motif for a traditional spooky appearance.
Gothic Black Sweater
Crochet the entire sweater in black and use a dark gray or charcoal shade for subtle skull details. This creates a more understated Crochet Scary Skull design.
Bright Halloween Version
Combine orange, purple, white, and black to create a colorful Halloween sweater that stands out at parties and seasonal gatherings.
Cropped Version
Reduce the number of body rows to create a cropped Crochet Scary Skull sweater that pairs well with highwaisted jeans, trousers, or skirts.
Oversized Fit
Increase the foundation chain and add additional rows to create a relaxed oversized sweater.
Longer Sweater
Continue the body motif for additional rows to create a longer sweater that can be worn with leggings or fitted pants.
Decorative Edging
Add a simple scalloped, picot, or shell border around the neckline and cuffs if you want to give the sweater a more decorative finish.
Styling Ideas
The Crochet Scary Skull sweater is perfect for Halloween parties, fall outings, costume events, and casual October outfits.
Pair it with black jeans and ankle boots for a simple gothicinspired look.
Wear it with ripped denim and sneakers for a casual Halloween outfit.
For a more feminine look, style the sweater with a black skirt, tights, and ankle boots.
Layer the Crochet Scary Skull sweater over a fitted camisole or tank top if the open filet sections create more coverage than you prefer.
Complete the outfit with Halloweeninspired jewelry, a black handbag, or a spooky hair accessory.
Care Instructions
Hand wash the crochet sweater in cool or lukewarm water using a gentle detergent.
Avoid bleach and harsh cleaning products that may damage the yarn.
Do not wring or twist the sweater because this can stretch the chain spaces and distort the skull motif.
Gently press out excess water and lay the sweater flat on a clean towel.
Reshape the panels and neckline while damp, then allow the sweater to air dry completely.
Avoid hanging the sweater while wet because the weight of the water can stretch the crochet fabric.
Store the finished Crochet Scary Skull sweater folded in a cool, dry place.
Frequently Asked Questions
Is the Crochet Scary Skull sweater beginnerfriendly?
This sweater is best suited to confident beginners or intermediate crocheters because it uses basic stitches but requires careful attention to a chart. Once you understand chain spaces, double crochet, single crochet, and simple decreases, the construction is straightforward.
Can I make the Crochet Scary Skull sweater in a different size?
Yes. Adjust the foundation chain for the front and back panels and modify the number of rows to achieve your desired width and length. Always maintain the stitch repeat shown in the chart when changing the size.
Can I make the sleeves longer?
Absolutely. Continue repeating the sleeve stitch pattern until you reach your preferred length, then finish with the single crochet cuff.
What yarn is best for this Crochet Scary Skull sweater?
Cotton, cotton blends, and soft acrylic yarn can all work well. Choose a yarn that gives good stitch definition because the skull motif depends on clearly defined double crochet stitches and chain spaces.
Can I use different Halloween colors?
Yes. Black and white create a classic skull effect, while purple, orange, gray, cream, and green can give the sweater a more colorful Halloween appearance.
Do I need to follow the chart exactly?
For the best skull shape, it is strongly recommended to follow the chart carefully. The position of the chain spaces, double crochet sections, and filled areas creates the facial features of the skull.
Can I make the Crochet Scary Skull motif larger?
Yes. You can enlarge the design by using a larger motif repeat or adjusting the overall scale of the chart. However, make sure the modified motif still fits evenly within the width of your sweater panel.
Conclusion
This Crochet Scary Skull sweater is a fun Halloween crochet project that combines a wearable garment with a bold spooky motif. The filet-style skull design gives the sweater plenty of character while keeping the fabric lightweight and comfortable.
The four-panel construction also makes this Crochet Scary Skull sweater easy to customize. You can change the width, length, sleeve size, yarn color, and neckline to create a garment that suits your style and measurements.
Whether you make it for a Halloween party, a fall wardrobe, a handmade gift, or simply because you love spooky crochet designs, this Crochet Scary Skull sweater is a creative project to add to your seasonal crochet collection.