Granny squares are a cornerstone of crochet, celebrated for their versatility, charm, and the endless creative possibilities they offer. Whether you’re a novice or an experienced crocheter, mastering a variety of granny square patterns can significantly enhance your crafting repertoire. This article delves into some standout designs, providing insights and tips to help you bring these delightful motifs to life.
Classic Granny Square
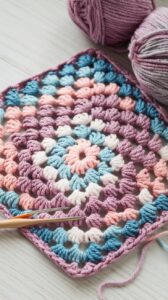

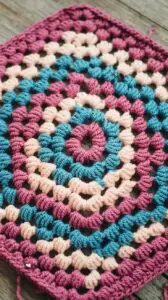
The Classic Granny Square is where it all begins for most crocheters. This timeless pattern is the foundation of countless projects, from cozy blankets to vintage-inspired garments. Its charm lies in its simplicity and adaptability—you can make it as small or as large as you want by simply adding more rounds!
What You’ll Need:
- Worsted weight yarn in 2-3 colors.
- A 5mm (H/8) crochet hook.
- Scissors and a tapestry needle.
Stitches You’ll Use:
- Chain (ch)
- Double crochet (dc)
- Slip stitch (sl st)
How to Crochet It:
- Start with a magic circle or chain 4 and join with a slip stitch to form a ring.
- Round 1: Chain 3 (counts as the first double crochet). Work 2 more double crochets into the ring, chain 2. Repeat (3 double crochets, chain 2) three more times. Join with a slip stitch to the top of the chain 3.
- Round 2: Slip stitch into the corner space. Chain 3 (counts as the first dc), then work 2 dc, chain 2, and 3 dc in the same corner space. Move to the next corner and repeat the (3 dc, ch 2, 3 dc) pattern around. Join with a slip stitch.
- Repeat: Keep adding rounds by working clusters of 3 dc in each space between clusters from the previous round, always working (3 dc, ch 2, 3 dc) in each corner.
Tips for Success:
- Keep your tension even to prevent the square from becoming wavy or distorted.
- Experiment with color changes at the beginning of each round for a vibrant, multi-colored look
Solid Granny Square
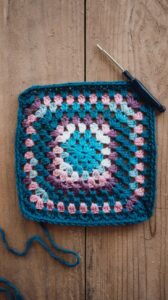
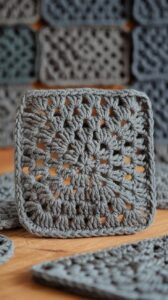
If you love the structure of the Classic Granny Square but want something a bit sturdier, the Solid Granny Square is a perfect option. This design fills in the gaps between stitches, creating a dense, uniform block ideal for warm blankets or durable home décor.
What You’ll Need:
- Worsted or bulky yarn in one solid color or multiple shades.
- A 5.5mm (I/9) crochet hook.
- Scissors and a tapestry needle.
Stitches You’ll Use:
- Chain (ch)
- Double crochet (dc)
- Slip stitch (sl st)
How to Crochet It:
- Begin with a magic circle or chain 4 and join to form a ring.
- Round 1: Chain 3 (counts as the first dc). Work 2 more dc into the ring. Chain 2, then work 3 dc. Repeat this pattern two more times for a total of four clusters. Join with a slip stitch to the top of the chain 3.
- Round 2: Chain 3, and double crochet in the next two stitches. In the corner space, work (2 dc, ch 2, 2 dc). Continue working 1 dc in each stitch across and (2 dc, ch 2, 2 dc) in the corners.
- Repeat: Add as many rounds as you like, always working 1 dc in each stitch and (2 dc, ch 2, 2 dc) in the corners.
Tips for Success:
- This square works up beautifully with gradient yarns to showcase the stitch details.
- Block your finished squares for a crisp, clean look when joining them.
Sunburst Granny Square


The Sunburst Granny Square takes your crochet skills up a notch with its rounded, floral-inspired center. It’s a playful, cheerful pattern that works well for everything from baby blankets to decorative pillows.
What You’ll Need:
- Soft acrylic or cotton yarn in bright, cheerful colors.
- A 4.5mm (G/7) crochet hook.
- Scissors and a tapestry needle.
Stitches You’ll Use:
- Magic circle
- Chain (ch)
- Double crochet (dc)
- Half-double crochet (hdc)
- Slip stitch (sl st)
How to Crochet It:
- Begin with a magic circle.
- Round 1: Chain 3 (counts as the first dc). Work 15 dc into the magic circle, then pull tight to close. Join with a slip stitch. (16 dc total)
- Round 2: Chain 2. Work 2 hdc in each stitch around. Join with a slip stitch. (32 hdc total)
- Round 3: Chain 3. In the first stitch, work 1 dc, chain 1, and 2 dc (this creates a corner). In the next 7 stitches, work 1 dc in each. Repeat this pattern (corner, 7 dc) around. Join with a slip stitch.
- Optional Rounds: Keep adding rounds with a mix of double and half-double crochet stitches as needed to reach your desired size.
Tips for Success:
- Use bold, contrasting colors to highlight the “sunburst” effect.
- Keep the center stitches tight to maintain the round shape before transitioning to a square.
Hexagon Granny Square
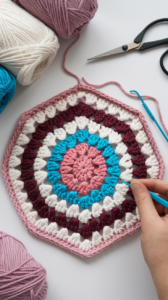
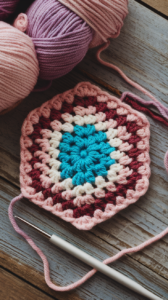
The Hexagon Granny Square is a fresh, six-sided twist on the classic design. Its geometric shape makes it ideal for modern, creative projects like honeycomb-patterned blankets, table runners, or even garments.
What You’ll Need:
- Medium-weight yarn in 2-3 complementary colors.
- A 5mm (H/8) crochet hook.
- Scissors and a tapestry needle.
Stitches You’ll Use:
- Chain (ch)
- Double crochet (dc)
- Slip stitch (sl st)
How to Crochet It:
- Start with a magic circle or chain 4 and join with a slip stitch to form a ring.
- Round 1: Chain 3 (counts as the first dc). Work 11 more dc into the ring. Join with a slip stitch to the top of the chain 3. (12 dc total)
- Round 2: Chain 3. Work 1 dc into the same stitch, then chain 1. Skip the next stitch and work (2 dc, ch 1) in the next stitch. Repeat around, ending with a chain 1 and slip stitch to the top of the chain 3.
- Round 3: Slip stitch into the first chain-1 space. Chain 3, work 1 dc, chain 1, and 2 dc into the same space. In the next chain-1 space, work 2 dc. Alternate between (2 dc, ch 1, 2 dc) in the corners and 2 dc in the side spaces to form the hexagon.
Tips for Success:
- Use gradient or variegated yarns for a stunning color transition effect.
- When joining hexagons, use an invisible join technique for a clean, polished look.
Two-Color Solid Granny Square


The Two-Color Solid Granny Square takes the classic solid square up a notch by adding a second color. This creates a clean, modern look that is great for color-blocked projects like throws, cushions, or even scarves.
What You’ll Need:
- Two skeins of worsted-weight yarn in contrasting colors.
- A 5mm (H/8) crochet hook.
- Scissors and a tapestry needle.
Stitches You’ll Use:
- Chain (ch)
- Double crochet (dc)
- Slip stitch (sl st)
How to Crochet It:
- With Color 1: Start with a magic circle or chain 4 and join to form a ring.
- Round 1: Chain 3 (counts as the first dc). Work 2 dc, chain 2, and repeat (3 dc, ch 2) three more times. Join with a slip stitch.
- Round 2: Slip stitch to the corner space. Work (3 dc, ch 2, 3 dc) in the first corner. In the side spaces, work 3 dc. Repeat this pattern, joining with a slip stitch. Fasten off Color 1.
- With Color 2: Attach the new color to any corner space. Repeat the same pattern as Round 2, continuing to expand the square with each round.
Tips for Success:
- Weave in ends neatly as you go to avoid a messy back.
- Use bold, contrasting colors for a striking visual effect or soft pastels for a more subtle look.
