A Beginner-Friendly 4th of July Crochet Bandana for Summer Celebrations
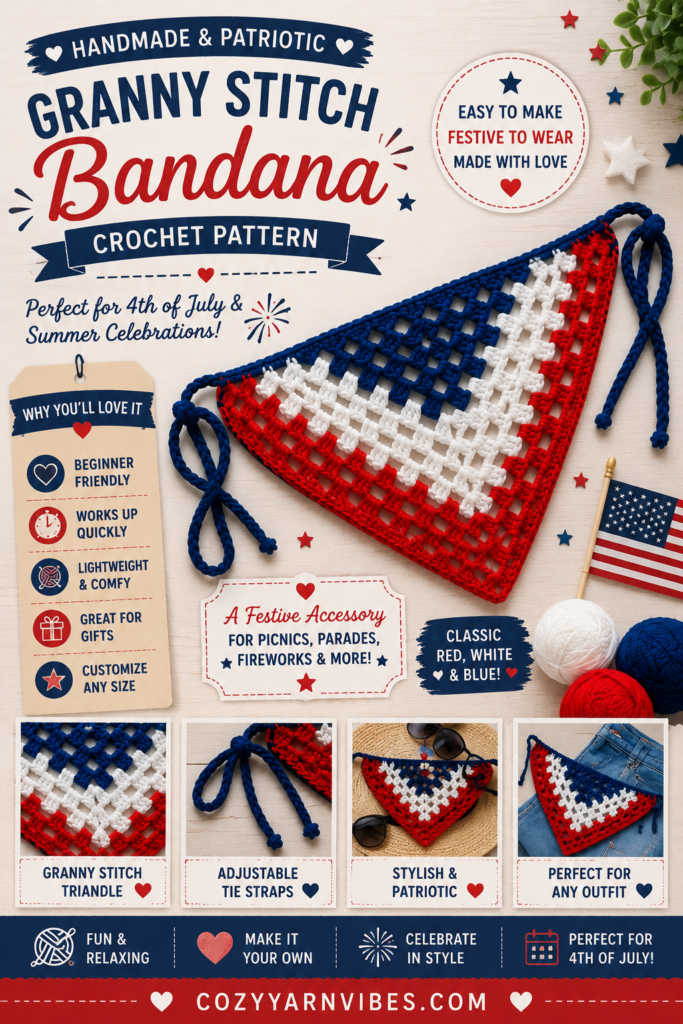
Looking for a fun and festive crochet project to celebrate Independence Day? This Patriotic Granny Stitch Bandana Crochet Pattern is the perfect accessory for summer picnics, fireworks shows, parades, and backyard barbecues.
Inspired by the classic granny stitch and worked in a triangular shape, this bandana features the iconic red, white, and blue color palette of the American flag. The lightweight, breathable design makes it comfortable to wear during warm weather while adding a handmade patriotic touch to your outfit.
Whether you’re a beginner looking for a quick project or an experienced crocheter searching for a festive accessory, this crochet bandana is easy to customize and works up quickly.
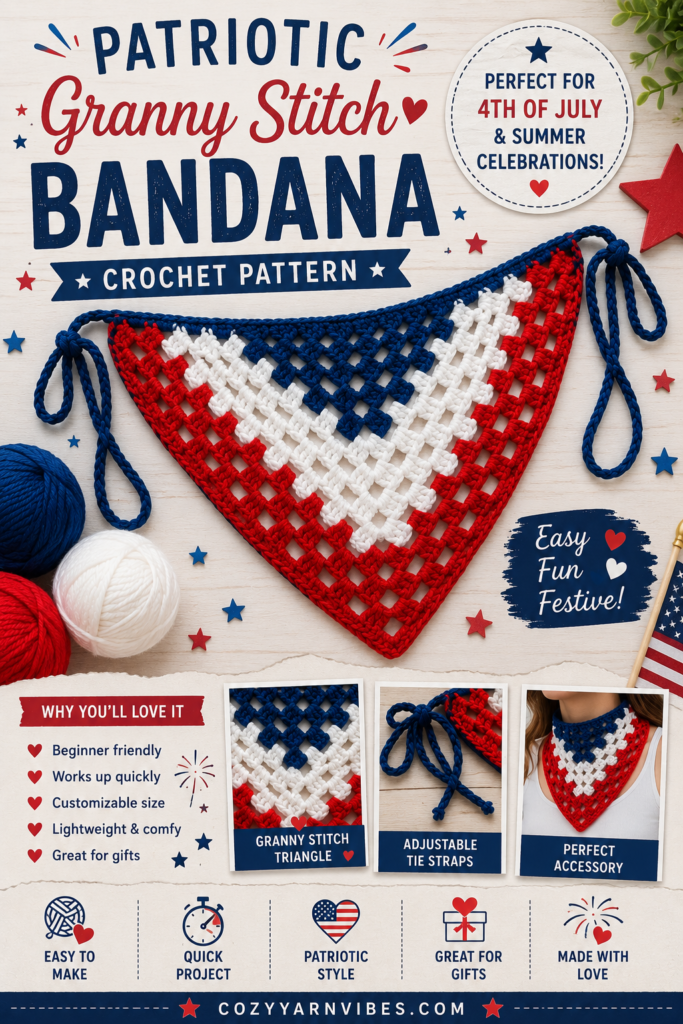
Why You’ll Love This Pattern
✨ Beginner-friendly granny stitch design
✨ Quick weekend crochet project
✨ Lightweight and breathable
✨ Perfect for Independence Day celebrations
✨ Easy to customize in any color combination
✨ Great handmade gift idea
Skill Level
Beginner
If you know how to chain and work double crochet stitches, you’ll be able to make this bandana.
Finished Size
Approximately:
- Width: 22–26 inches
- Height: 10–13 inches
Size can easily be adjusted by adding or removing rows.
Materials Needed
- Worsted Weight Yarn (#4)
Colors:
- Navy Blue
- White
- Red
Additional Supplies:
- 5 mm (H) Crochet Hook
- Yarn Needle
- Scissors
- Measuring Tape
MISUMOR Crochet Kit for Beginners -2 PCS Jellyfish Animals Starter Crochet Accessories with Crochet Hook Step-by-Step Instructions and Video Tutorials
(as of July 18, 2026 18:04 GMT +00:00 – More infoProduct prices and availability are accurate as of the date/time indicated and are subject to change. Any price and availability information displayed on [relevant Amazon Site(s), as applicable] at the time of purchase will apply to the purchase of this product.)
Crochetta Crochet Kit for Beginners, Beginner Crochet Kit for Adults with Step-by-Step Video Tutorials, DIY Crochet Animal Kits Knitting Supplies, 3 Pack Turtle (40%+ Yarn)
$15.98 (as of July 18, 2026 18:04 GMT +00:00 – More infoProduct prices and availability are accurate as of the date/time indicated and are subject to change. Any price and availability information displayed on [relevant Amazon Site(s), as applicable] at the time of purchase will apply to the purchase of this product.)
ZMAAGG Beginners Crochet Kit, Crochet Animal Kit, Knitting Kit with Yarn, Polyester Fiber, Crochet Hooks, Step-by-Step Instructions Video, Crochet Starter Kit for Beginner DIY Craft Art (Dinosaur)
(as of July 18, 2026 18:04 GMT +00:00 – More infoProduct prices and availability are accurate as of the date/time indicated and are subject to change. Any price and availability information displayed on [relevant Amazon Site(s), as applicable] at the time of purchase will apply to the purchase of this product.)
XSEINO Crochet Kit for Beginners – Crochet Start Kit with Step-by-Step Video Tutorials – Learn to Crochet Kits for Adults and Kids – Panda, Frog, Hedgehog
$11.99 (as of July 18, 2026 18:04 GMT +00:00 – More infoProduct prices and availability are accurate as of the date/time indicated and are subject to change. Any price and availability information displayed on [relevant Amazon Site(s), as applicable] at the time of purchase will apply to the purchase of this product.)Stitches & Abbreviations (US Terms)
- ch = chain
- dc = double crochet
- sl st = slip stitch
- sp = space
- st = stitch
- rep = repeat
How to Do These Stitches
Chain (ch)
Yarn over and pull through the loop on your hook.
Double Crochet (dc)
- Yarn over.
- Insert hook into stitch.
- Pull up a loop.
- Yarn over and pull through two loops.
- Yarn over and pull through remaining two loops.
Granny Stitch Cluster
A granny stitch cluster consists of:
3 double crochets worked into the same chain space.
This stitch creates the beautiful open texture seen throughout the bandana.
Pattern Notes
- The pattern is worked from the top center downward.
- Each row increases at the center point.
- Color changes can be made whenever desired.
- The chart uses alternating granny stitch clusters to create the triangular shape.
Crochet Pattern
Foundation Ring
Ch 4 and join with a sl st to form a small ring.
Row 1 (Black on Chart)
Ch 4 (counts as dc + ch 1).
Work a granny stitch cluster (3 dc) into the ring.
Ch 1.
Work another granny stitch cluster (3 dc) into the ring.
Ch 1.
Work 1 dc into the ring.
Turn.
Row 2 (Purple on Chart)
Ch 4.
Work a granny stitch cluster in the first space.
Ch 1.
Work a granny stitch cluster in the next space (the space between the two clusters from the previous row).
Ch 1.
Work another granny stitch cluster in the same space.
This creates the center increase.
Ch 1.
Work a granny stitch cluster in the next space.
Ch 1.
Work 1 dc in the last stitch.
Turn.
Row 3 (Black on Chart)
Ch 4.
Work a granny stitch cluster in the first space.
Ch 1.
Work a granny stitch cluster in the next space.
Ch 1.
Work a granny stitch cluster in the next space.
Ch 1.
Work a granny stitch cluster and another granny stitch cluster in the same center space with a ch 1 between them.
This forms the increase section.
Ch 1.
Work a granny stitch cluster in the next space.
Ch 1.
Work a granny stitch cluster in the next space.
Ch 1.
Work 1 dc in the last stitch.
Turn.
Continue the Pattern
Continue following the chart and repeating the same principle:
- Work one granny stitch cluster in every chain space.
- Ch 1 between clusters.
- In the center increase space, always work:
(3 dc, ch 1, 3 dc)
This center increase creates the triangular shape of the bandana.
Each row becomes wider as additional spaces are created on both sides of the center increase.
Continue crocheting until your bandana reaches the desired size.
Important Note
The increase is always worked in the center of the bandana.
In every row, the center increase consists of:
(3 dc, ch 1, 3 dc)
worked into the same center space.
This increase creates the signature triangle shape and allows the bandana to grow evenly on both sides.
Finishing
When the bandana reaches your desired size:
- Fasten off and weave in ends.
- Attach yarn to one corner.
- Chain 60–80 stitches (or desired length) for a tie.
- Fasten off.
- Repeat on the opposite corner.
- Optionally work a round of single crochet around the entire bandana for a clean finished edge.
Your Patriotic Granny Stitch Bandana is now ready to wear for Independence Day celebrations, summer festivals, picnics, and fireworks nights.
Customization Ideas
Patriotic Picnic Style
Use traditional red, white, and blue stripes.
Coastal Summer Style
Try navy, cream, and light blue.
Boho Americana
Use dusty red, ivory, and denim blue.
Kids Version
Make fewer rows for a smaller size.
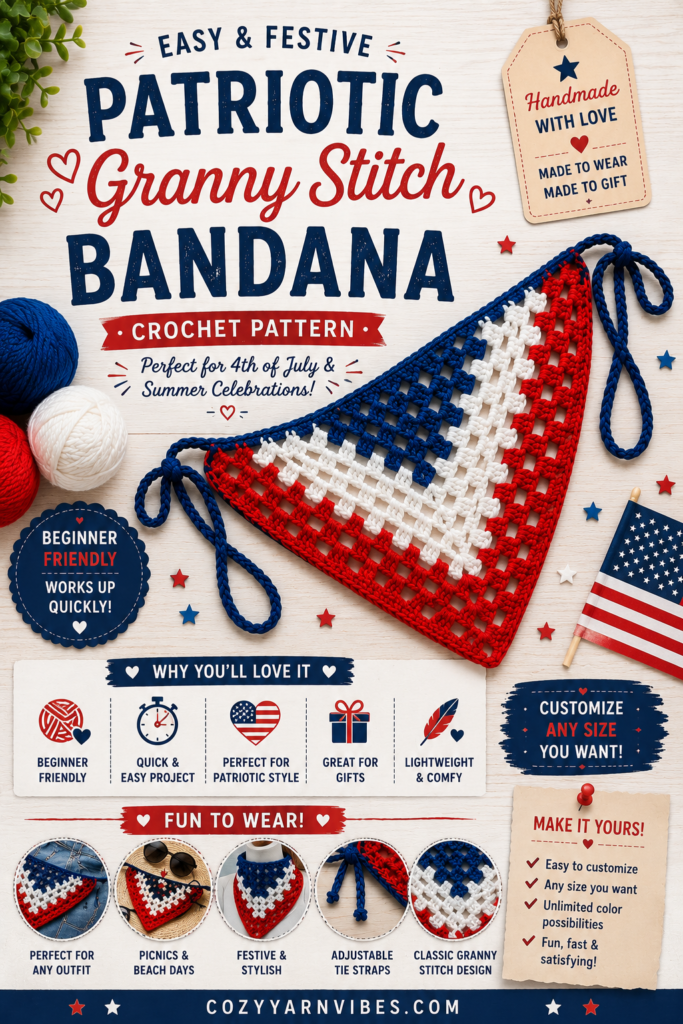
Styling Ideas
This crochet bandana looks adorable with:
- Denim shorts
- White summer dresses
- Crochet tops
- Tank tops
- Beach outfits
- Festival wear
It’s perfect for:
- Independence Day
- Memorial Day
- Labor Day
- Summer picnics
- Fireworks celebrations
Care Instructions
- Hand wash in cool water.
- Lay flat to dry.
- Avoid high heat.
- Store folded when not in use.
Frequently Asked Questions
Can beginners make this bandana?
Yes! The pattern mainly uses chains and double crochet granny stitch clusters.
How do I make it larger?
Simply continue adding rows until the bandana reaches your preferred size.
Can I use cotton yarn?
Absolutely. Cotton yarn is excellent for warm-weather accessories and helps the bandana hold its shape.
Can I use different colors?
Yes. The pattern works beautifully in any color combination, not just patriotic colors.
Construction Summary
The bandana is worked as a top-down granny stitch triangle. Each row increases at the center while granny stitch clusters build outward on both sides. Once the desired size is reached, ties are added to the corners and the edges are finished for a clean look.