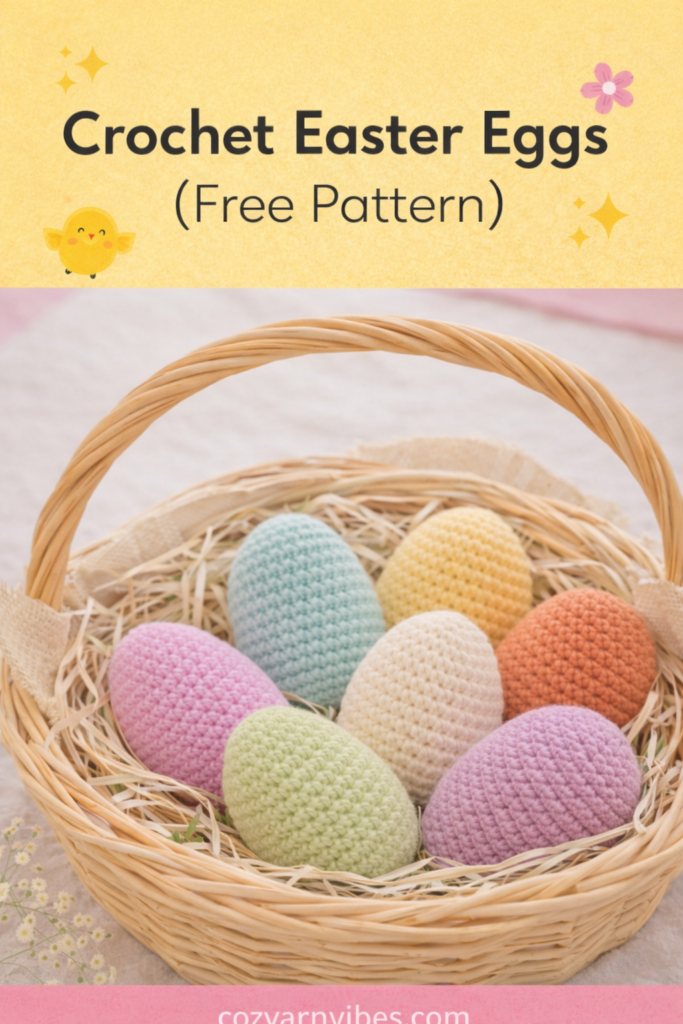
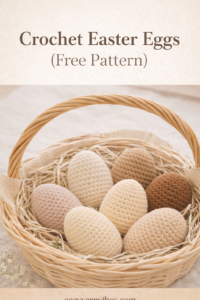
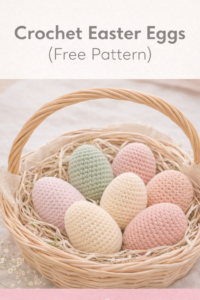
Crochet Easter Eggs (Free Pattern + Beginner-Friendly Tutorial)
Crochet Easter eggs are one of those quick, satisfying projects that never get old. They’re small, beginner-friendly, and perfect for using up leftover yarn — plus, they look absolutely beautiful in pastel colors.
Whether you want to decorate your home, fill Easter baskets, or create handmade gifts, these little eggs are a must-make seasonal project.
The best part? You can finish one in under an hour — making them perfect for last-minute crafting.
📊 Pattern At a Glance
| Item | Details |
|---|---|
| Skill Level | Beginner |
| Size | ~2.5 inches tall |
| Yarn | Worsted weight (4) |
| Hook | 4.0 mm |
| Time | 30–45 minutes |
| Technique | Continuous rounds |
| Uses | Decor, gifts, basket fillers |
🧶 Materials
Yarn Options
- Acrylic (budget-friendly)
- Cotton (firmer shape, premium feel)
👉 You’ll need about 15–20 yards per egg
Tools
- 4.0 mm crochet hook
- Stitch marker
- Tapestry needle
- Scissors
- Polyester fiberfill
💡 Tip: Good stuffing = smooth egg shape
Aeelike Crochet Kit for Beginners, 59pcs Crochet Starter Kits with Yarn, Ergonomic Hooks & Storage Case, Learn-to-Crochet Set for Adults, Kids & Seniors, Ideal DIY Craft Gift for Women
$15.79 (as of July 15, 2026 09:12 GMT +00:00 – More infoProduct prices and availability are accurate as of the date/time indicated and are subject to change. Any price and availability information displayed on [relevant Amazon Site(s), as applicable] at the time of purchase will apply to the purchase of this product.)
Fortuning’s JDS Crochet Kit for Beginners, Axolotls & Cat Crochet Kit for Adults Beginner, Complete Crochet Animals Starter Kit with Step-by-Step Video Tutorials, Easy Knitting Kit Cat Crafts Gifts
$18.99 (as of July 15, 2026 09:12 GMT +00:00 – More infoProduct prices and availability are accurate as of the date/time indicated and are subject to change. Any price and availability information displayed on [relevant Amazon Site(s), as applicable] at the time of purchase will apply to the purchase of this product.)
Yarniss Crochet Kit for Beginners, All in One Crochet Kits with 840 Yards Crochet Yarn, Ergonomic Crochet Hooks Set with Yarn for Adults, Navy
$18.89 (as of July 15, 2026 09:12 GMT +00:00 – More infoProduct prices and availability are accurate as of the date/time indicated and are subject to change. Any price and availability information displayed on [relevant Amazon Site(s), as applicable] at the time of purchase will apply to the purchase of this product.)
UzecPk Crochet Kit for Beginners, Crochet Kit, 4 Pcs Crochet Coasters Kits with Crochet Yarn, Crochet Hook, Step-by-Step Instructions Video, Crochet Supplies Set Craft Kits for Adults
$8.98 (as of July 15, 2026 09:12 GMT +00:00 – More infoProduct prices and availability are accurate as of the date/time indicated and are subject to change. Any price and availability information displayed on [relevant Amazon Site(s), as applicable] at the time of purchase will apply to the purchase of this product.)🔤 Abbreviations (US Terms)
- MR – magic ring
- sc – single crochet
- sc2tog – decrease
- st – stitch
- rnd – round
🧠 Pattern Notes
- Worked in continuous rounds (no joining)
- Use a stitch marker — very important
- Shape is created using increase + decrease
📏 Gauge
Not critical for this project, but tighter stitches = better shape
🪡 Free Crochet Easter Egg Pattern
🥚 Top Section (Increase)
Start with a magic ring
- Rnd 1: MR, 6 sc (6)
- Rnd 2: inc in each st (12)
- Rnd 3: (sc, inc) repeat (18)
- Rnd 4: (sc 2, inc) repeat (24)
- Rnd 5: (sc 3, inc) repeat (30)
✔ This forms the rounded top
🥚 Middle Section
- Rnd 6–8: sc in each st (30)
✔ This creates the classic egg belly
🥚 Bottom Section (Decrease)
- Rnd 9: (sc 3, dec) repeat (24)
- Rnd 10: (sc 2, dec) repeat (18)
👉 Start stuffing here
- Rnd 11: (sc 1, dec) repeat (12)
- Rnd 12: dec around (6)
🧵 Closing
- Fasten off (leave long tail)
- Thread needle through remaining stitches
- Pull tight and close
- Weave ends inside
🎨 Optional Color Changes
To add stripes:
- Change color at start of any round
💡 Best placements:
- Round 3
- Round 6
- Round 9
🎨 Color Ideas
🌸 Soft & Classic
- Baby pink
- Lavender
- Mint green
🌿 Neutral Aesthetic
- Cream
- Oatmeal
- Beige
🌈 Bold & Fun
- Coral
- Mustard
- Teal
💡 Pinterest tip:
Muted tones (sage + cream + blush) perform BEST
📏 Size Variations
Smaller Egg
- Use thinner yarn + smaller hook
Larger Egg
- Use bulky yarn + larger hook
- Add extra increase rounds
🎁 Creative Uses
- Easter basket fillers
- Gift toppers
- Table decor
- Bowl display
🧼 Care Tips
- Hand wash only
- Lay flat to dry
- Avoid over-compressing
💡 Beginner Tips
- Always use a stitch marker
- Keep tension slightly tight
- Stuff gradually (don’t overfill)
⚠️ Safety Note
Not suitable for children under 3 (due to stuffing)
❓ FAQs
How long does one egg take?
Around 30–45 minutes
Best yarn to use?
Worsted acrylic or cotton
Why are there gaps?
Your tension is too loose → try smaller hook
💭 Final Thoughts
There’s something incredibly satisfying about finishing one of these tiny eggs — especially when you pull that final stitch closed and see the perfect shape form.
They’re quick, relaxing, and honestly a little addictive. Once you make one… you’ll probably make ten.
Veryy energetic blog, I loved that a lot. Will there be a part 2?
Escucha soy redactor y me gustaría participar en tu bog, ¿es conveniente?
¿Reciben colaboradores?
yes i do, email me your details and how you wana work.