🌿 Lacy Granny Square Blanket – Elegant Crochet Motif Pattern
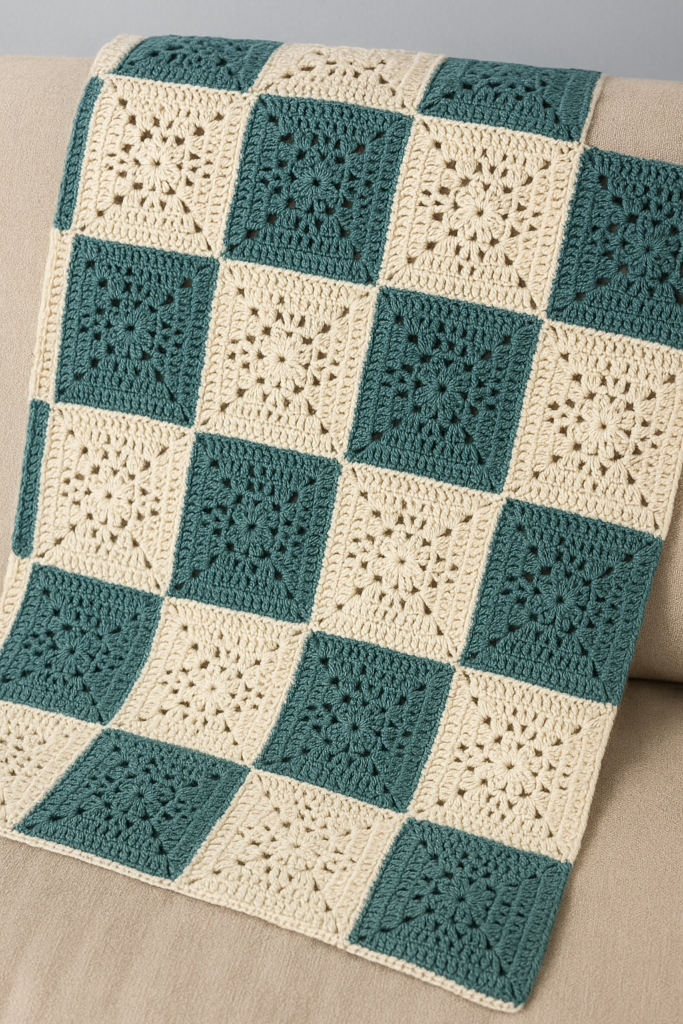
If you’re looking for a crochet pattern that’s both timeless and delicate, this Lacy Granny Square Blanket is a perfect match. Whether you want to make a baby blanket, bed throw, table runner, or even a light shawl, this versatile square motif adds grace and texture to any project.
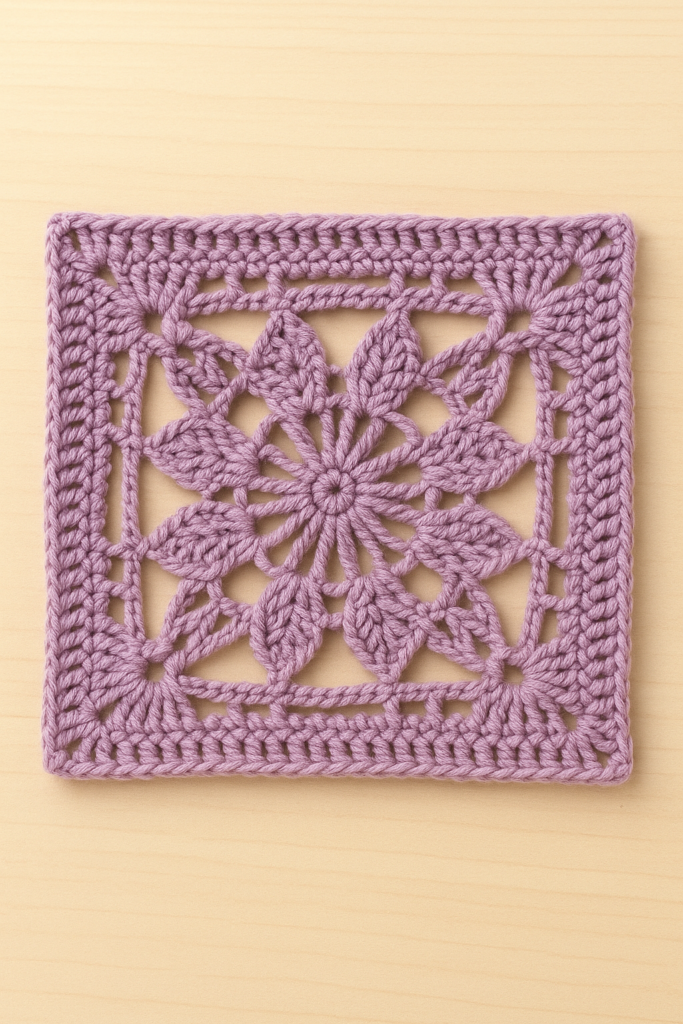
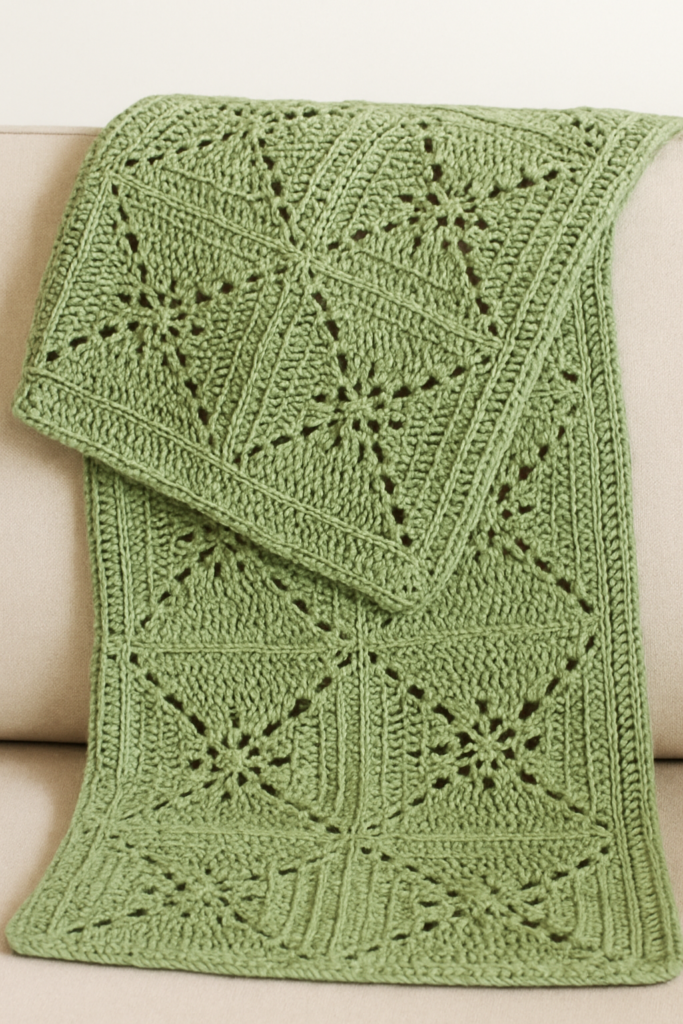
Each square features an airy floral design at the center, transitioning into classic double crochet borders. Joined together, they create a visually striking pattern that’s as functional as it is beautiful.
📏 Sizing:
Each completed square measures approximately 24 cm (9.5 inches) across when using medium-weight yarn and a 4.0 mm hook. Adjust hook and yarn to suit your desired size and texture.
🧶 Materials:
- Yarn: Cotton or cotton blend (light/medium worsted)
- Hook: 4.0 mm or size needed for gauge
- Scissors
- Tapestry needle
RED HEART Super Saver Yarn, White
$3.76 (as of June 4, 2026 18:07 GMT +00:00 – More infoProduct prices and availability are accurate as of the date/time indicated and are subject to change. Any price and availability information displayed on [relevant Amazon Site(s), as applicable] at the time of purchase will apply to the purchase of this product.)
F1 Lite iCord Knitting Machine, High Efficiency Handheld Manual i-Cord Maker with Wider Yarn Compatibility, Portable DIY Bead i-Cord Knitting Craft Tool, Ideal Gift for Crochet Beginners & Enthusiasts
$37.88 (as of June 4, 2026 18:07 GMT +00:00 – More infoProduct prices and availability are accurate as of the date/time indicated and are subject to change. Any price and availability information displayed on [relevant Amazon Site(s), as applicable] at the time of purchase will apply to the purchase of this product.)🪡 Stitches & Abbreviations:
- ch – chain
- sl st – slip stitch
- sc – single crochet
- dc – double crochet
- tr – treble crochet
- sp – space
- st(s) – stitch(es)
✨ How to Do the Stitches:
- Double Crochet (dc): Yarn over, insert hook in stitch, yarn over, pull through (3 loops on hook), yarn over, pull through 2 loops, yarn over, pull through last 2 loops.
- Treble Crochet (tr): Yarn over twice, insert hook into stitch, yarn over, pull through (4 loops on hook), yarn over, pull through 2 loops at a time until one loop remains.

🌿 Crochet Lacy Square – Corrected Pattern Instructions
🧶 Start With:
- A magic ring
🧵 Foundation:
Round 1:
- Into the magic ring:
Ch 3(counts as first dc), then 24 dc.
Join with a slip stitch to the top of the first ch-3. (25 dc total including the initial ch-3)
Round 2: Lacy Center with Decreases
Ch 3(counts as first dc of a decrease),
2 dc together in the same stitch (3 dc together = 1 dec group)Ch 3, skip 1 stitch, then (3 dc together in next stitch, ch 3, skip 1 st)
— repeat around.
You should end with a ch 3 and join with sl st to top of first decrease.
Round 3: Expanded Lace with Corner Base
- Repeat the same as Round 2, but:
- Use ch 4 instead of ch 3 between groups
- At the four corner points (i.e., every fourth or fifth decrease group), ch 7 instead of 4 to start forming square shape
Round 4: Build the Frame
Start from the middle stitch of a ch-7 corner loop:
- (5 dc) in that middle stitch (first dc should align with last dc of the previous corner group)
Ch 3, skip 4 stitches,scin nextCh 5, skip 2 stitches,scin nextCh 3, skip 4 stitches, 5 dc in next 5 stitchesCh 2, 5 dc in next 5 stitches (first dc should fall in the same st as last dc of the previous group)
Repeat this full sequence for each side of the square, building toward four strong corners and lace sides.
✅ Notes:
- Be sure to align your 5 dc clusters with the ones from the previous row for symmetry.
- Chain spaces (3, 5, 7) create the light airy texture — don’t tighten them too much.
- Adjust stitch counts evenly on all sides to maintain the square shape.
🎨 Customization Ideas:
- Yarn Color: Try alternating colors for each round or use gradient yarns for stunning color transitions.
- Join-as-you-go: Seamlessly join squares in the final round using slip stitches for a neat look.
- Add Border: Finish with a scalloped or picot border for extra charm.
🧼 Care Tips:
- Hand wash with mild soap.
- Lay flat to dry and shape while damp.
- Store folded or rolled to avoid stretching corners.
❓ FAQ
Q: Can I use this square to make garments?
A: Absolutely! These squares are perfect for lightweight cardigans, shrugs, or even boho-style tops.
Q: How many squares for a blanket?
A: A small baby blanket might use 16–20 squares, while a throw may use 35–49 depending on your desired size.