
Willow Breeze Lace Poncho Top – Crochet Pattern
Introduction
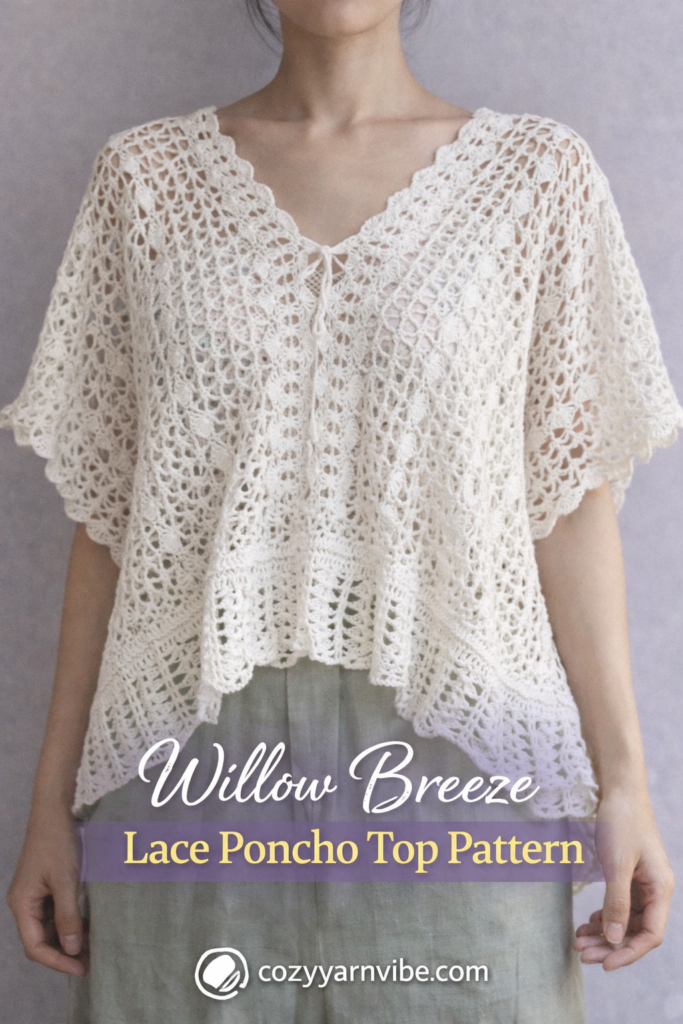
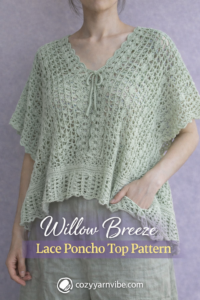
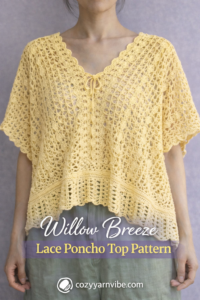
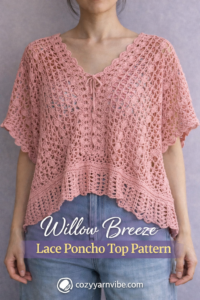
The Willow Breeze Lace Poncho Top is a lightweight crochet garment featuring an elegant open lace design and relaxed poncho silhouette. The airy stitch pattern creates beautiful texture while keeping the fabric breathable and comfortable for warm weather.
This crochet lace poncho is worked using two rectangular panels for the front and back, which are then joined at the shoulders. The lace pattern combines treble crochet stitches, fan stitches, and chain spaces to create a delicate mesh fabric that drapes beautifully.
The repeating stitch pattern becomes easy to memorize after a few rows, making this project relaxing and enjoyable once you establish the rhythm.
Skill Level
Beginner – Intermediate
You should be comfortable with:
• chain stitches
• single crochet
• treble crochet
• skipping stitches
• repeating stitch patterns
Finished Fit
This top has a loose poncho-style fit with wide sleeves and soft drape.
Approximate finished measurements:
| Size | Width | Length |
|---|---|---|
| One Size | 90–110 cm | 55–60 cm |
The width can be adjusted by adding more pattern repeats.
Materials
Yarn
• Lightweight cotton or cotton blend yarn
• DK or light worsted weight
• Approx. 400–500 g
Hook
• 4 mm – 5 mm crochet hook
Other Supplies
• scissors
• yarn needle
• stitch markers (optional)
Crochet Highland Cow Bag Holder Kit, DIY Crochet Kit for Kitchen Storage | DIY crochet animal bag holder kit with 4 cute design options, combining creative crafting, kitchen bag storage and home decor
$11.99 (as of October 20, 2026 14:40 GMT +00:00 – More infoProduct prices and availability are accurate as of the date/time indicated and are subject to change. Any price and availability information displayed on [relevant Amazon Site(s), as applicable] at the time of purchase will apply to the purchase of this product.)
Jumbo Chunky Yarn for Hand Knitting – Chunky Chenille Yarn for Crocheting Blankets,Super Soft Bulky Fluffy Yarn,9 Jumbo Pack(19yds,8oz Each Skein),Deep Harbor
$27.99 (as of October 20, 2026 14:40 GMT +00:00 – More infoProduct prices and availability are accurate as of the date/time indicated and are subject to change. Any price and availability information displayed on [relevant Amazon Site(s), as applicable] at the time of purchase will apply to the purchase of this product.)Stitches & Abbreviations
| Abbreviation | Meaning |
|---|---|
| ch | chain |
| sc | single crochet |
| tr | treble crochet |
| sk | skip |
| rep | repeat |
How to Do These Stitches
Treble Crochet (tr)
- Yarn over twice.
- Insert hook into stitch.
- Yarn over and pull up a loop.
- Yarn over, pull through 2 loops.
- Yarn over, pull through 2 loops.
- Yarn over, pull through remaining 2 loops.
Treble crochet creates a tall stitch that helps form the airy lace fabric used in this top.
Fan Stitch
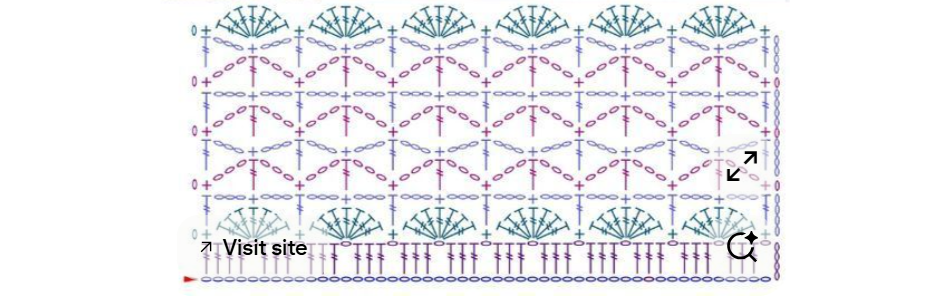
The fan stitch used in this pattern consists of 7 treble crochets worked into the same stitch.
This creates a decorative shell or fan shape that spreads outward and adds texture to the lace fabric.
Stitch Pattern Instructions
Foundation Chain
Chain a multiple that fits the width of your panel.
Row 1
- Ch 5 (counts as 1 treble crochet).
- Sk 1 st.
- Make 3 tr in the next 3 stitches.
- Ch 1.
- Sk 1 stitch.
- Make 3 tr in the next 3 stitches.
- Ch 1.
- Sk 1 stitch.
- Repeat across the row.
- At the end of the row, make 4 tr in the last stitch.
- Turn.
Row 2
- Ch 1.
- Sc in the first stitch.
- Sk 3 stitches.
- Make 7 tr in the next stitch (fan stitch).
- Sk 3 stitches.
- Sc in the next stitch.
- Sk 3 stitches.
- Make 7 tr in the next stitch.
- Repeat across the row.
- Turn.
Row 3
- Ch 4 (counts as tr).
- Make tr in the next stitch.
- Ch 3.
- Make sc in the center of the fan stitch.
- Ch 3.
- Make tr in the stitch at the end of the fan (top of previous sc).
- Repeat this sequence across the row following the graph if needed.
- Turn.
Row 4
- Ch 1.
- Sc in first stitch.
- Ch 3.
- Sk the bottom 3 chain stitches.
- Make tr on top of the sc from the previous row.
- Ch 3.
- Sk the next 3 chains.
- Make sc in the next stitch.
- Repeat across the row.
- Turn.
Row 5
- Ch 4 (counts as tr).
- Make tr in the first stitch.
- Ch 3.
- Sk the bottom 3 chains.
- Sc in the next stitch.
- Ch 3.
- Sk 3 chains.
- Make tr in the next stitch.
- Repeat across the row.
- Turn.
Rows 6–9
Repeat the stitch sequence from:
• Row 3
• Row 4
• Row 5
Then work Row 2 again.
Continue Pattern
Repeat this row sequence until the panel reaches your desired width and length.
Construction Overview
The Willow Breeze Lace Poncho Top is constructed using two large lace panels worked vertically.
Instead of traditional front and back rectangles, the garment is made using:
• 1 left side panel
• 1 right side panel
Each panel is crocheted using the lace stitch pattern described above.
The panels are then joined at the shoulders and partially along the sides, which forms both the front and back of the garment at the same time. This construction creates the natural drape and poncho-style shape seen in the finished top.
Because the panels are mirrored, the lace pattern flows diagonally across the body, giving the top its elegant texture.
Panel Construction
Left Panel
- Start with the foundation chain for your desired width.
- Work the stitch pattern rows as described earlier.
- Continue repeating the pattern sequence until the panel reaches the desired length.
Fasten off.
Right Panel
Repeat the exact same instructions to create the second mirrored panel.
Both panels should be the same size.
Assembly
- Lay the left and right panels flat with the right sides facing up.
- Join the panels at the shoulder seams, leaving a center opening for the neckline.
- Sew the panels together along the sides, leaving enough space for comfortable arm openings.
Once joined, the two panels naturally form both the front and back of the top, giving the garment its relaxed poncho silhouette.
Bottom Structure Panel (Fan Stitch Border)
To give the crochet lace poncho more structure and a finished shape, an additional border section is crocheted along the bottom edge.
This border uses the same stitch pattern sequence ending at the fan stitch row.
Bottom Border Instructions
- Attach yarn to the bottom edge of the garment.
- Work across the edge using the same pattern repeat.
- Continue until reaching the fan stitch row (Row 2).
The fan stitches create a slightly flared edge, which gives the garment a more structured and decorative finish.
This border also helps the top hold its shape and prevents the lace fabric from curling.
Why This Construction Works
This panel construction offers several benefits:
• creates a natural drape
• reduces complex shaping
• keeps the lace pattern continuous
• allows easy size adjustments
• produces the elegant poncho silhouette seen in the photo
Final Finishing
After attaching the bottom border and sewing the panels:
• add a single crochet edging around the neckline
• weave in all yarn ends
• lightly block the garment to open the lace pattern
Customization Ideas
You can easily customize this top:
• make it longer for a tunic
• use pastel yarn for summer
• add fringe to the hem
• create longer sleeves
• use gradient yarn
Styling Ideas
This lace poncho top pairs well with:
• linen trousers
• denim shorts
• maxi skirts
• beachwear
Layer it over a tank top or swimsuit for a relaxed boho look.
Very good i like it
看不懂但大受震撼
wish you all the best
wish you best and best
Love this pattern, very beautiful. I would like to make one but not very sure I can understand it. In this pattern, you need to make one big piece for the back and 2 for the front?
After copying out into my note book, I understood the instructions. Thanks for the beautiful pattern.