
Easy Lace Crochet Poncho Top (Free Stitch Pattern + Chart)
Introduction
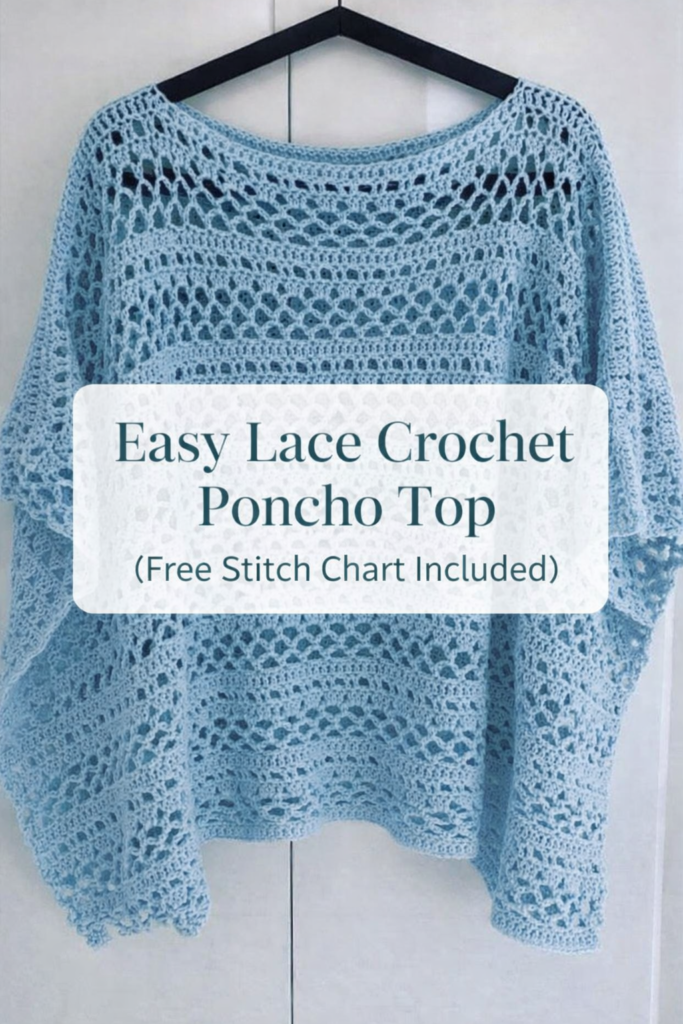
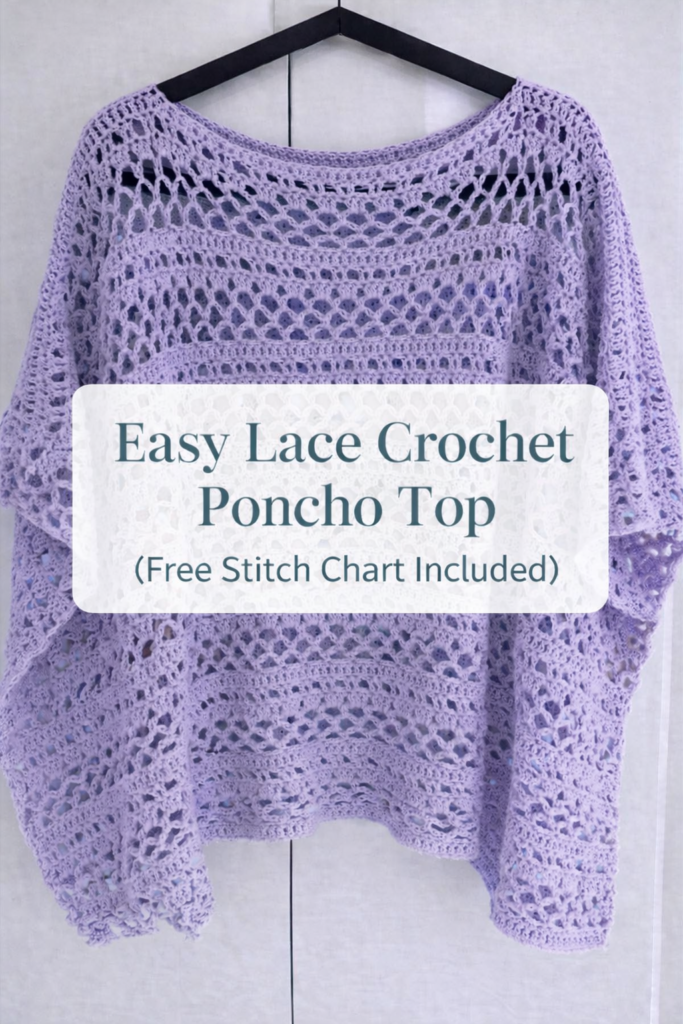
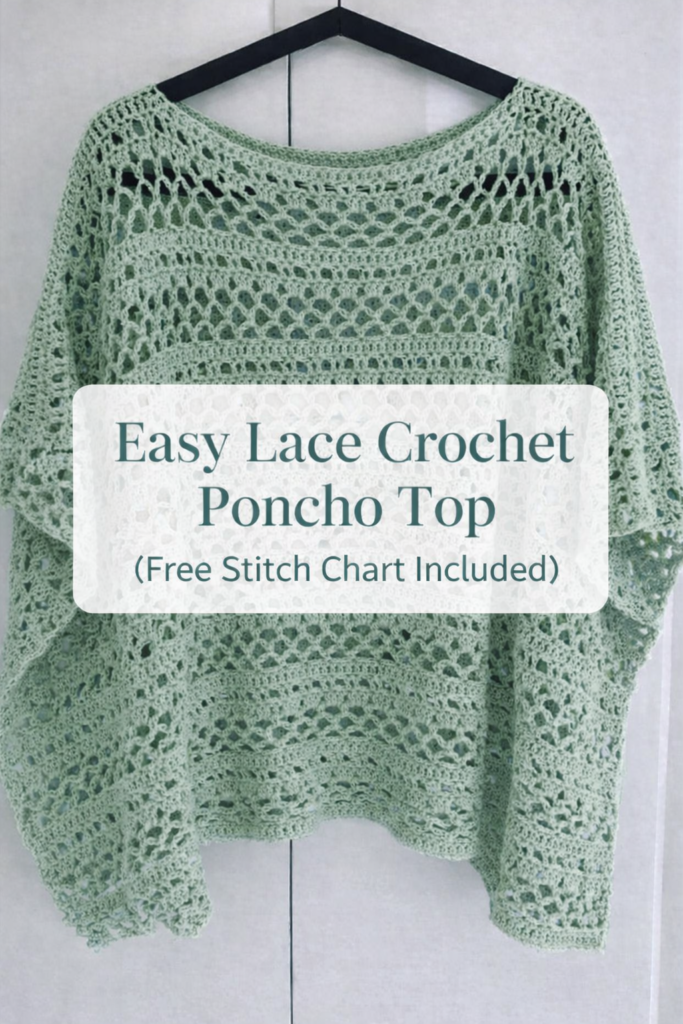
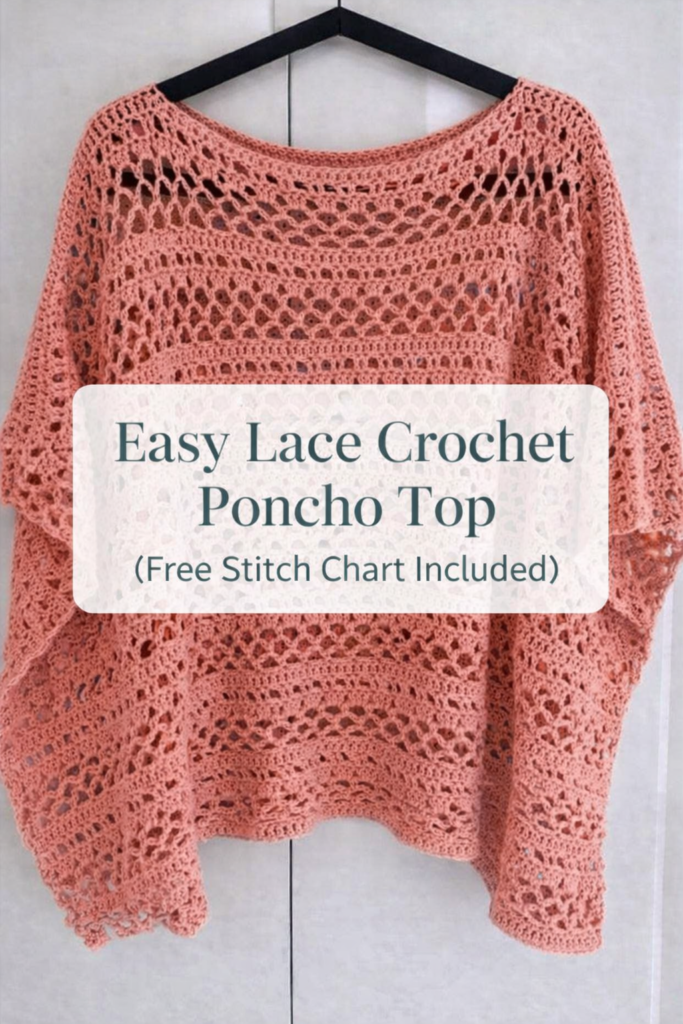
If you love airy, lightweight crochet garments, this lace crochet poncho top is a must-make. Featuring a beautiful open mesh and fan lace stitch, this design is perfect for summer layering, beach cover-ups, or casual everyday wear. The loose fit makes it beginner-friendly, while the stitch pattern gives it an elegant, handmade look.
In this tutorial, I’ll walk you through the stitch pattern, materials, sizing tips, and step-by-step instructions based on the chart shown above—so you can confidently recreate this stunning piece.
Skill Level
Beginner–Intermediate
(Basic stitches with simple lace repeats)
Finished Size & Fit
- Style: Loose poncho / boxy lace top
- Fit: Relaxed, drapey
- Customization: Easily adjustable for width and length
- Suggested Size Range: One size fits most (XS–XL with adjustments)
Materials Needed
- Yarn:
- Lightweight yarn (Category 3 – DK or light worsted)
- Cotton or cotton-blend recommended for breathability
- Hook Size:
- 4.0 mm – 5.0 mm (choose based on drape preference)
- Stitch markers (optional)
- Scissors
- Yarn needle
💡 Tip: Cotton yarn gives crisp stitch definition, while bamboo blends create extra flow.
MOREJMTT Crochet Kit for Beginners, Learn to Crochet, Include Easy Knitting Soft Yarn, Step-by-Step Video Tutorial, Hook, Holiday Birthday Gift for Adults (Sausage Dog)
$7.99 (as of October 8, 2026 14:26 GMT +00:00 – More infoProduct prices and availability are accurate as of the date/time indicated and are subject to change. Any price and availability information displayed on [relevant Amazon Site(s), as applicable] at the time of purchase will apply to the purchase of this product.)
MAGIMUSE Crochet Kit for Beginners, 5 Cat Crochet Amigurumi Craft Kit | Includes Step-by-Step Video Tutorials, 40% More Yarn and DIY Crochet & Knitting Supplies for Beginner Animal Projects.
$21.99 (as of October 8, 2026 14:26 GMT +00:00 – More infoProduct prices and availability are accurate as of the date/time indicated and are subject to change. Any price and availability information displayed on [relevant Amazon Site(s), as applicable] at the time of purchase will apply to the purchase of this product.)
Yarniss Crochet Kit for Beginners, All in One Crochet Kits for Adult, Navy | Ergonomic Crochet Hooks Set with 840 Yards Crochet Yarn & Crochet Accessories, Learn to Crochet with Instruction & Tutorial
$19.99 (as of October 8, 2026 14:26 GMT +00:00 – More infoProduct prices and availability are accurate as of the date/time indicated and are subject to change. Any price and availability information displayed on [relevant Amazon Site(s), as applicable] at the time of purchase will apply to the purchase of this product.)
Cat Crochet Kit for Beginners-Calico Cat Crochet Kits for Adults Kids, Crochet Starter Kit with Step-by-Step Video Tutorials,Crochet Animal Kits Learn to Crochet Kits for Adults Kids
$16.99 (as of October 8, 2026 14:26 GMT +00:00 – More infoProduct prices and availability are accurate as of the date/time indicated and are subject to change. Any price and availability information displayed on [relevant Amazon Site(s), as applicable] at the time of purchase will apply to the purchase of this product.)Stitches & Abbreviations
- ch – chain
- sl st – slip stitch
- sc – single crochet
- dc – double crochet
- hdc – hald double crochet
- ch-sp – chain space
- rep – repeat
How to Do the Main Stitches
- Double Crochet (dc): Yarn over, insert hook, yarn over, pull through, yarn over, pull through 2 loops twice
- Chain Spaces: Skip stitches to create airy mesh sections
Pattern Overview
This poncho top is made in horizontal lace rows:
- Start with a long foundation chain
- Work lace pattern rows back and forth
- Fold fabric and seam sides
- Finish neckline and edges
No shaping required—perfect for relaxed wear.
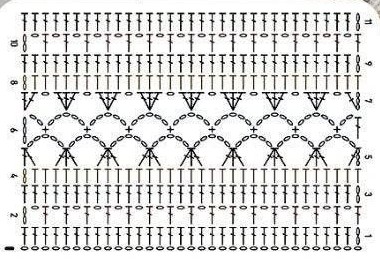
Stitch Pattern Explanation (Chart-Based)
The lace pattern consists of three repeating sections:
- Solid dc rows for structure
- Mesh rows for airflow
- Fan lace rows for decorative texture
Each repeat creates the wave-like openwork seen in the finished top.
Step-by-Step Instructions
Step 1: Foundation Chain
Chain a multiple of 10 + 2 (adjust length to desired width).
Example:
- Small width: ch 92
- Medium width: ch 112
- Large width: ch 132
Step 2: Base Rows
Row 1: Dc in 4th ch from hook and across. Turn.
Row 2: Ch 3, skip 1 stitch, dc next. (skip 1 dc in next ) REPEAT. Turn.
These rows create stability for the lace sections.
Row 3:
Ch 2, dc in each stitch .
Row 4:
Ch 2, hdc in each stitch .
Step 3: Fan Lace Row
Row 5:
Ch 3, dc in next st, ch 5, skip 1 st, dc3tog (work 3 dc together over the next 3 sts), ch 5, skip 1 st; repeat across.
Row 6:
Ch 6, sc in mesh middle ch, ch 5 sc in mes middle ch – Repeat.
Row 7:
Ch 3 dc in same st, ch 1, 3dc in mesh middle ch – Repeat.
This row creates the signature scalloped lace look.
Step 5: Repeat Pattern
Repeat Rows 4-1 backwards . its the main design. Now repeat it as many times as you want to reach desired length.
Assembly
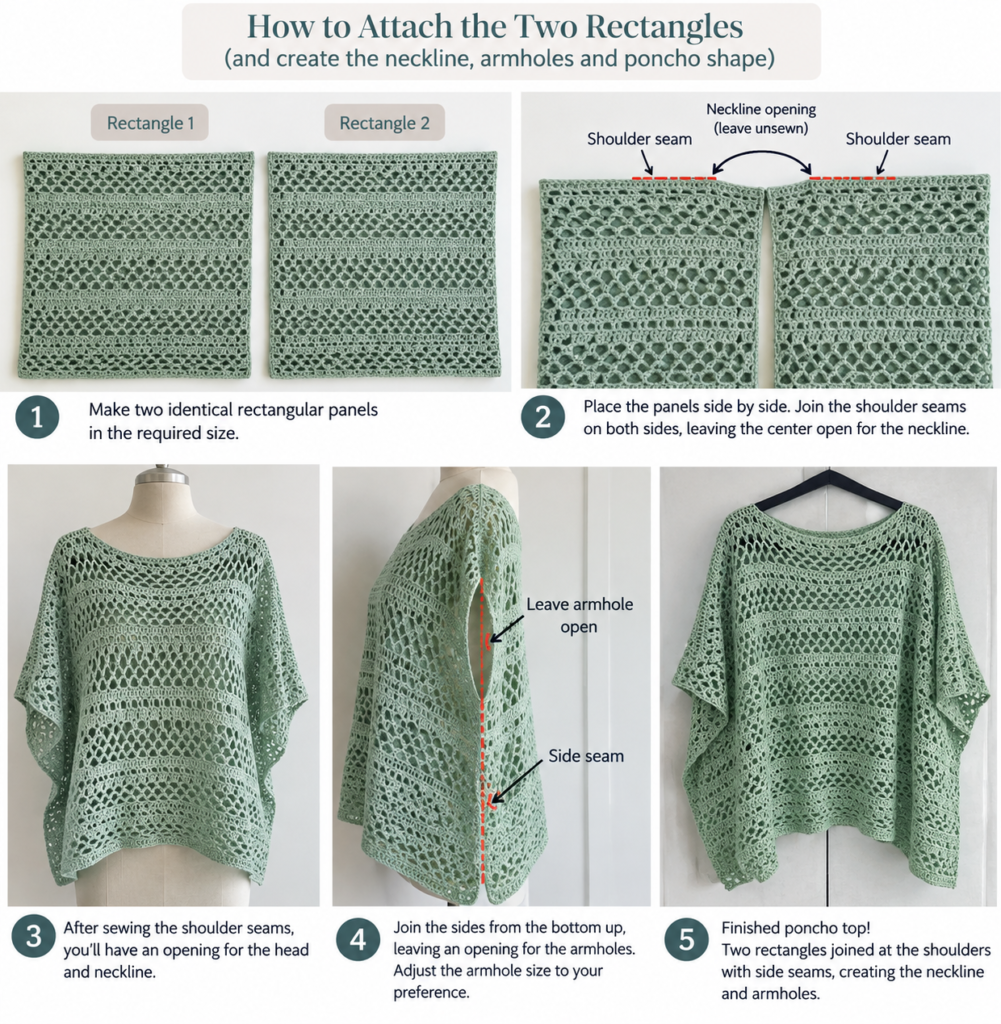
- Fold the rectangle in half
- Seam sides, leaving arm openings
- Join yarn at neckline
- Work 1–2 rounds of sc evenly around
Optional: Add picot edging for extra detail.
Customization Ideas
- Crop length for summer
- Tunic length for leggings
- Add fringe at hem
- Use gradient or ombré yarn
- Create sleeves by extending side seams
Styling Suggestions
- Layer over a tank top or dress
- Wear with jeans or linen pants
- Perfect as a beach cover-up
- Pair with belts for definition
Care Instructions
- Hand wash cold
- Lay flat to dry
- Avoid hanging to prevent stretching
FAQs
Is this poncho beginner friendly?
Yes! If you know basic crochet stitches, you can follow this pattern easily.
Can I make it larger or smaller?
Absolutely—just adjust the foundation chain.
What yarn works best?
Cotton or bamboo blends are ideal for summer wear.
Can I sell finished items?
Yes, handmade items are allowed—credit the design inspiration when possible.
Knyteruna Chunky Yarn for Hand Knitting, #10 Chunky Blanket Chenille Yarn, Large Bulky Thick Jumbo Yarn, Super Chunky Knit Yarn for Crocheting, 8 Skein (8oz,20yds Each Skein), Tie Dye Multi Blue&White
$23.99 (as of October 8, 2026 16:43 GMT +00:00 – More infoProduct prices and availability are accurate as of the date/time indicated and are subject to change. Any price and availability information displayed on [relevant Amazon Site(s), as applicable] at the time of purchase will apply to the purchase of this product.)
Hiya, I’m really glad I’ve found this information. Today bloggers publish just about gossips and net and this is really annoying. A good blog with interesting content, this is what I need. Thanks for keeping this web site, I will be visiting it. Do you do newsletters? Can’t find it.
I can’t seem to find how much yarn I need to make a L/XL Poncho.
I have the same question. Did you get an answer?
Hi! 😊 For the L/XL size, I recommend approximately **900–1,100 yards (825–1,005 meters) of DK/light worsted yarn**. I’d suggest getting a little extra, especially if you prefer a longer or looser-fitting poncho. Happy crocheting! 🧶💕
This is a beautiful piece. How is the neckline created?
Thank you so much! Jean 😊 The neckline is created during assembly. Once both panels are finished, lay them together and seam the shoulder sections, leaving the center portion unsewn for your head and neckline. You can adjust the size of the opening by sewing a little more or less along the shoulders. 🧶💕
I am so excited, I just started this pattern. I do have a question about row 2, it says skip 1, db crochet, to end. That would lose every other stitch. Then when I reverse pattern not sure how to get those stitches back. Please help I am stuck.
Thank you.
I’m not the designer I’m making this right now though. You’re chain 1 skip a stitch dc in next. You gain that stitch back next row as stitch goes in the dc AND the chain. Hope this helps.
I think it’s a mistake in the pattern. I added 1 chain in between each dc and it worked out perfectly.
Hi Laurie ,😊 You’re right to question that. In Row 2, you should **chain 1 after each double crochet** to replace the skipped stitch. So the repeat is: **skip 1 stitch, double crochet in the next stitch, chain 1**, and continue across the row. This creates the open mesh while keeping the stitch count consistent, so you’ll have the spaces you need when working the pattern back. I’ll clarify this in the written pattern as well. Thank you for pointing it out! 🧶💕
Did you get an answer? I am wondering the same thing. I would love to make this but am unclear on the composition of the neckline.
Same here I can’t work out how to fold it and make the neck line
Yes, I started this pattern, but it’s not clear how to create the neckline and I don’t understand working rows 4 – 1 in reverse- it doesn’t seem right.
Hi Anne ! 😊 You’re right—the wording “work Rows 4–1 in reverse” is confusing. You do **not** work the stitches backwards. It means to continue the lace pattern in the opposite sequence so the design mirrors the first section.
For the neckline, make the two panels first. During assembly, seam the panels together along the shoulders but **leave the center section open for your head**. That unsewn center opening creates the neckline. You can leave a larger or smaller opening depending on the fit you prefer.
Thank you for pointing this out! I’ll update that section of the pattern to make the instructions clearer. 🧶💕
I’ve i’ve started this top and I understand the pattern, but I’m really confused how you end up with a rectangle and then you fold it to make the top because one side will be closed all the way so how do you make an arm ball there are you making two rectangles I think you’re making two rectangles and joining them somehow could you please clarify that it’s definitely not gonna work to make one rectangle and fold it in half because one side will be closed maybe a picture of how to assemble with make some sort of sense of this.
Really frustrated and confused. The stitch pattern is easy to follow but how can you possible take one rectangle and fold and make holes for arms! One side is open but the other side is folded and therefore solid. Please put photo of assembly as I don’t think one rectangoe can be wide enough or make this top please clarify. Thank you.
confused… your chart doesn’t match the pictured poncho AND assembly doesn’t make sense… I love the pictured poncho so I have adjusted your pattern to suit: ch as per pattern, [1 x dc row, 3 x mesh rows, 1 x 3dc in each ch5sp, 1 x (dc 2, skip 1) across row] repeating this sequence ending at the shoulder with a final 1 x dc row to assist seaming and made 2 rectangles then seamed the side seams leaving desired armhole width, seam across the top leaving an opening for head (essentially like a boat neck style)… hope this helps others
I saw the same thing! I thought it was just me. If you fold the item, there is no neck opening. You have to make 2 panels and then sew them together.
Reading and re-reading the directions I was confused as well. Making 2 rectangles makes sense.
Same doubt..I also thought to do in the same way
Claro está que todas estamos confundidas con el escote, esto me pareció como las recetas de cocina de las abuelas que nunca te la daban completa, yo solo encontré solución haciendo dos rectángulos iguales, coser a la altura deseada para mangas e igual para el cuello. Gracias a todas por sus comentarios y aparte el patrón no coincide con el poncho ya hecho , ahí sólo marca 2 vueltas de 5 cadenas, yo voy a poner las tres.
I would like to make this pattern. Thank you all for the updates on the instructions. Could someone recommend brand type of Yarn to use that worked well for them. I noticed that cotton was recommended but there are so many different brands of cotton Yarn to decide from
Hello creator??? Are you not getting notified of all the comments on here? It’s a very nice top but your pattern explanation and lack of photos sucks..
It seems like quite a few people have been having trouble understanding the **assembly and how the neckline is created**. I’ve now added a step-by-step image to the pattern showing how to attach the two rectangles, create the neckline, and leave the arm openings. 🧶
I’ve also tried to reply to as many of your questions in the comments as possible. Please check the updated pattern and the new assembly image—I hope it makes everything much clearer! 💕 And thank you all for your questions and feedback.