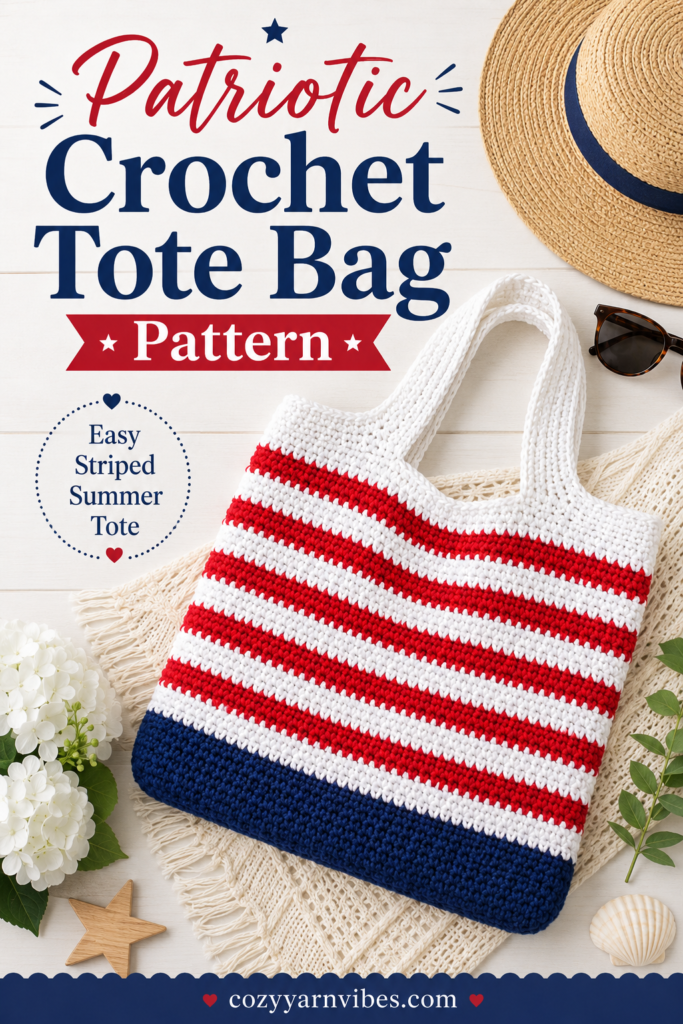
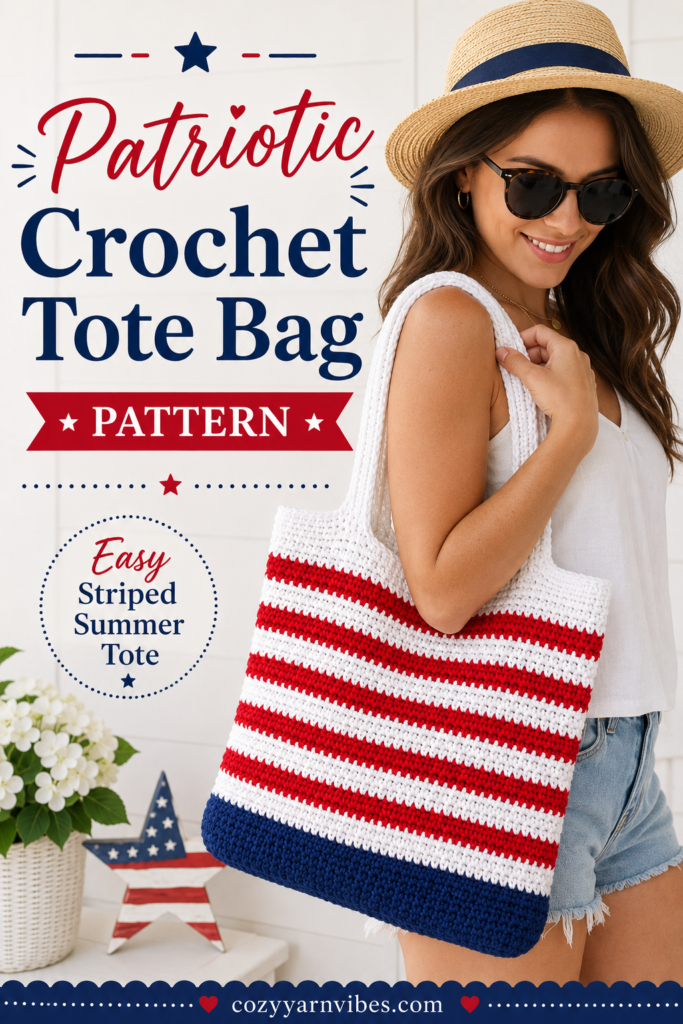
A Handmade Red, White, and Blue Crochet Bag for Summer
A crochet tote bag is one of those projects that is both useful and fun to make. This Patriotic Striped Crochet Tote Bag Pattern is inspired by classic red, white, and blue summer colors, making it perfect for 4th of July celebrations, beach days, picnics, market trips, and everyday summer outings.
The bag has a bold navy base, bright red and white stripes, and sturdy crochet handles. It is roomy enough to carry yarn, books, snacks, a small towel, or your daily essentials. The simple striped design also makes it a great project for beginners who want to practice working rows, changing colors, and making a practical crochet accessory.
You can keep the colors patriotic, or you can easily change the shades to make a beach tote, market bag, school bag, or everyday handmade purse.
Why You’ll Love This Crochet Tote Bag
This crochet tote bag is:
Beginner-friendly and practical
Made with simple basic crochet stitches
Perfect for patriotic holidays and summer outfits
Easy to customize in different colors
Strong enough for light everyday use
A great handmade gift idea
Useful as a beach bag, market bag, or yarn project bag
The striped look gives the bag a clean and classic style, while the crochet texture makes it feel soft, cozy, and handmade.
Skill Level
Beginner to easy.
This pattern is suitable for crocheters who are comfortable with basic stitches like chain, single crochet, and double crochet. You will also need to change yarn colors between stripe sections.
Finished Size
Approximate finished size:
Width: 15–18 inches
Height: 13–16 inches
Handle drop: 8–11 inches
Your final size may vary depending on your yarn, hook size, and tension.
For a larger tote, add more rows to the body or increase the starting chain.
For a smaller tote, use fewer starting chains and fewer body rows.
Materials Needed
Worsted weight yarn in navy blue, red, and white
5 mm crochet hook
Yarn needle
Scissors
Measuring tape
Stitch markers, optional
UzecPk Crochet Kits, Crochet Kit for Beginners 4 PCS Crochet Coasters Kits | Crochet Kits with Crochet Yarn, Crochet Hook, Step-by-Step Instructions Video, Crochet Supplies Set Craft Kits for Adults
$8.98 (as of July 26, 2026 16:30 GMT +00:00 – More infoProduct prices and availability are accurate as of the date/time indicated and are subject to change. Any price and availability information displayed on [relevant Amazon Site(s), as applicable] at the time of purchase will apply to the purchase of this product.)
The Woobles Crochet Kit for Beginners – Easy Arts and Crafts Knitting & Crochet Animals Kit As Seen On Shark Tank – Pierre The Penguin
$29.96 (as of July 26, 2026 16:30 GMT +00:00 – More infoProduct prices and availability are accurate as of the date/time indicated and are subject to change. Any price and availability information displayed on [relevant Amazon Site(s), as applicable] at the time of purchase will apply to the purchase of this product.)
Zepiany Crochet Kit for Beginners Crochet Cat Beginner Crochet Kit for Adults Amigurumi Crochet Animals Cat Crafts Crochet Kits Easy Knitting Kit
$16.49 (as of July 26, 2026 16:30 GMT +00:00 – More infoProduct prices and availability are accurate as of the date/time indicated and are subject to change. Any price and availability information displayed on [relevant Amazon Site(s), as applicable] at the time of purchase will apply to the purchase of this product.)
Aeelike Crochet Kit for Beginners – 59-Piece Crochet Starter Kits with Yarn, Ergonomic Hooks & Storage Case, Learn-to-Crochet Set for Adults, Kids & Seniors, Ideal DIY Craft Gift for Women
$17.99 (as of July 26, 2026 16:30 GMT +00:00 – More infoProduct prices and availability are accurate as of the date/time indicated and are subject to change. Any price and availability information displayed on [relevant Amazon Site(s), as applicable] at the time of purchase will apply to the purchase of this product.)Suggested Yarn
Cotton yarn or cotton-blend yarn is a great choice for a tote bag because it gives the bag better structure and durability. Acrylic yarn can also be used, but cotton usually holds the tote shape better.
Suggested Colors
Navy blue for the base
White for the light stripe sections
Red for the bold stripe sections
You can also use cream instead of bright white if you want a softer vintage patriotic look.
Stitches & Abbreviations
US Crochet Terms
ch = chain
sc = single crochet
dc = double crochet
sl st = slip stitch
st = stitch
sts = stitches
rep = repeat
FO = fasten off
How to Do These Stitches
Chain Stitch — ch
Make a slip knot on your hook. Yarn over and pull through the loop on your hook. Repeat until you have the number of chains needed.
Slip Stitch — sl st
Insert your hook into the stitch, yarn over, and pull the yarn through the stitch and the loop on your hook. Slip stitch is useful for joining, finishing edges, or moving across stitches neatly.
Single Crochet — sc
Insert your hook into the stitch, yarn over, and pull up a loop. Yarn over again and pull through both loops on your hook. Single crochet creates a firm, tight fabric, which is helpful for bag bases and borders.
Double Crochet — dc
Yarn over, insert your hook into the stitch, yarn over and pull up a loop. You will have three loops on your hook. Yarn over and pull through two loops, then yarn over again and pull through the last two loops. Double crochet works up faster and gives the tote body a flexible texture.
Color Change
To change colors neatly, work the last stitch of the row until the final yarn-over step. Drop the old color, yarn over with the new color, and pull through to finish the stitch. Then continue with the new color on the next row.
Pattern Notes
This tote is worked as two flat panels and then joined together.
You can also work it in the round if you prefer a seamless bag.
The navy section forms the base of the bag.
The red and white rows create the striped body.
Handles are crocheted separately or worked directly from the top edge.
Use stitch markers to keep the handle placement even.
For a stronger tote, use cotton yarn and a slightly smaller hook.
Crochet Pattern
Front Panel
Navy Base Section
Using navy blue yarn, ch 46.
Row 1: Dc in the 3rd ch from the hook and in each ch across. Turn.
Row 2: Ch 2, dc in each st across. Turn.
Rows 3–8: Repeat Row 2.
This creates the solid navy base of the tote.
Fasten off navy yarn.
Striped Body Section
Join white yarn.
Rows 9–11: Ch 2, dc in each st across. Turn.
Change to red yarn.
Rows 12–14: Ch 2, dc in each st across. Turn.
Change to white yarn.
Rows 15–17: Ch 2, dc in each st across. Turn.
Change to red yarn.
Rows 18–20: Ch 2, dc in each st across. Turn.
Change to white yarn.
Rows 21–23: Ch 2, dc in each st across. Turn.
Change to red yarn.
Rows 24–26: Ch 2, dc in each st across. Turn.
Change to white yarn.
Rows 27–31: Ch 2, dc in each st across. Turn.
Fasten off and weave in ends.
Back Panel
Make a second panel exactly the same as the front panel.
Try to keep your tension even so both panels are the same size.
Joining the Tote Bag
Place the front and back panels together with the right sides facing out.
Using navy blue or white yarn, join yarn at one top side corner.
Single crochet down the side, across the bottom, and up the other side.
Do not crochet across the top opening.
Fasten off and weave in ends.
For extra strength, you can work a second round of single crochet along the joined edges.
Top Edge Border
Join white yarn at the top opening of the bag.
Round 1: Sc evenly around the top edge. Join with a sl st to the first sc.
Round 2: Ch 1, sc in each st around. Join with a sl st.
Fasten off and weave in ends.
This helps make the top opening cleaner and stronger.
Crochet Handles
Handle Option 1: Separate Handles
Make 2 handles.
Ch 70–80, depending on how long you want the handle.
Row 1: Sc in the 2nd ch from the hook and in each ch across. Turn.
Rows 2–5: Ch 1, sc in each st across. Turn.
Fasten off, leaving a long tail for sewing.
Sew one handle to the front of the bag and one handle to the back. Make sure both handles are placed evenly from the side edges.
For a stronger hold, sew each handle end in a square shape and then stitch an “X” through the square.
Handle Option 2: Worked Directly Onto the Bag
Mark two handle spaces on the front side of the bag.
Join yarn at the first marker.
Sc across to the second marker.
Ch 45–55 for the handle opening.
Skip the center stitches between the markers and rejoin with sc at the next marker.
Continue sc around the top edge and repeat the same handle placement on the back side.
Work 2–3 more rounds of sc around the top and handles to make them sturdy.
Other Variations to Try
Beach Crochet Tote
Use ocean-inspired shades like aqua, cream, sky blue, and sand. This version would look perfect for summer beach trips.
Market Bag Version
Use neutral colors like beige, white, and brown. Make the handles slightly shorter for carrying groceries or fresh flowers.
Vintage Patriotic Tote
Use cream instead of bright white and choose a deeper burgundy red with dark navy blue.
Everyday Striped Tote
Try black and white stripes, pink and cream stripes, or sage green and ivory for a soft everyday bag.
Kids Tote Bag
Use a smaller starting chain and fewer rows. Add shorter handles so the bag is easier for a child to carry.
Yarn Project Bag
Make the tote a little wider and add extra height so it can hold yarn skeins, hooks, and a small crochet project.
Customization Tips
Add a fabric lining if you want the bag to hold smaller items.
Sew in a magnetic snap for a simple closure.
Add a small crochet star applique for a patriotic detail.
Use thicker yarn for a chunkier tote.
Add tassels or fringe for a boho summer look.
Use a smaller hook if you want a tighter, sturdier fabric.
Care Instructions
Hand wash the crochet tote gently in cool water.
Use mild soap or gentle detergent.
Do not wring the bag harshly, especially around the handles.
Press out extra water with a towel.
Lay flat to dry and shape the bag while damp.
Avoid hanging the bag while wet because the weight of the water can stretch the handles.
If the bag is made with cotton yarn, reshape it carefully after washing.
Store flat or lightly folded when not in use.
Frequently Asked Questions
Is this crochet tote bag beginner-friendly?
Yes. This pattern uses basic crochet stitches and simple rows, making it a good beginner-friendly tote bag project.
What yarn is best for a crochet tote bag?
Cotton yarn or cotton-blend yarn is best because it gives the bag more structure and strength. Acrylic yarn can work too, but it may stretch more over time.
Can I make this tote bag bigger?
Yes. Add more chains at the beginning to make the panels wider, or add more rows to make the bag taller.
Can I make this tote bag smaller?
Yes. Use fewer starting chains and fewer rows. You can also make the handles shorter for a smaller bag.
Do I need to line the bag?
A lining is optional. If you plan to carry small items like keys, lip balm, coins, or makeup, a fabric lining can be helpful.
How do I make the handles stronger?
Use single crochet for the handles and sew them securely to the bag. You can also work extra rows around the handle or sew the handles with strong thread.
Can I use this bag as a beach bag?
Yes, but avoid overloading it with heavy items. Cotton yarn is best if you want to use it as a beach or poolside bag.
Can I sell finished bags made from this pattern?
Yes, you can sell finished handmade bags made from this pattern. Please do not copy or resell the written pattern itself.
Final Thoughts
This Patriotic Striped Crochet Tote Bag Pattern is a fun and useful project for summer. The navy base gives the bag a bold finish, while the red and white stripes create a classic handmade patriotic look.
Use it for 4th of July celebrations, beach days, picnics, market trips, or as a cheerful everyday crochet tote. Once you make one, you can easily change the colors and create a whole collection of handmade striped bags.