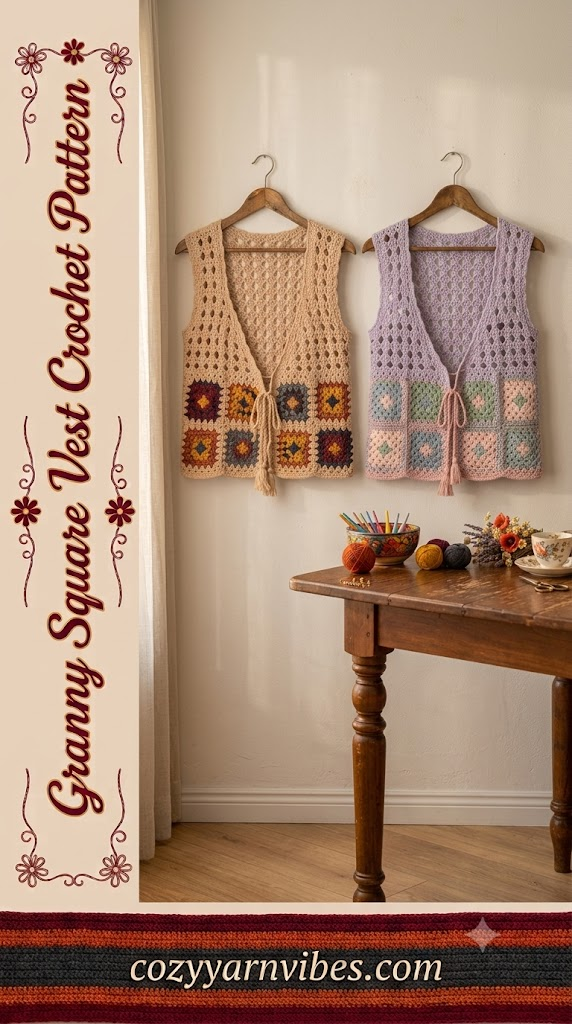
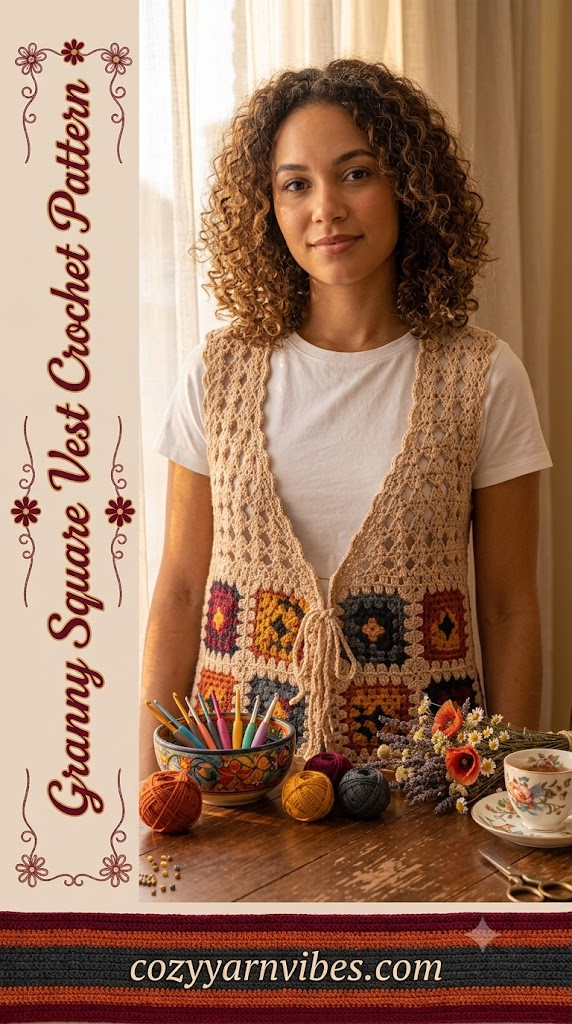
Are you searching for an easy Granny Square Vest Crochet Pattern that can be done without having much knowledge of crochet techniques? This lovely crochet vest will surely appeal to all those beginners who have some experience in making basic stitches. This vest can be crocheted using the technique of crocheting squares and then joining them to form a nice-looking vest.
Due to its airy design, this vest can be worn in spring, summer, and even in early autumn. It can be worn over T-shirt, tank top, dress, or blouse. What I like the most about this vest is that you can customize it in terms of color, size, and length.
Easy Granny Square Vest Crochet Pattern
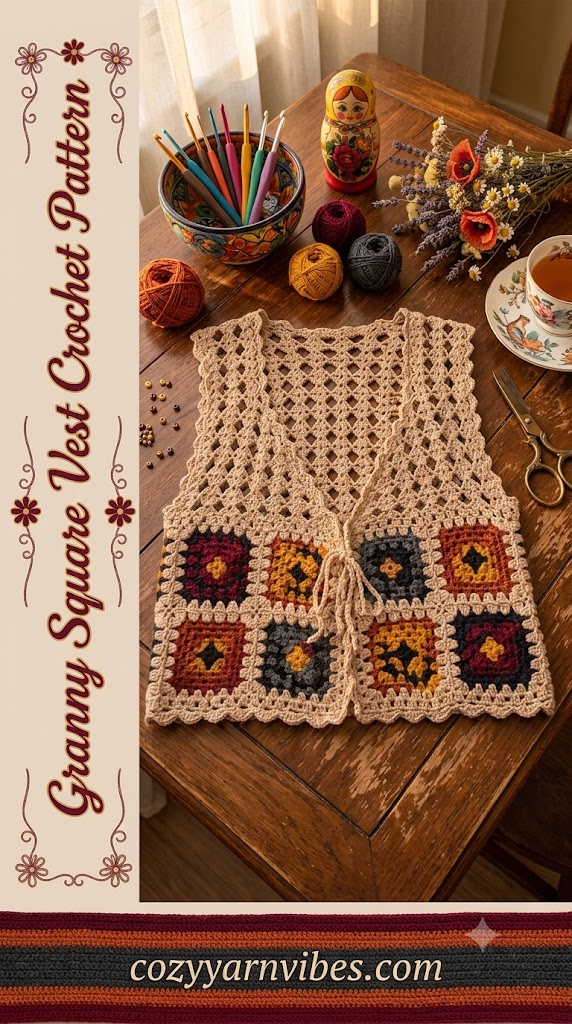
The Granny Square Vest Crochet Pattern is done through joining several granny squares in order to make up the body of the vest. In this pattern, you do not crochet the entire vest but rather crochet each square individually and then join them after. After the squares have been joined to create the vest, there is a simple border that is done around the armholes, neckline, and front of the vest. The last step is crocheting ties in front.
The entire process is interesting, relaxing, and a great way of using leftover yarns in various colors.
Why You’ll Love This Pattern
- Beginner-friendly project
- Uses simple crochet stitches
- Easy to adjust for any size
- Great for using leftover yarn
- Lightweight and comfortable
- Perfect for layering
- Quick to make
- Beautiful handmade look
Skill Level
Beginner
If you know how to make chains, single crochet, double crochet, and slip stitches, you can easily complete this Granny Square Vest Crochet Pattern.
Finished Size
Approximately:
Width: 18–20 inches
Length: 20 inches
You can easily make the vest wider or longer by adding more granny squares.
Materials Needed
Yarn
- Worsted Weight Cotton Yarn (#4)
- Approximately 450–600 yards
Cotton yarn is recommended because it is soft, breathable, and keeps the vest in shape.
Color
The sample vest uses:
- Cream
- Rust
- Mustard
- Navy Blue
- Burgundy
You can use any colors you like.
Additional Supplies
- 5 mm Crochet Hook
- Yarn Needle
- Stitch Markers
- Scissors
- Measuring Tape

MISUMOR Crochet Kit for Beginners -2 PCS Jellyfish Animals Starter Crochet Accessories with Crochet Hook Step-by-Step Instructions and Video Tutorials
(as of September 14, 2026 19:32 GMT +00:00 – More infoProduct prices and availability are accurate as of the date/time indicated and are subject to change. Any price and availability information displayed on [relevant Amazon Site(s), as applicable] at the time of purchase will apply to the purchase of this product.)
Halloween Ghost Crochet Kit for Beginners, DIY Amigurumi Craft Kit | Beginner-friendly Halloween DIY kit with 100% cotton yarn, tools, filling and step-by-step instructions. Ages 12+.
$19.99 (as of September 14, 2026 19:32 GMT +00:00 – More infoProduct prices and availability are accurate as of the date/time indicated and are subject to change. Any price and availability information displayed on [relevant Amazon Site(s), as applicable] at the time of purchase will apply to the purchase of this product.)
Fortuning’s JDS Crochet Kit for Beginners, 3 PCS Dinosaur Cat Crochet Kits | w/ Step-by-Step Video Tutorials, Beginner Crochet Kit for Adults, Crochet Animal Kit for Starters, Dinosaur Cat Crochet Set
$16.99 (as of September 14, 2026 19:32 GMT +00:00 – More infoProduct prices and availability are accurate as of the date/time indicated and are subject to change. Any price and availability information displayed on [relevant Amazon Site(s), as applicable] at the time of purchase will apply to the purchase of this product.)
kgxulr Crochet Kit, Sunflower Crochet Kit for Beginners, Knitting Kit | Beginner Crochet Kit, Crochet Flower Kit, Sunflower Crochet Kit, Beginner Crochet Kit for Adults
$9.99 (as of September 14, 2026 19:32 GMT +00:00 – More infoProduct prices and availability are accurate as of the date/time indicated and are subject to change. Any price and availability information displayed on [relevant Amazon Site(s), as applicable] at the time of purchase will apply to the purchase of this product.)Stitches & Abbreviations (US Terms)
ch = chain
asl st = slip stitch
sc = single crochet
dc = double crochet
sp = space
st = stitch
rep = repeat
How to Make These Stitches
Chain (ch)
Yarn over and pull the yarn through the loop on your hook. Repeat until you reach the required number of chains.
Slip Stitch (sl st)
Insert your hook into the stitch, yarn over, and pull the yarn through both the stitch and the loop already on your hook.
Single Crochet (sc)
Insert the hook into the stitch, yarn over, pull up a loop, yarn over again, and pull through both loops.
Double Crochet (dc)
Yarn over, insert the hook into the stitch, pull up a loop, yarn over and pull through two loops, then yarn over again and pull through the remaining two loops.
Granny Cluster
A granny cluster is made by working 3 double crochet stitches into the same chain space. These clusters create the classic granny square design.
Granny Square Vest Crochet Pattern Notes
The vest is made by making separate granny squares first. Once all the squares have been made, they are then sewn together to form the front and back pieces of the vest.
Try to maintain an even tension in your crocheting to make sure that each square is the same size. Squares should be blocked before sewing them to ensure that the final result is nice and that the task is easy.
The size of the vest depends on the number of squares and the size of each square. It’s easy to increase the size of the vest by just adding more squares.
The front of the vest is open and finished off with a crochet border and ties.
Granny Square Vest Crochet Pattern
This Granny Square Vest Crochet Pattern will be made in 3 different panels. There are 2 panels for the front, while there’s 1 panel for the back. Let’s start making the 3 panels and attach them together to make a beautiful crochet vest.
Step 1: Making The Granny Squares
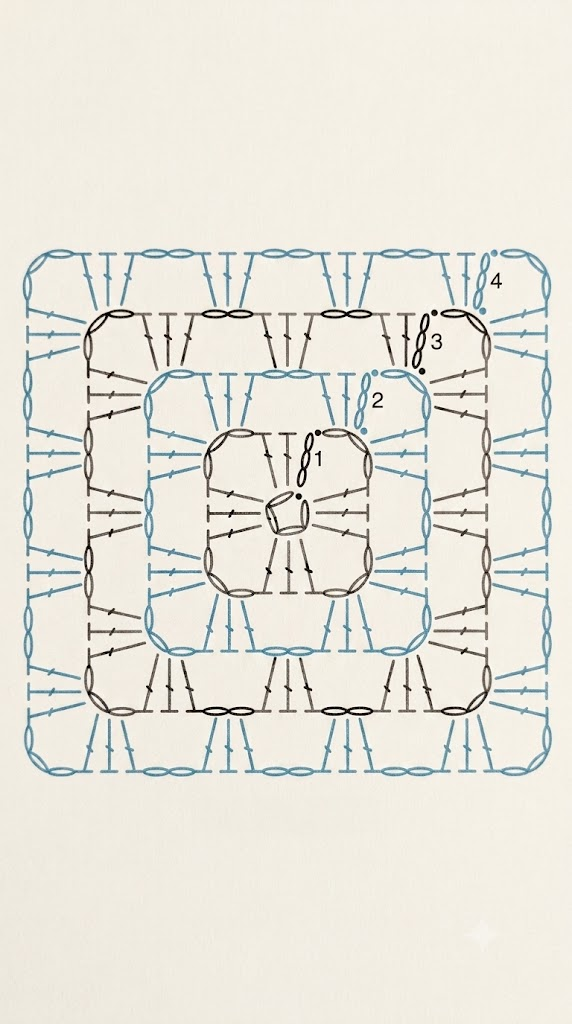
In the first step, we will make 16 granny squares if you are making the vest exactly similar to the image provided. However, you can alter the number of granny squares based on your preferences.
A granny square is always started at the core. Make a magic ring (or chain 4 and join with a slip stitch to form a ring). From this ring forward, you need to make a ch 3.
In the first row, you will make chain 3 (counts as the first dc), work 2 dc into the ring, chain 2. Then 3 dc, and ch 3 at the corner. Repeat this pattern three more times. Join with a slip stitch to the top of the beginning chain.
Repeat this pattern 4-5 times all around the core till you get a perfect granny square.
Make a total of 16 granny squares using the same pattern.
Step 2: Making The Front Left Panel
Making the Foundation
Let’s start by making the 1st panel of the front part. Start by making a ch 20-30, depending on the width of your waist. Remember that this is only half of the waist, so measure it accordingly. Then make 2-3 rows of single crochet (sc) to give the vest a sturdy look at the bottom. Make a ch 3 at the end for the next row.
Arrange Granny Squares
Now arrange the 4 granny squares as shown in the picture and join them edge to edge using slip stitches or your preferred joining method. Once all the squares are joined, you will have the lower section of the left front panel.
Crochet the Upper Part
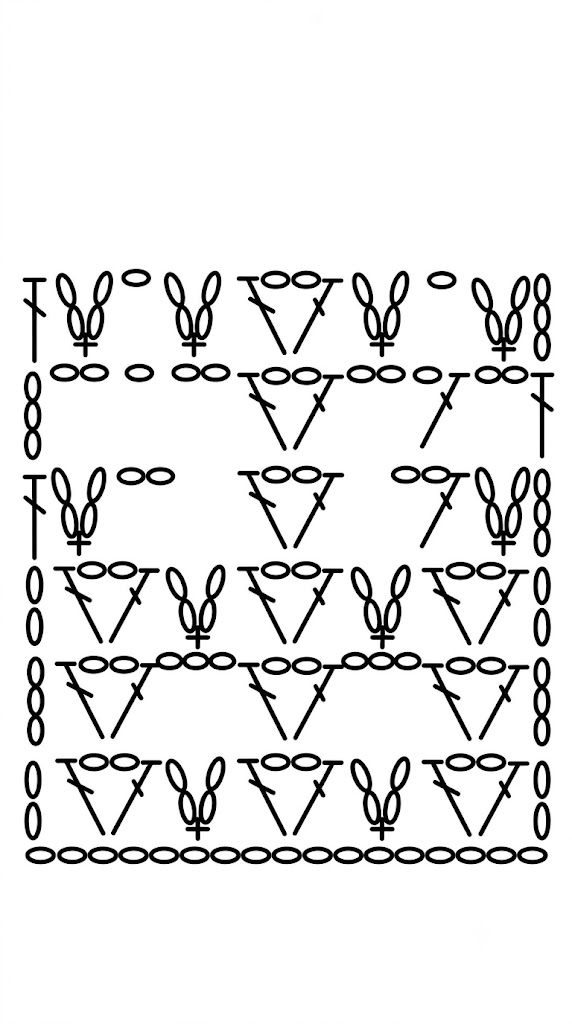
For the upper part, start making a row of single crochet to give a base.
Row 1:
Then, turn your work. Ch 3 (counts as the first dc throughout). Skip the next 2 stitches, then work 1 V-stitch (dc, ch 2, dc) into the following stitch. Skip the next 2 stitches, ch 2, then work 1 sc into the next stitch. Ch 2, skip the next 2 stitches, then work 1 V-stitch into the following stitch.
Continue repeating this sequence across the row:
Skip 2 sts, ch 2, sc in the next st, ch 2, skip 2 sts, V-st in the next st.
Repeat until you reach the end of the row.
Row 2:
Turn your work. Ch 3 (counts as the first dc). Work 1 V-stitch (dc, ch 2, dc) into the ch-2 space of the first V-stitch from the previous row. Ch 3, then work 1 V-stitch into the ch-2 space of the next V-stitch.
Continue repeating this sequence across the row, placing each V-stitch into the ch-2 space of the V-stitch directly below, with ch 3 between each V-stitch.
Repeat across the row until all V-stitches have been worked. Finish the row by working the final edge stitch as shown in the stitch chart.
Repeat rows 1 and 2 till you reach your desired height of the vest as shown in the chart. But keep in mind that you have to make space for armholes and neckline.
Making the Neckline and Armholes
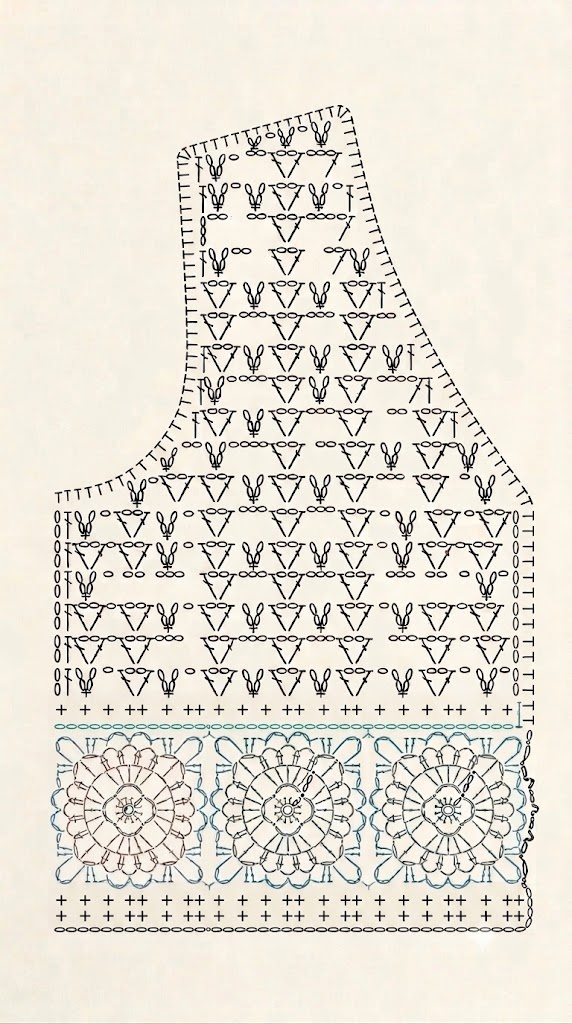
Continue repeating the established stitch pattern until the panel reaches the point where the armhole shaping should begin.
Armhole Shaping
To shape the armhole, continue working the pattern as established while leaving one pattern repeat (one V-st section) unworked at the armhole edge. Turn your work and continue crocheting only over the remaining stitches.
For each following row, begin and end the row according to the established stitch pattern, leaving the required stitches unworked at the armhole edge to create a gradual slant, as shown in the stitch diagram. Continue shaping until the desired armhole depth is reached.
Once the armhole is fully shaped, work even without further shaping until you reach the neckline.
Neckline Shaping
When the panel reaches the desired neckline depth, begin shaping the neckline by leaving the required number of pattern repeats unworked along the front edge. Continue crocheting only across the remaining stitches to form the shoulder.
To maintain the stitch pattern, complete each row only over the shoulder stitches, turning your work at the end of every row. Continue leaving additional pattern repeats unworked at the neckline edge as needed to create the gentle curve shown in the diagram.
Continue until the shoulder reaches the required height.
Finishing the Edges
After both front panels have been completed, work 2-3 rows of single crochet (sc) evenly around each neckline edge and armhole opening. Place one sc into each stitch and work additional stitches evenly around row ends to create a smooth, neat finish.
Step 3: Making The Front Right Panel
Make the right side front panel using the exact same steps as provided in the Step 2 and as given in the crochet pattern chart.
Step 4: Making the Back Panel
The back will be made in 1 panel so instead of using just 4 squares, you need to use all the remaining 8 granny squares, stitch them together and continue all the steps provided above by using the chart pattern. In this way, you will have all the 3 panels ready to join.
Step 5: Joining The Panels
Once the left front panel, right front panel, and back panel are complete, place them with the right sides facing each other.
First, join the shoulders of the front and back panels using a slip stitch or by sewing them together with a yarn needle. Next, join the side seams, leaving the armhole openings unjoined. Fasten off and weave in any loose ends.
Step 5: Making the Front Tie
To join the two front panels, make a single crochet (sc) ribbon.
Attach the yarn to one front panel and chain until the ribbon reaches the desired length. Turn and work 1 single crochet (sc) into each chain across. Repeat this process for 2–3 rows, or until the ribbon reaches your preferred width.
Fasten the ribbon securely to both front panels as shown in the image. This tie holds the vest together while adding a simple decorative finish.
Step 6: Finishing the Edges
Attach the yarn to the neckline and work 2 rows of single crochet (sc) evenly around the neckline. Repeat the same 2 sc rows around both armholes and along the front opening. This gives the vest a neat finish and helps the edges keep their shape.
Other Variations to Try
You can easily customize this vest to match your personal style. Try using solid-colored granny squares for a simple and modern look, or make each square in a different color to create a bright patchwork design. You can also add extra rows to make the vest longer, crochet a scalloped border around the edges for a decorative finish, or replace the crochet ties with wooden buttons for a unique touch.
Customization Ideas
Cropped Vest
Work fewer rows on the upper section to create a stylish cropped vest.
Long Vest
Add more granny square rows before joining the panels to make a longer vest.
Neutral Color Vest
Use cream, beige, gray, or brown yarn for a classic and timeless design.
Colorful Vest
Mix bright or pastel colors to create a fun and eye-catching handmade vest.
Button-Up Vest
Replace the crochet ties with buttons to give your vest a different and easy-to-wear finish.
Styling Ideas
This Granny Square Vest Crochet Pattern can be styled in multiple ways. It can be worn over a regular t-shirt with jeans. The vest also goes well with dresses, skirts, and wide pants.
The vest can be paired up with long-sleeved shirts or light sweaters when it gets cold outside. Sneakers or ankle boots can be worn along with it to give a stylish appearance. A necklace, tote, or hat will complement your handmade outfit.
This granny square vest pattern can be used for everyday wearing, outings, vacations, art fairs, and casual meetups.
Care Instructions
In order to keep your vest looking good, you will need to hand wash it with cold or lukewarm water using a gentle detergent. It is not recommended that you use any bleach or other harsh cleaning products on it because the yarn is very sensitive to such substances.
When you finish washing, you should remove the excess water without twisting the material. Simply lay it down flat and allow it to dry.
Do not put it into a dryer and do not expose it to high heat because it could get deformed. Once the vest is dry, fold it up carefully.
Frequently Asked Questions
Is this Granny Square Vest Crochet Pattern suitable for beginners?
Yes. This pattern uses basic stitches like chain, slip stitch, single crochet, and double crochet, making it a great project for beginners.
How many granny squares do I need?
The number of granny squares depends on the size you want to make. Simply add or remove squares to adjust the width and length of the vest.
Can I use acrylic yarn instead of cotton?
Yes, you can. Cotton yarn is more breathable and holds its shape well, while acrylic yarn is softer, warmer, and available in many colors.
Can I make the vest longer?
Yes. Add more rows to each granny square or join extra rows of squares before making the upper section.
Can I make this vest in one color?
Absolutely. You can crochet all the granny squares in one color for a simple and elegant design or use multiple colors for a classic granny square look.
Conclusion
This Granny Square Vest Crochet Pattern is a fun and beginner-friendly project that you can enjoy making at your own pace. Since it is made with simple granny squares, it is easy to customize the size, colors, and length to match your style.
Whether you are making this vest for yourself, as a handmade gift, or to sell at craft fairs or online, it is a timeless crochet project that you can wear in every season. With just a few basic stitches and a little creativity, you can create a beautiful vest that you will enjoy wearing for years to come.
For more interesting crochet patterns, read our Crochet Fan Stitched V-neck top tutorial.