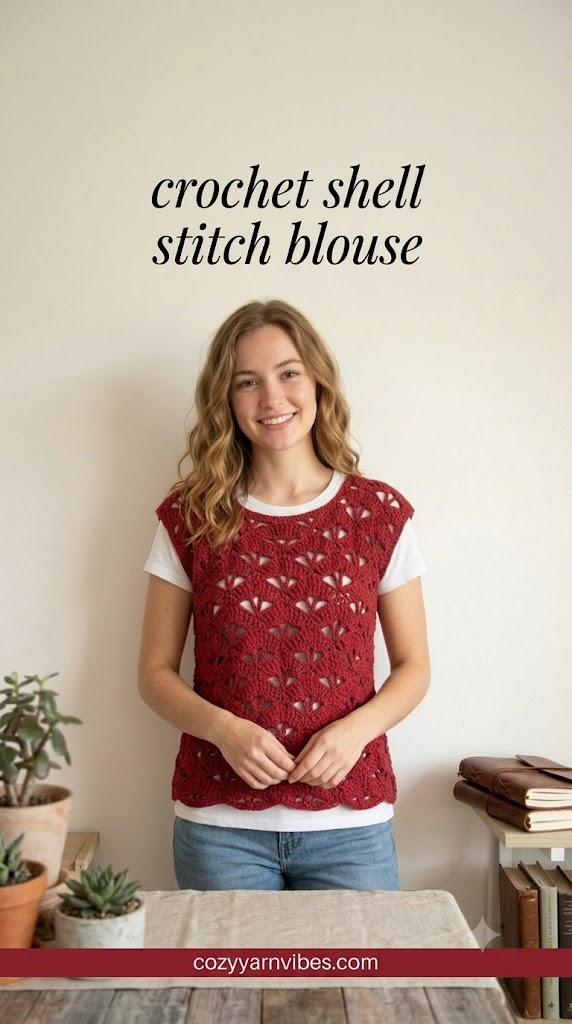
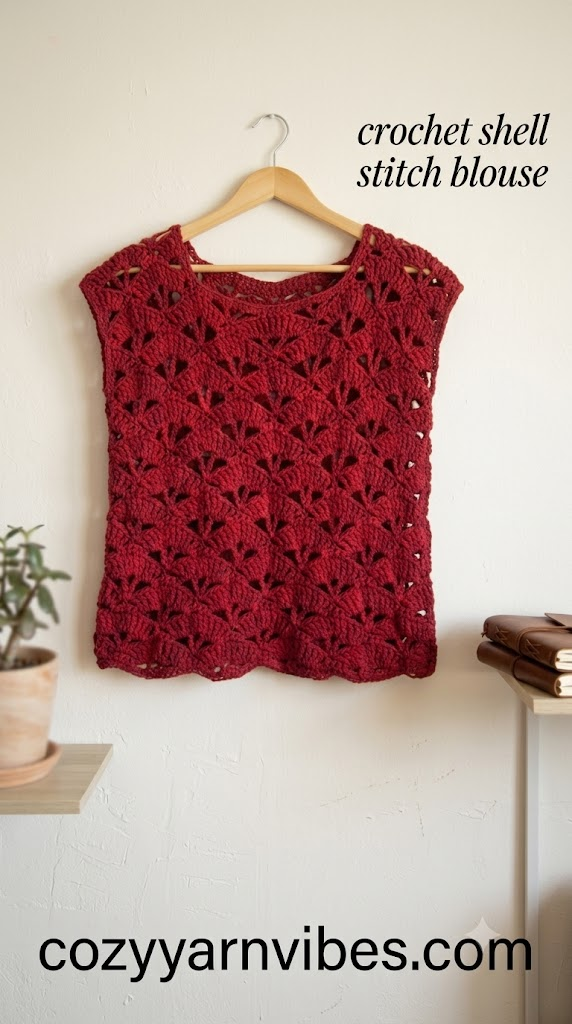
Seeking a simple and easy-to-make Crochet Shell Stitch Blouse Tutorial for your handmade wardrobe? This stunning crochet blouse is ideal for beginners who have already mastered all basic crochet stitches. With a unique and elegant shell stitch, it provides you with a lightweight, breezy, and soft fabric to be worn on warmer days. This handmade blouse is great for styling with jeans, skirts, shorts, or linen pants!
Easy Crochet Shell Stitch Blouse Tutorial
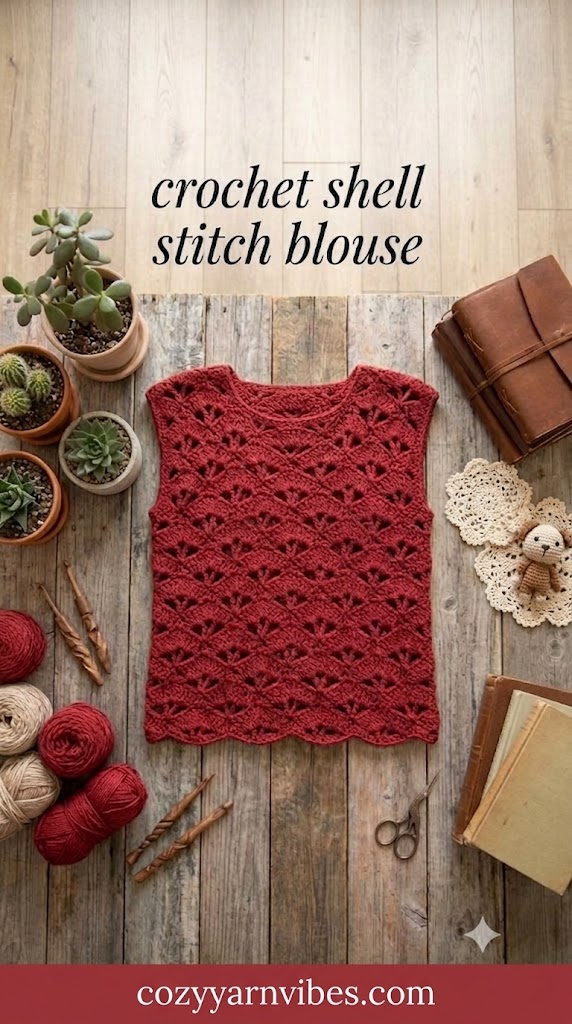
According to the crochet shell stitch blouse tutorial, the blouse is knitted separately in two parts, which will later be sewn together to form the entire garment. The use of the shell stitch adds a touch of delicacy to the garment without sacrificing its lightness and airiness.
The construction of the blouse starts with an easy foundation row followed by a number of shell stitches which will keep growing until the necessary length is achieved. The two parts will then be joined at the shoulders and side seams and the sleeves added.
The final result will be a comfy, light, and breathable garment perfect for daily wear during the hot season.
Why You’ll Love This Pattern
- Beginner-friendly construction
- Beautiful shell stitch texture
- Lightweight and breathable fabric
- Perfect for spring and summer
- Easy to customize for any size
- Comfortable enough for everyday wear
- Works up faster than many lace crochet garments
Skill Level
Beginner to Easy Intermediate
If you already know how to make chain stitches, single crochet, and double crochet, you’ll have no trouble making this Crochet Shell Stitch Blouse.
Finished Size
Approximately:
Width: 18 inches
Length: 21 inches
Sleeve Length: 7 inches
The blouse can easily be made longer, shorter, wider, or more fitted by adjusting your foundation chain and adding or removing rows.
Materials Needed
Yarn
• Worsted Weight Cotton Yarn (#4)
• Approximately 500–600 yards
Cotton yarn is recommended because it is breathable, holds its shape well, and creates beautiful stitch definition for shell stitch crochet patterns.
Color
• Light Beige (or any color of your choice)
Additional Supplies
5 mm (H) Crochet Hook
Stitch Markers
Yarn Needle
Scissors
Measuring Tape
Aeelike Crochet Kit for Beginners- Ideal DIY Craft Gift for Women, Pink | Crochet Starter Kits with Yarn, Ergonomic Hooks & Storage Case, Learn-to-Crochet Set for Adults, Kids & Seniors
$15.29 (as of September 15, 2026 19:39 GMT +00:00 – More infoProduct prices and availability are accurate as of the date/time indicated and are subject to change. Any price and availability information displayed on [relevant Amazon Site(s), as applicable] at the time of purchase will apply to the purchase of this product.)
Wimmsie Crochet Animal Kit for Beginners – Easy Beginner Crochet Kit for Kids – Amigurumi Chicken Chick & Egg – 3 Kawaii Stuffed Animals – Cute DIY Yarn Plush
$20.99 (as of September 15, 2026 19:39 GMT +00:00 – More infoProduct prices and availability are accurate as of the date/time indicated and are subject to change. Any price and availability information displayed on [relevant Amazon Site(s), as applicable] at the time of purchase will apply to the purchase of this product.)
CODGP Crochet Kit for Beginners, 13-Inch Elephant Crochet Kit for Adults | Crochet Starter Kit Gift, Animal Amigurumi Kit, Durable Chenille Yarn, Full Supplies, Step-by-Step Videos, for Crochet Lovers
$26.98 (as of September 15, 2026 19:39 GMT +00:00 – More infoProduct prices and availability are accurate as of the date/time indicated and are subject to change. Any price and availability information displayed on [relevant Amazon Site(s), as applicable] at the time of purchase will apply to the purchase of this product.)
INSCRAFT 113 Piece Crochet Kit with Yarn Set– 1600 Yards Assorted Yarn for Knitting and Crochet, 73PCS Crochet Accessories Set Including Ergonomic Hooks, Knitting Needles & More Ideal Beginner Kit
$31.99 (as of September 15, 2026 19:39 GMT +00:00 – More infoProduct prices and availability are accurate as of the date/time indicated and are subject to change. Any price and availability information displayed on [relevant Amazon Site(s), as applicable] at the time of purchase will apply to the purchase of this product.)Stitches & Abbreviations (US Terms)
ch = chain
sc = single crochet
dc = double crochet
sl st = slip stitch
sp = space
st = stitch
rep = repeat
How to Make These Stitches
Chain (ch)
Make an overcast stitch over your yarn and pull the yarn through the existing loop on the hook. Repeat this process till you get to the required number of chains. Chain stitch forms the base for the blouse.
Single Crochet (sc)
Insert your hook into the stitch, make an overcast stitch, pull up a loop, make an overcast stitch again and draw the loop through the two loops on the hook. It forms an even and sturdy fabric.
Double Crochet (dc)
Make an overcast stitch, insert the hook in the stitch, pull up a loop, make an overcast stitch again, pull through two loops, then make another overcast stitch and pull through the last two loops.
Shell Stitch
Shell stitch involves doing double crochet stitches within the same stitch or chain space. It creates a fan-like pattern that gives the blouse a decorative touch.
Pattern Notes for Crochet Shell Stitch Blouse Tutorial
This blouse is knit from bottom up in two panels which are sewn together after completion of both panels.
It is essential that you maintain an even stitch count on both panels, so that they are of the same size. Placing markers at the beginning of each row helps in achieving neatness.
Lining material can be inserted in the front and back panels separately before sewing the two panels together. Sewing is done at the shoulder and sides after the addition of lining material.
After sewing, neck, sleeve, and bottom edgings are added to the finished piece.
Crochet Shell Stitch Blouse Tutorial: Step-by-Step
By using this Crochet Shell Stitch Blouse Tutorial, you can make this blouse very easily in no time. You need to prepare 2 panels and then join them at the end. So let’s get started.
Making The Front Panel Base
We will start by making the front panel. For the front panel, you need to make ch 40-50 depending on the needed width. For this purpose, it’s better to measure your waist before starting. This first chain will decide the width of your blouse so you can alter it accordingly.
After the ch 40, make 2 rows of single crochet. These 2 sc rows will give your blouse a sturdy and strong base.
Now let’s start the main shell pattern of the blouse.
Making The Front Panel Shell Pattern
Crocheting Row 1:
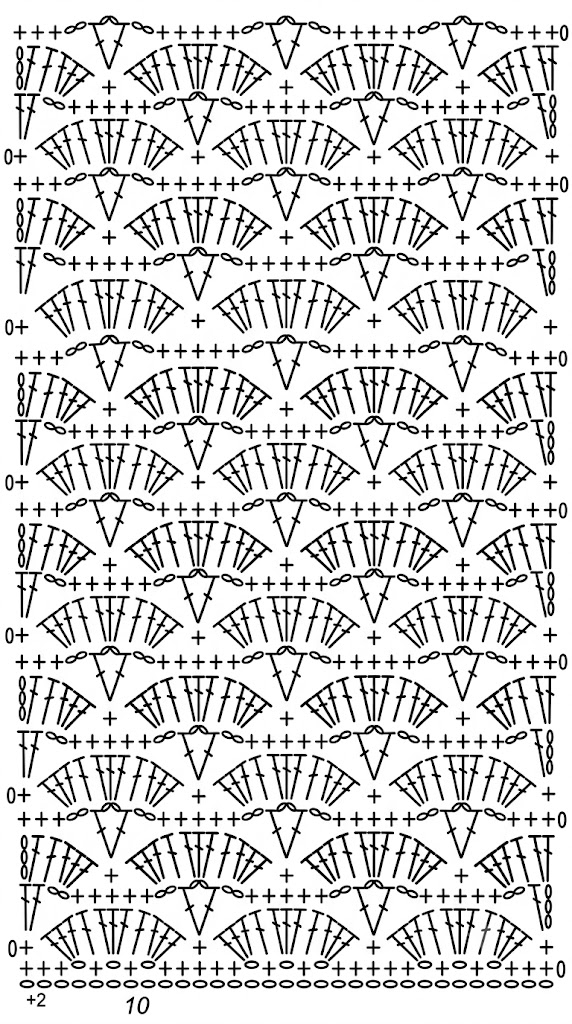
Work 3 single crochets (sc) into each of the first 3 chain stitches. Then chain 1, skip 1 stitch, work 1 sc in the next stitch, chain 1, skip 1 stitch, work 1 sc in the next stitch, chain 1, and skip 1 stitch. Next, work 5 sc in the next 5 stitches. Repeat this sequence across the row as shown in chart. Once you reach the end, chain 1 and turn your work to begin the next row.
Row 2 Making:
Begin by making a ch 1 and turning your work. Work 1 single crochet (sc) into the first single crochet (sc) from the previous row. Then, skip 2 stitches, then into the chain space, work 3 dc to create the first half of the shell. Work 1 dc into the next sc, then 3 dc into the following chain space. Again, work 1 dc into the next sc and at last work 3 dc into the following chain space. This will complete your shell pattern.
Then, work 1 sc into the center sc from the previous row. Work according to the chart provided above and skip 2 sc stitches from each side. Then repeat the pattern across the row: 3 dc in the chain space, 1 dc in the next sc, 3 dc in the next chain space, 1 dc in the next sc, 3 dc in the next chain space, 1 sc in the center sc. Continue repeating this sequence until you reach the end of the row as shown in the pattern chart. Finish with chain 3 and turn to begin the next row.
Crocheting Row 3:
Begin with the turning chain (ch 3), which counts as the first double crochet (dc). Work 1 dc into the first single crochet (sc) from the previous row. Chain 2, skip 3 stitches, then work 1 sc in each of the next 5 dc stitches across the shell. Now again Chain 2, skip 3 stitches, then create a V-stitch by working 1 dc, ch 2, and 1 dc into the center sc from the previous row. Further, Chain 2, skip 3 stitches, work 1 sc in each of the next 5 dc stitches, then chain 2, skip 3 stitches again. Repeat this sequence across the row until you reach the end according to the chart. Finish with ch 3 and turn to begin the next row.
The V-stitch (1 dc, ch 2, 1 dc) creates the open spaces between the shells, while the 5 sc worked across each shell help shape the next row of the pattern. Together, these stitches create the airy, repeating shell design shown in the chart.
Making Row 4:
Begin with the turning chain (ch 3), which counts as the first double crochet (dc). Work 2 dc into the first chain-2 space, then 1 dc into the next dc, followed by 3 dc into the chain-2 space. Then, work 1 sc into the center sc from the previous row (according to the chart, you need to skip 2 stitches each before and after the sc).
Work 3 dc into the next chain-2 space. Then, work 1 dc in the next dc stitch, 3 dcs in the next ch 2 stitch, and at last work another dc in the last dc of the V-stitch. This completes the 11-dc shell. Then work 1 sc into the center sc from the previous row. Repeat this sequence across the row. Finish with ch 3 and turn to continue the pattern.
Repeat this pattern as shown in the chart again till the row is complete.
Next Rows:
Next rows will be made by following the exact same pattern explained in rows 2, 3, and 4. Repeat this pattern till you reach the desired length of your shirt.
Making the Neckline
Shaping the Neckline
Continue repeating Rows 2 to 4 until the blouse reaches the desired length. To create the neckline, leave 2 to 3 shell motifs (11-dc shells) unworked in the center of the front panel. Continue following the same stitch pattern on both sides to form the two shoulders. Adjust the number of skipped shells if you want a wider or narrower neckline.
Finishing the Neckline
Attach the yarn to the neckline and work 2 rows of single crochet (sc) evenly around the edge. Repeat the same 2 sc rows around the armholes. This gives the neckline and armholes a neat, clean finish while helping them keep their shape.
Making the Back Panel
The back panel will be made by following the exact same Steps 1, 2, and 3. Take a look at the chart given above; it will help a lot in making the best patterns.
Joining the Front and Back Panels
Once both the front and back panels are complete, place them together with the right sides facing outward. Make sure the shell stitches on both panels line up evenly before joining.
Start by joining the shoulders. Use a yarn needle with the same yarn or a slip stitch seam to sew both shoulder edges together. Leave enough space in the center for the neckline.
Next, join the side seams of the blouse. Begin sewing from the bottom edge and continue upward. Stop sewing once you reach the point where you want the armhole to begin. Leave the upper side edges open to create comfortable arm openings for the sleeves.
Repeat the same process on the opposite side, making sure both armholes are the same size.
After both side seams have been joined, weave in all loose yarn ends neatly using a yarn needle. Turn the blouse right side out and check that all seams are secure and even.
Your Crochet Shell Stitch Blouse is now fully assembled and ready for the finishing details, such as adding a border, straps, or sleeves if desired.
Other Variations to Try
- Add scalloping to the sleeves and hemline of the blouse to achieve a gentle and feminine touch.
- Use several yarn colors to make stripes of shell stitches for a fun and colorful effect.
- Extend the blouse design by adding extra rows of shell stitches to make it a tunic.
- Exchange the shoulder straps for wider straps or short flutter sleeves to change the look of the blouse.
- Make the blouse oversized by making both panels wider.
Customization Ideas
Solid Color Blouse
Crochet the entire blouse using one solid yarn color for a timeless, elegant design that pairs easily with any outfit.
Striped Shell Stitch Blouse
Alternate between two or three yarn colors every few rows to create a colorful handmade blouse with a unique appearance.
Longer Crochet Tunic
Continue adding shell stitch rows before finishing the body to transform your blouse into a stylish tunic.
Different Strap Styles
Customize the blouse with thin spaghetti straps, wide shoulder straps, tie-up straps, or even cap sleeves depending on your preference.
Oversized Summer Blouse
Increase the width of both panels and crochet additional rows to create a relaxed oversized blouse that’s perfect for warm weather.
Styling Ideas
The Crochet Shell Stitch Blouse can be matched with different types of outfits both casual and elegant. For an easy-going look, team up the blouse with high-waist jeans or shorts made of denim. To create a classy outfit, you can combine it with a maxi skirt, linen pants, or wide-legged pants.
In the hot season, complete the outfit with some comfy sandals, a woven purse, and a hat made of straw. In order to make an extra cover for the upper body, you can put on a camisole or a tank top under the blouse.
No matter where you go, be it a restaurant, a shop, a picnic, or just hanging out with your friends at the beach, the Crochet Shell Stitch Blouse will look great.
Care Instructions
Hand wash your crochet blouse in cold or warm water using a gentle detergent. Bleaching agents should not be used since they will weaken the fiber and also reduce the stitches.
After washing, squeeze any extra water from the blouse without twisting the fabric. Dry the blouse flat on a clean towel in order to retain its shape.
The blouse should not be put in the dryer because it will change the yarn. The blouse should then be folded properly and kept in a cool dry place in order to preserve its shell stitch design.
Frequently Asked Questions
Is this blouse suitable for beginners?
Yes. This blouse uses basic crochet stitches such as chain, single crochet, double crochet, and the shell stitch. If you are comfortable with these stitches, you can complete this project with ease.
Can I make the blouse longer?
Absolutely. Simply continue repeating the shell stitch pattern until you reach your preferred length. You can easily turn it into a regular blouse or a tunic.
Which yarn works best for this pattern?
Cotton yarn is the best choice because it is breathable, lightweight, and helps the shell stitch pattern stand out beautifully. However, you can also use bamboo or cotton-blend yarn for a soft finish.
Can I customize the size?
Yes. You can adjust the size by changing the foundation chain, adding or removing rows, and making both panels wider or narrower until you achieve your desired fit.
Can I use different colors?
Of course. You can crochet the blouse in a solid color, pastel shades, ombre yarn, or multiple colors to create your own unique handmade design.
Conclusion
The Crochet Shell Stitch Blouse is a wonderful project for anyone who enjoys making stylish handmade clothing. Its elegant shell stitch texture, lightweight fabric, and simple construction make it comfortable to wear throughout spring and summer.
Whether you are making this Crochet Shell Stitch Blouse for yourself, as a thoughtful handmade gift, or to sell at local craft fairs or online, it can easily be customized to suit your personal style. Experiment with different colors, lengths, strap styles, and finishing details to create a blouse that is truly your own.
If you’re looking for a seashell pattern crochet shirt guide, give a read to our Seashell Lace Crochet Bag Tutorial for Beginners.