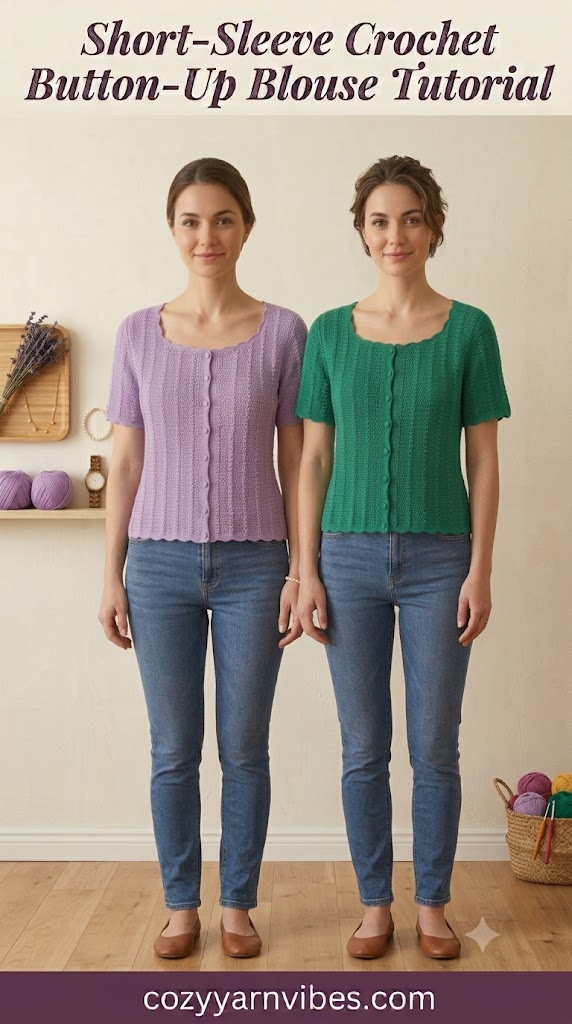
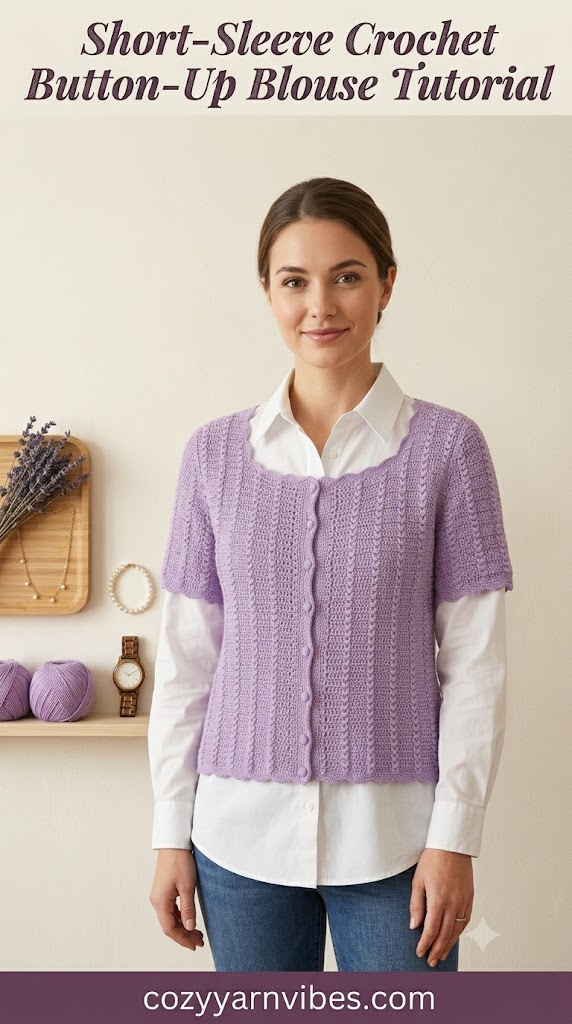
Are you searching for an effortless Short-Sleeve Crochet Button-Up Blouse Tutorial that is both trendy and comfy? Then here’s the right crochet pattern for you! It is made from basic crochet stitches and is easy to make in a few panels, which makes it ideal for experienced beginners. The classic front with buttons, short sleeves, and a comfortable fit make this handmade shirt perfect to combine with jeans, shorts, skirts, or linen pants. You can easily use it either for yourself or for giving as a present or selling.
Easy Short-Sleeve Crochet Button-Up Blouse Tutorial
This is a blouse made by crocheting with short sleeves that start at the bottom and work upwards in separate pieces before sewing them together. The design includes two pieces for the front, one piece for the back and two short sleeves. After all these pieces are put together, the blouse will be finished off with a pretty button band at the front.
This easy design makes this piece an enjoyable craft project for anyone that already knows basic crocheting stitches. As this piece is worked in separate pieces, one can easily modify its length and width as required.
Once done, you will end up with a nice light blouse.
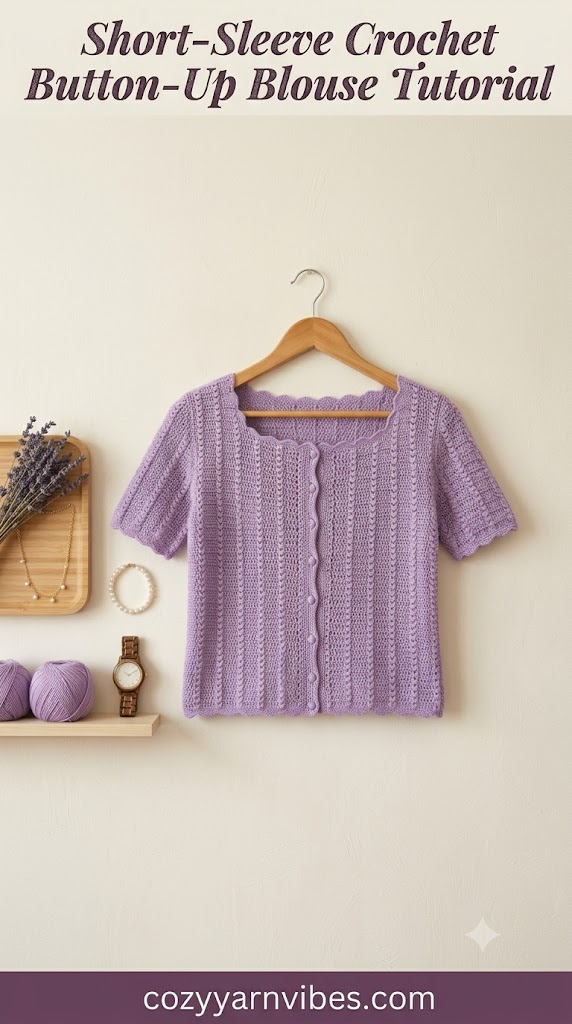
Why You’ll Love This Pattern
– Beginner-friendly construction
– Classic button-up design
– Lightweight and breathable
– Comfortable short sleeves
– Easy to customize for any size
– Perfect for casual everyday wear
– Works up quickly using basic crochet stitches
Skill Level
Beginner to Easy Intermediate
If you’re comfortable making chain stitches, single crochet, double crochet, and simple shaping, you’ll have no difficulty creating this short-sleeve crochet button-up blouse.
Finished Size
Approximately:
Width: 18 inches
Length: 22 inches
Sleeve Length: 7 inches
The blouse can easily be adjusted by changing the foundation chain, adding more rows, or modifying the sleeve length according to your preference.
Materials Needed
Yarn
Worsted Weight Cotton Yarn (#4)
Approximately 550–650 yards
Cotton yarn is highly recommended because it creates a breathable fabric with excellent stitch definition, making it ideal for warm-weather garments.
Color
White, Cream, Beige, Sage Green, or any color of your choice.
Additional Supplies
5 mm (H) Crochet Hook
Stitch Markers
Yarn Needle
Scissors
Measuring Tape
The Woobles Loopables Crochet Kit for Beginners (Pierre the Penguin) | As seen on Shark Tank, No crochet hook needed, fingerloop premade loops: Easy Peasy Loopable Yarn, pre-started piece
$34.95 (as of September 16, 2026 20:11 GMT +00:00 – More infoProduct prices and availability are accurate as of the date/time indicated and are subject to change. Any price and availability information displayed on [relevant Amazon Site(s), as applicable] at the time of purchase will apply to the purchase of this product.)
Susan’s Family 4Ply Yarn Combo 10×50g/131Yards – Terminator | 60% Cotton 40% Acrylic Yarn for Knitting & Crochet, DIY Scarf & Blanket Pattern & Video Tutorials, Handmade Gift
$18.90 (as of September 16, 2026 20:11 GMT +00:00 – More infoProduct prices and availability are accurate as of the date/time indicated and are subject to change. Any price and availability information displayed on [relevant Amazon Site(s), as applicable] at the time of purchase will apply to the purchase of this product.)
The Woobles Crochet Kit for Beginners – Pierre The Penguin | As seen on Shark Tank, Kit includes: Easy Peasy Yarn, pre-started piece, hook, safety eyes, stuffing, video tutorials, gift
$29.96 (as of September 16, 2026 20:11 GMT +00:00 – More infoProduct prices and availability are accurate as of the date/time indicated and are subject to change. Any price and availability information displayed on [relevant Amazon Site(s), as applicable] at the time of purchase will apply to the purchase of this product.)
CrochetBox Cthulhu Crochet Kit for Beginners, Easy Craft for Adults | 30% Extra Yarn, Pre-Started First Round, Step-by-Step Video, PDF Guide, Printed Instructions, Hook, Safety Eyes, Teen Gift
$15.99 (as of September 16, 2026 20:11 GMT +00:00 – More infoProduct prices and availability are accurate as of the date/time indicated and are subject to change. Any price and availability information displayed on [relevant Amazon Site(s), as applicable] at the time of purchase will apply to the purchase of this product.)Stitches & Abbreviations (US Terms)
ch = chain
sc = single crochet
dc = double crochet
sl st = slip stitch
sp = space
st = stitch
rep = repeat
sk = skip
How to Make These Stitches
Chain (ch)
Begin by making a slip knot and placing it on your hook. Yarn over and pull the yarn through the loop already on the hook. Repeat until you have the required number of chains. The chain forms the foundation of your blouse and determines its width.
Single Crochet (sc)
Insert your hook into the next stitch, yarn over, and pull up a loop. Yarn over again and pull through both loops on the hook. Single crochet creates a sturdy fabric that is perfect for borders, button bands, and the base rows of the blouse.
Double Crochet (dc)
Yarn over and insert the hook into the next stitch. YO and pull up a loop. Then again yarn over and pull through the first two loops, then yarn over once more and pull through the remaining two loops. Double crochet creates a soft, lightweight fabric that gives the blouse a comfortable drape.
Chain Space (ch-sp)
A chain space is the opening created by one or more chain stitches. Many decorative stitches are worked directly into these spaces instead of individual stitches.
Puff Cluster
Each puff cluster is made by working 3 half double crochet stitches together (hdc3tog) into the same stitch.
To make the decorative motif:
- Work hdc3tog
- Ch 1
- Work another hdc3tog into the same stitch
Pattern Notes for Short-Sleeve Crochet Button-Up Blouse
The short-sleeved crocheted button-up blouse is designed with separate pieces made from the bottom to the top. In this project, you need to create two identical front panels, one back panel, and two short sleeves which should be joined later on.
Both front panels are made with an opening for buttons, and the back panel is made in one piece. After completing all the pieces, they are joined together along the shoulder and side seams and the sleeves are added.
The neckline, front opening, sleeve edges, and bottom edge are completed with single crocheted rows.
The button band is crocheted into the front edges of the completed blouse. One of the edges of the front has equally spaced buttonholes, and the other front edge has no holes at all but is solid.
It is always important to check whether the front panels are exactly of the same size. Stitch markers can help keep the edges straight and the count of stitches the same.
Short-Sleeve Crochet Button-Up Blouse: Step-by-Step
Sweater Construction
This sweater is worked as five separate panels and then sewn together.
You will make:
- 2 Front Panels (Left and Right)
- 1 Back Panel
- 2 Sleeves
All panels are crocheted flat using the same main stitch pattern shown in the chart.
Left Front Panel
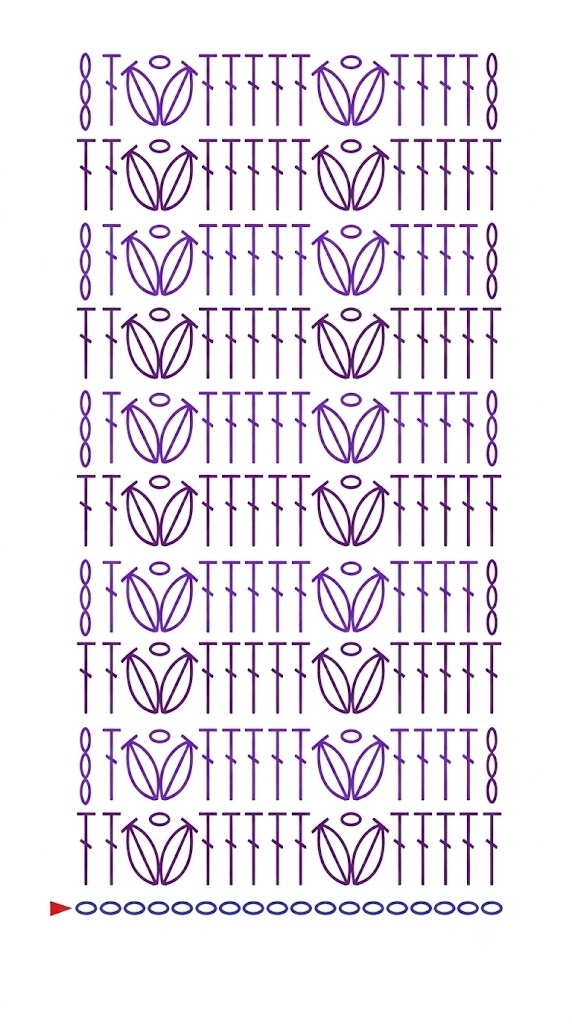
Foundation
Begin with a foundation chain that comfortably fits half of your front width.
The sample uses approximately 20-30 chains, but adjust the chain count according to your desired sweater size. Ensure the stitch repeat is maintained.
Row 1
Ch 3 (counts as the first double crochet throughout).
Work:
- 5 dc in the next 5 stitches
- Skip 1 stitch
- Work (hdc3tog, ch 1, hdc3tog) into the next stitch to create one puff cluster
- Skip 1 stitch
- Work 5 dc
Repeat this sequence across the entire row until only the turning stitches remain.
Turn your work.
Row 2
Ch 3 (counts as the first dc).
Continue following the established stitch pattern.
- Work 5 dc over the previous dc stitches.
- Work each puff cluster into the ch-1 space of the puff cluster from the previous row.
- Continue alternating sections of double crochet and puff clusters across the row.
Turn.
Remaining Rows
Repeat Row 2 until the panel reaches the desired length.
Maintain the stitch pattern exactly as established, keeping the puff clusters aligned vertically with those from previous rows.
Front Button Band
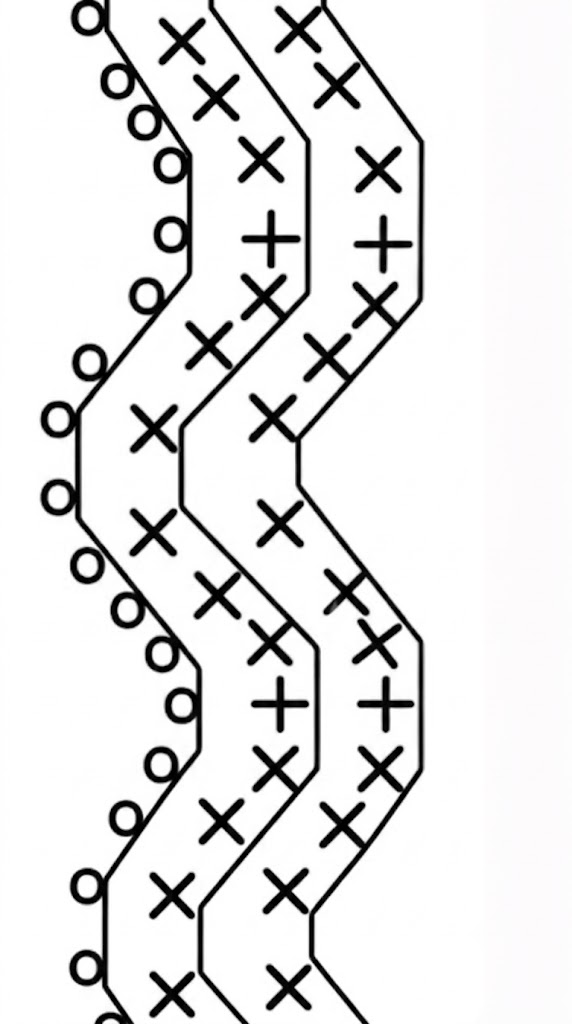
Once the panel is complete, crochet the decorative edging along the inside edge of the panel where the front opening will be.
Working from the bottom upward:
Row 1
Join the yarn at the lower corner.
Work a row of chain stitches evenly along the entire inside edge.
Rows 2-3
Work 2 rows of single crochet into the foundation chain to create the narrow button band.
While working the second row, leave spaced chain openings evenly to form buttonholes. Adjust the spacing according to the size and number of buttons you plan to use.
This edging creates the raised decorative trim visible on the sweater front.
Shaping the Neckline
Continue working the stitch pattern until the panel reaches the beginning of the neckline.
To shape the neckline:
Leave approximately 3-4 stitch pattern repeats (or the desired neckline width) unworked along the inside edge of the panel.
Continue crocheting only the remaining stitches to the shoulder.
Maintain the established stitch pattern while working the shoulder section.
Fasten off.
Right Front Panel
Work the right front panel exactly the same as the left panel.
The only difference is the placement of the neckline.
When the panel reaches neckline height:
- Leave 3-4 stitch pattern repeats unworked along the left inside edge.
- Continue working only the shoulder stitches until the desired height is reached.
Fasten off.
Front Edging
Work the same decorative edging along:
- the inside front opening
- around the neckline opening
Using the same method:
- Foundation chain
- 2 rows of single crochet
This creates the soft scalloped trim around the neckline and front opening shown in the sample sweater.
Back Panel
Work the back panel using the same stitch pattern.
Foundation
Chain the required width for the back.
Repeat the stitch pattern exactly as established for the front panels.
Unlike the front panels, do not shape the neckline.
Continue working straight until the back panel matches the finished height of the front pieces.
Fasten off.
Sleeves (Make 2)
Each sleeve is crocheted as one flat rectangular panel.
Foundation
Chain the desired sleeve width.
Repeat the same stitch pattern used for the body:
- Sections of double crochet
- Puff clusters worked into the ch-1 spaces
Continue until the sleeve reaches the desired length.
Sleeve Edging
At the cuff edge, crochet the same decorative edging used on the front opening.
Work:
- Foundation chain
- 2 rows of single crochet
This creates the neat scalloped finish around each sleeve.
Repeat for the second sleeve.
Joining the Panels
Arrange the pieces in the following order:
- Left Front
- Back
- Right Front
- Two Sleeves
With the right sides facing together:
- Sew each front shoulder to the corresponding back shoulder.
- Attach each sleeve evenly around the armhole opening.
- Sew the side seams from the underarm to the bottom edge.
- Sew the sleeve seams from the cuff to the underarm.
Turn the sweater right side out.
Finishing the Neckline
Using the neckline chart as a guide, work the decorative zigzag edging evenly around the neckline.
The edging is made using:
- Single crochet stitches
- Chain stitches
Repeat the zigzag sequence around the entire neckline to create the soft scalloped finish shown in the sample sweater.
Fasten off and weave in all yarn ends securely.
Buttons
Sew the buttons evenly onto the left front button band, positioning them opposite the buttonholes.
Once all buttons are attached, gently block the sweater to smooth the fabric and define the stitch pattern. The sweater is now ready to wear.
Other Variations to Try
- Add decorative scalloped edges to the sleeves and hemline to add a feminine touch.
- Design the blouse using several colors to make horizontal stripes through crocheting.
- Make the blouse longer to design a light weight cardigan or tunic through crocheting.
- Substitute the regular buttons with wooden, pearl, or coconut shell buttons.
- Insert small patch pockets in the front panel sections.
Customization Ideas
Solid Color Blouse
Crochet the entire blouse using one solid shade for a timeless design that can easily be paired with almost any outfit.
Color Block Design
Use different colors for the sleeves, front panels, and back panel to create a modern color-block effect.
Cropped Version
Reduce the number of body rows to create a fashionable cropped blouse that pairs beautifully with high-waisted jeans or skirts.
Relaxed Oversized Fit
Increase the width of each panel and add extra body rows to create a loose, oversized blouse that is comfortable for everyday wear.
Decorative Borders
Finish the neckline, sleeves, and hem with shell stitches, picot edging, or scalloped borders for a more elegant handmade appearance.
Styling Ideas
This short-sleeve crochet button-up blouse is incredibly versatile and can be styled for many occasions.
Pair it with denim jeans and sneakers for a relaxed everyday outfit.
Wear it with linen trousers or wide-leg pants for a lightweight summer look.
Style it with a flowing maxi skirt and sandals for vacations, brunches, or outdoor gatherings.
Layer it over a camisole or tank top for additional comfort while maintaining the airy crochet design.
Complete your outfit with a woven handbag, simple jewelry, and a sun hat for a timeless handmade style.
Care Instructions
Hand wash your crochet blouse using cool or lukewarm water and a gentle detergent.
Avoid bleach or harsh cleaning products that may weaken the yarn fibers.
Gently press out excess water without twisting the fabric.
Lay the blouse flat on a clean towel and reshape it before allowing it to air dry.
Do not hang the blouse while wet, as this may stretch the fabric.
Store it folded in a cool, dry place to help maintain its shape.
Frequently Asked Questions
Is this blouse beginner-friendly?
Yes. The pattern uses basic crochet stitches and simple panel construction, making it suitable for confident beginners.
Can I make the sleeves longer?
Absolutely. Simply continue repeating the stitch pattern until you reach your preferred sleeve length before adding the finishing border.
Can I adjust the size?
Yes. You can easily customize the width, length, sleeve size, and neckline by adjusting the foundation chain and the total number of rows.
Which yarn works best?
Cotton yarn is recommended because it is breathable, lightweight, and provides excellent stitch definition. Cotton blends and bamboo yarn also work well.
Can I use different buttons?
Of course. Wooden, coconut shell, resin, pearl, or vintage-style buttons can all be used to give your blouse a different appearance.
Conclusion
This Short-Sleeve Crochet Button-Up Blouse is a wonderful project for crocheters who enjoy creating stylish handmade clothing with simple construction. The separate panels, comfortable fit, and classic button-up design make it suitable for beginners while offering plenty of opportunities for customization.
Whether you crochet this short-sleeve crochet button-up blouse for yourself, as a thoughtful handmade gift, or to sell at craft fairs or online, you can easily personalize it by experimenting with different yarn colors, sleeve lengths, decorative borders, and button styles. With just a few adjustments, you’ll have a unique handmade garment that you can enjoy wearing throughout spring and summer.
For more amazing crochet projects, read our blog Crochet Shell Stitch Blouse Tutorial