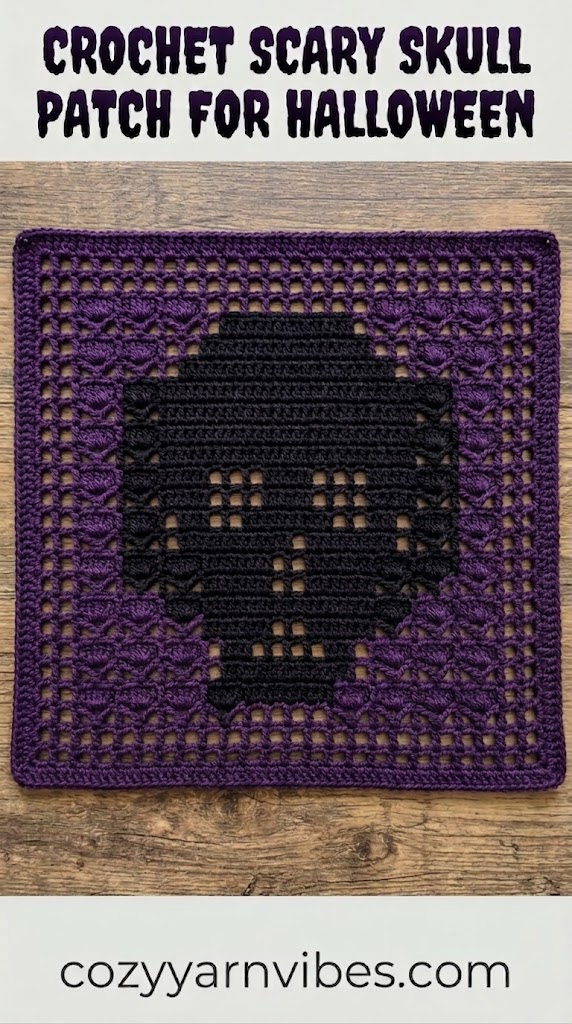
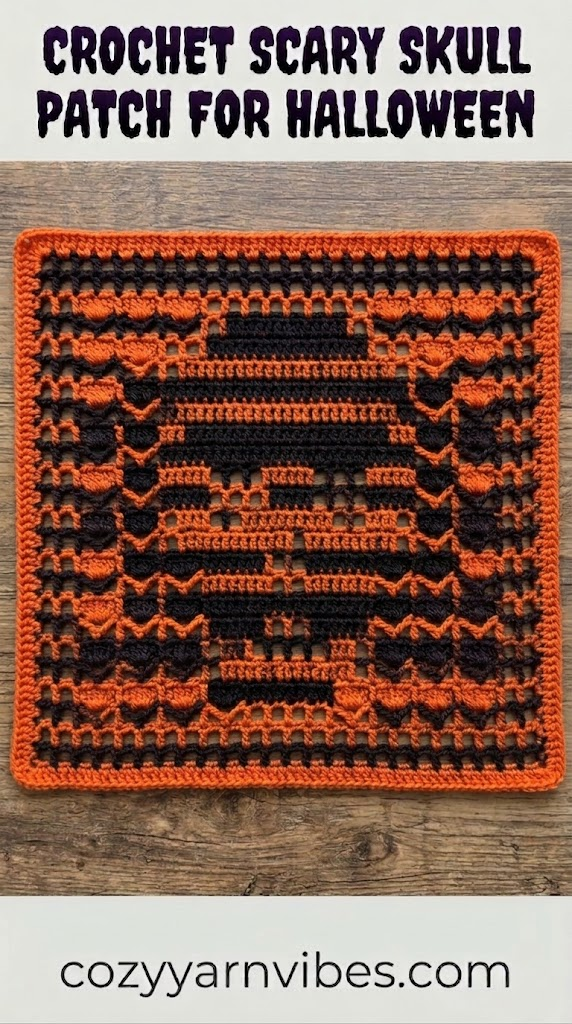
Looking for a spooky crochet project to make for Halloween? This Crochet Scary Skull Pattern Project For Halloween Season creates a bold skull-inspired design using openwork, double crochet sections, chain spaces, and decorative motifs. The pattern is worked in rows, making it a great choice for crocheters who enjoy chart-based designs with repeating stitch patterns.
The design gradually builds the skull motif through the center of the piece. The surrounding openwork sections create a decorative frame, while the center becomes wider and narrower throughout the rows to form the skull shape. You can use the finished piece as part of Halloween clothing, home décor, accessories, or other seasonal crochet projects.
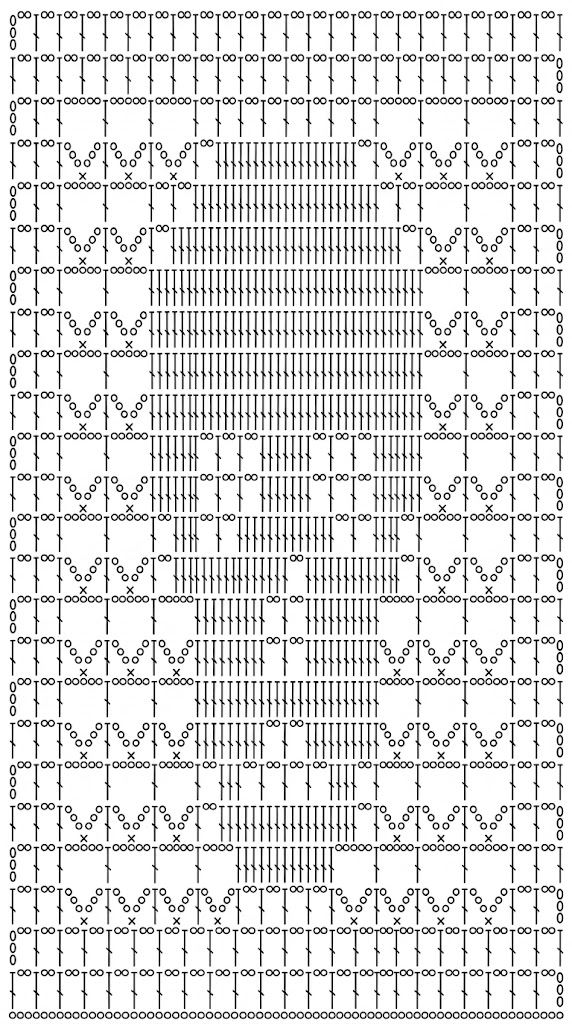
The written instructions below are designed to be used together with the pattern chart. Since several rows contain detailed stitch placement, checking the chart while working will help you keep the design symmetrical.
Easy Crochet Scary Skull Pattern Tutorial
This Crochet Scary Skull Pattern Project For Halloween Season is worked from a foundation chain of 76–80 stitches, depending on the desired size. The first rows establish the openwork background, while later rows gradually build the skull motif in the center.
The pattern mainly uses double crochet, single crochet, and chain spaces. The combination of solid dc sections and open chain spaces creates the recognizable skull design shown in the chart.
You can use traditional Halloween colors such as black and white, or experiment with purple, orange, gray, cream, green, or other contrasting shades.
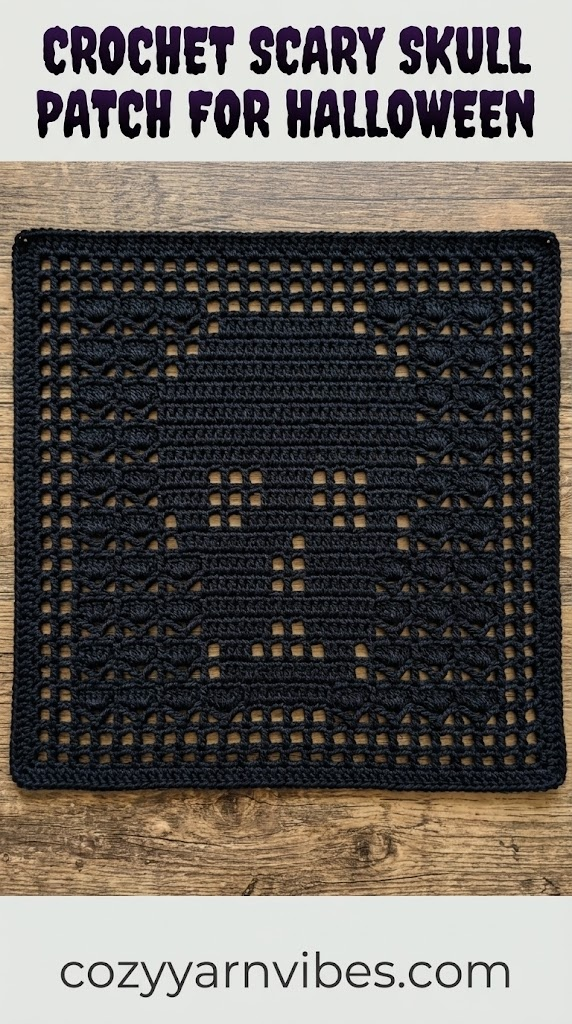
Why You’ll Love This Pattern
- Perfect for Halloween crochet projects
- Creates a striking scary skull design
- Works well with contrasting yarn colors
- Uses basic crochet stitches
- The openwork design creates a lightweight fabric
- Can be adapted for different project sizes
- Great for Halloween clothing and accessories
- Works beautifully with traditional black-and-white colors
- Can be made more colorful for a playful Halloween look
Skill Level
Beginner to Intermediate
This pattern is best suited to crocheters who are comfortable with chain stitches, single crochet, double crochet, skipping stitches, and following a crochet chart. The stitch combinations themselves are simple, but some of the center sections require careful counting and attention to stitch placement.
Finished Size
The finished dimensions are not fixed because the pattern begins with a foundation chain of 76–80 stitches. Your final size will depend on the foundation chain you choose, your yarn weight, crochet hook, and personal tension.
For the best results, maintain consistent tension throughout the project so that the skull motif remains symmetrical.
Materials Needed
Yarn
Use a yarn weight and hook combination that gives you a comfortable, even fabric. A medium-weight yarn is a practical choice for a Halloween project, especially if you want the skull motif to have good stitch definition.
For a traditional skull design, choose a dark background color and a contrasting light color for the skull. If the project is worked in one color, the pattern’s open and solid sections will create the design through texture and negative space.
Color
Black and white are classic Halloween choices, but you can also use combinations such as purple and white, orange and black, charcoal and cream, or dark green and ivory.
Choose colors with enough contrast to make the center skull design easy to see.
Additional Supplies
- Crochet hook suitable for your chosen yarn
- Yarn needle
- Scissors
- Measuring tape
- Stitch markers, if needed
- Pattern chart for reference
Stitches & Abbreviations (US Terms)
This Crochet Scary Skull Pattern Project For Halloween Season uses US crochet terminology.
Ch chain
Sc single crochet
Dc double crochet
Sk skip
St stitch
Sts stitches
Rep repeat
How to Make These Stitches
Chain (ch)
Yarn over and pull the yarn through the loop on your hook to make a chain.
Single Crochet (sc)
Insert the hook into the indicated stitch, yarn over, and pull up a loop. Yarn over again and pull through both loops on the hook.
Double Crochet (dc)
Yarn over and insert the hook into the indicated stitch. YO and pull up a loop. Yarn over and pull through two loops. YO again and pull through the remaining two loops.
Slip Stitch (sl st)
Insert the hook into the indicated stitch, yarn over, and pull the yarn through both the stitch and the loop on your hook.
Pattern Notes
- This pattern uses US crochet terminology.
- Chain 3 at the beginning of a row counts as the first dc unless otherwise stated.
- The foundation chain is 76–80 stitches depending on the desired size.
- Keep your tension consistent throughout the project.
- Carefully count stitches in the center sections, especially where the number of consecutive dc stitches changes.
- Use the chart together with the written instructions to check stitch placement.
- When instructed to skip stitches, make sure the skipped stitches are counted correctly.
- Keep the chain spaces loose enough to prevent the fabric from pulling or curling.
- The center skull motif becomes wider and narrower as the rows progress.
Crochet Scary Skull Pattern Step-By-Step Process
This Crochet Scary Skull Pattern Project For Halloween Season is worked over 24 rows. The first two rows establish the openwork base. Rows 3–14 gradually build the decorative skull structure, while Rows 15–21 develop and shape the large center section. Rows 22–24 complete the upper openwork pattern.
Foundation Chain
Chain 76–80 stitches, depending on your desired size.
Row 1
Ch 3, which counts as the first dc. Make 1 dc in the next stitch, ch 2, sk 2 stitches, then make 1 dc in the next stitch.
Continue repeating 1 dc, ch 2, sk 2 stitches across the row.
Row 2
Repeat Row 1.
Ch 3, 1 dc, ch 2, sk 2 stitches, then continue repeating 1 dc, ch 2, sk 2 stitches across the row.
Row 3
Ch 3, ch 2, sk 2 stitches, 1 dc, ch 2, sk 2 stitches.
Next, work the decorative section: 1 dc, ch 3, sk 2 stitches, 1 sc in the dc below, ch 3, sk 2 stitches, 1 dc.
Repeat this decorative section 3 more times, following the chart.
Next, work ch 3, ch 2, sk 2 stitches, 1 dc, ch 2, sk 2 stitches. Repeat this sequence 4 more times.
Work the decorative section of 1 dc, ch 3, sk 2 stitches, 1 sc in the dc below, ch 3, sk 2 stitches, 1 dc another 3 times.
To finish the row, work ch 3, ch 2, sk 2 stitches, 1 dc, ch 2, sk 2 stitches. Repeat this sequence 1 more time as shown in the chart.
Row 4
Ch 3, ch 2, sk 2 stitches, 1 dc, ch 2, sk 2 stitches.
Next, work 1 dc, ch 5, 1 dc. The ch-5 section skips all the ch-6 stitches and the sc from the previous row. Make the final dc into the next dc from the row below.
Repeat 1 dc, ch 5, 1 dc 3 more times.
Then work 13 consecutive dc stitches across the next 13 stitches.
After the center section, repeat 1 dc, ch 5, 1 dc 4 times.
Finish the row with 1 dc, ch 2, sk 2 stitches, 1 dc, ch 2, sk 2 stitches.
Row 5
Work Row 5 the same way as Row 3, but replace the center section with 18 consecutive dc stitches.
No chain spaces are worked within these 18 center dc stitches. Follow the chart for the placement of the surrounding decorative sections.
Row 6
Ch 3, ch 2, sk 2 stitches, 1 dc, ch 2, sk 2 stitches.
Next, work 1 dc, ch 5, 1 dc. Repeat this section 2 more times.
For the center section, work 1 dc, ch 2, sk 2 stitches, 4 dc across the next 4 stitches, ch 2, sk 2 stitches, 1 dc, ch 2, sk 2 stitches, 1 dc, ch 2, sk 2 stitches, 1 dc, ch 2, sk 2 stitches, 1 dc.
Then work 3 dc across the next 3 stitches, ch 2, sk 2 stitches, and 1 dc.
Continue with 1 dc, ch 5, 1 dc, repeating this section 3 times.
Finish with 1 dc, ch 2, sk 2 stitches, 1 dc, ch 2, sk 2 stitches, 1 dc.
Row 7
Work Row 7 the same as Row 5, but increase the center section to 20 dc stitches.
The center of this section contains two chain spaces. Work 9 dc across the next 9 stitches, ch 2, sk 2 stitches, 1 dc in the next stitch, ch 2, sk 2 stitches, then 10 dc across the next 10 stitches.
Follow the chart for all remaining sections.
Row 8
Work Row 8 the same as Row 4.
The difference is in the center, where you will work 24 consecutive dc stitches with no chain spaces.
Row 9
Repeat Row 7.
Work the same side and decorative sections as Row 7, including the 20-dc center arrangement with the chain spaces shown in the chart.
Row 10
Work Row 10 the same as Row 9, but replace the sc stitches in the decorative sections with ch 5 spaces between the 2 dc stitches, following the chart.
Row 11
Work Row 11 the same as Row 5, but make 30 consecutive dc stitches in the center.
In the exact center, separate the 15th and 16th dc with ch 2, sk 2 stitches, as shown in the chart.
Row 12
Ch 3, ch 2, sk 2 stitches, 1 dc, ch 2, sk 2 stitches, 1 dc.
Then work ch 5, 1 dc, ch 5, 1 dc.
Next, work ch 2, sk 2 stitches, 4 dc across the next 4 stitches, ch 2, sk 2 stitches, 1 dc in the next stitch, ch 2, sk 2 stitches, 13 dc across the next 13 stitches.
Continue with ch 2, sk 2 stitches, 1 dc, ch 2, sk 2 stitches, 4 dc across the next 4 stitches.
Then work ch 2, sk 2 stitches, 1 dc, ch 5, 1 dc, ch 5, 1 dc.
Finish with ch 2, sk 2 stitches, 1 dc, ch 2, sk 2 stitches, 1 dc.
Row 13
Ch 3, ch 2, sk 2 stitches, 1 dc, ch 2, sk 2 stitches, 1 dc.
Next, work ch 3, sk 2 stitches, 1 sc in the next stitch, ch 3, sk 2 stitches, 1 dc in the next stitch.
Repeat this decorative section once more.
Then work 7 dc across the next 7 stitches.
Continue with ch 2, sk 2 stitches, 1 dc, ch 2, sk 2 stitches, 1 dc, ch 2, sk 2 stitches, 7 dc across the next 7 stitches.
Repeat this sequence once more to create the next center section.
Next, work ch 3, sk 2 stitches, 1 sc in the next stitch, ch 3, sk 2 stitches, 1 dc in the next stitch. Repeat this decorative section once more.
Finish with ch 2, sk 2 stitches, 1 dc, ch 2, sk 2 stitches, 1 dc.
Row 14
Work Row 14 the same as Row 13, but replace the ch 3, sc, ch 3 decorative sections with ch 5 sections as shown in the chart.
Keep the remaining dc stitches and chain spaces in the same positions.
Row 15
Work Row 15 the same as Row 13, but replace the center section with 38 consecutive dc stitches.
Do not make chain spaces within these 38 center stitches.
Row 16
Work Row 16 the same as Row 14, with 38 consecutive dc stitches in the center.
No chain spaces are worked within the center dc section.
Row 17
Repeat Row 15.
Work 38 consecutive dc stitches in the center with no chain spaces.
Row 18
Repeat Row 16.
Work 38 consecutive dc stitches in the center with no chain spaces.
Row 19
Work Row 19 the same as Row 17, but modify the center section.
Work 1 dc, ch 2, sk 2 stitches, 36 consecutive dc stitches, ch 2, sk 2 stitches, 1 dc.
Follow the chart for the rest of the row.
Row 20
Work Row 20 the same as Row 18, but modify the center section.
Work 1 dc, ch 2, 1 dc, ch 2, 34 dc, ch 2, 1 dc, ch 2, 1 dc.
Continue following the chart for the remaining stitches.
Row 21
Work Row 21 following the same general structure as Row 19.
In this row, the center dc section becomes smaller, while additional decorative sections are introduced toward the sides. Follow the chart carefully for the exact stitch placement and shaping.
Row 22
Ch 3, ch 2, sk 2 stitches, 1 dc, ch 2, sk 2 stitches.
Next, work 1 dc, ch 5, 1 dc. Repeat this section 2 more times.
Then work 1 dc, ch 2, 1 dc. Repeat this section 7 more times.
Next, work 1 dc, ch 5, 1 dc 3 more times.
At the end of the row, work 1 dc, ch 2, 1 dc. Repeat this sequence 1 more time.
Rows 23–24
Work both rows the same way.
Ch 3, which counts as the first dc. Make 1 dc in the next stitch, ch 2, sk 2 stitches, then 1 dc in the next stitch.
Continue repeating 1 dc, ch 2, sk 2 stitches across the row.
Repeat the same pattern for Row 24.
Finishing the Crochet Scary Skull
After completing Row 24, fasten off the yarn and leave a long enough tail for weaving in.
Use a yarn needle to weave all loose ends securely into the back of the work. Gently stretch and shape the piece if necessary so that the rows sit evenly and the skull motif is clearly defined.
If the finished project has uneven edges, lightly block it to improve the overall shape. Allow it to dry completely before using it.
Your Crochet Scary Skull Pattern Project For Halloween Season is now ready to become part of a Halloween-inspired project.
Customization Ideas
Classic Black and White Skull
Use black as the main color and white for the skull design. The strong contrast makes the skull easy to recognize and gives the project a traditional Halloween appearance.
Purple Halloween Skull
Try a deep purple background with a white, cream, or gray skull. Add black details if your project includes additional colorwork.
Orange and Black Skull
For a traditional Halloween palette, combine orange and black. You can use orange as the main color and black for the skull, or reverse the combination.
Cute Skull
For a softer interpretation, use pastel pink, lavender, mint, or light blue. A lighter color palette can turn the scary skull motif into a playful Halloween design.
Glow-Inspired Skull
Use a very light or bright yarn for the skull against a dark background. White, cream, or neon-inspired shades can create a glow-like effect.
Styling Ideas
There are several ways to use this Crochet Scary Skull Pattern Project For Halloween Season once it is complete.
- Add it to a Halloween sweater or cardigan.
- Use it as a decorative panel on a crochet bag.
- Turn the finished piece into a wall hanging.
- Use it as part of a Halloween table decoration.
- Add it to a seasonal pillow or cushion.
- Make several pieces and join them into a larger Halloween project.
- Use the design as a decorative centerpiece for a Halloween display.
- Combine it with crochet pumpkins, bats, ghosts, and spider motifs.
For a larger seasonal project, you can repeat the skull design in different color combinations to create a coordinated Halloween collection.
Other Variations to Try
- Make the skull in white against a solid black background.
- Use orange and purple for a colorful Halloween palette.
- Try a monochrome gray-and-black version.
- Use different colors for the center and surrounding sections.
- Make a series of skulls in different Halloween colors.
- Add a contrasting border around the completed piece.
- Combine skull motifs with pumpkin or ghost designs.
- Use thicker yarn to create a larger and warmer version.
- Use lighter yarn for a delicate decorative piece.
Care Instructions
Follow the washing instructions recommended for your particular yarn. In general, gently hand washing the finished crochet piece in cool or lukewarm water with mild detergent is a safe option for many yarn types.
Avoid harsh detergents and bleach, especially when working with multiple colors.
Do not twist or wring the crochet piece. Instead, gently press out excess water and lay it flat to dry.
If the project loses its shape after washing, gently reshape it while damp and allow it to dry flat.
Conclusion
This Crochet Scary Skull Pattern Project For Halloween Season is a fun way to add a handmade spooky touch to your seasonal crochet collection. The combination of open chain spaces and solid double crochet sections creates a detailed skull motif while keeping the pattern interesting to work.
The design can be customized with different colors and yarn weights, making it suitable for everything from Halloween accessories to larger seasonal décor. Use the written instructions alongside the chart to keep track of the detailed center shaping and decorative sections.
Whether you make one skull design or repeat the pattern as part of a larger project, this crochet pattern is a creative way to bring Halloween style into your handmade work.
Read our latest blog post Crochet Spooky Skull Granny Square.
Frequently Asked Questions
Is this Crochet Scary Skull Pattern beginner-friendly?
The pattern uses basic stitches such as chains, single crochet, and double crochet. However, the detailed center shaping and changing stitch counts require careful counting, so it is best suited to confident beginners or intermediate crocheters.
What yarn should I use for this skull pattern?
The exact yarn weight is not fixed in the pattern instructions. Choose a yarn that gives you clear stitch definition and pair it with an appropriate hook size. A contrasting color combination will make the skull design easier to see.
How many chains do I need to start?
Begin with 76–80 chains, depending on your desired size. A longer foundation can be used if you are adapting the design, but the stitch placement will need to be adjusted accordingly.
Can I make the Crochet Scary Skull larger?
Yes. You can experiment with yarn weight, hook size, or adapt the surrounding sections to create a larger project. When changing the size, keep the center motif and its symmetry in mind.
Do I need to use two colors?
No. The pattern can be worked in a single color. However, using contrasting colors can make the skull motif and openwork sections much more noticeable.
What colors work best for Halloween?
Black, white, orange, purple, gray, cream, and deep green all work well for Halloween-inspired projects. For a classic look, use black and white or black and orange.
What can I make with this Crochet Scary Skull Pattern?
The design can be incorporated into sweaters, cardigans, bags, pillows, wall hangings, table décor, Halloween accessories, and other seasonal crochet projects. You can also repeat the motif to create a larger Halloween-themed piece.
The pattern structure used for this post follows the uploaded crochet blog format, including the tutorial, materials, stitch guide, step-by-step process, customization, styling, care, conclusion, and FAQ sections.