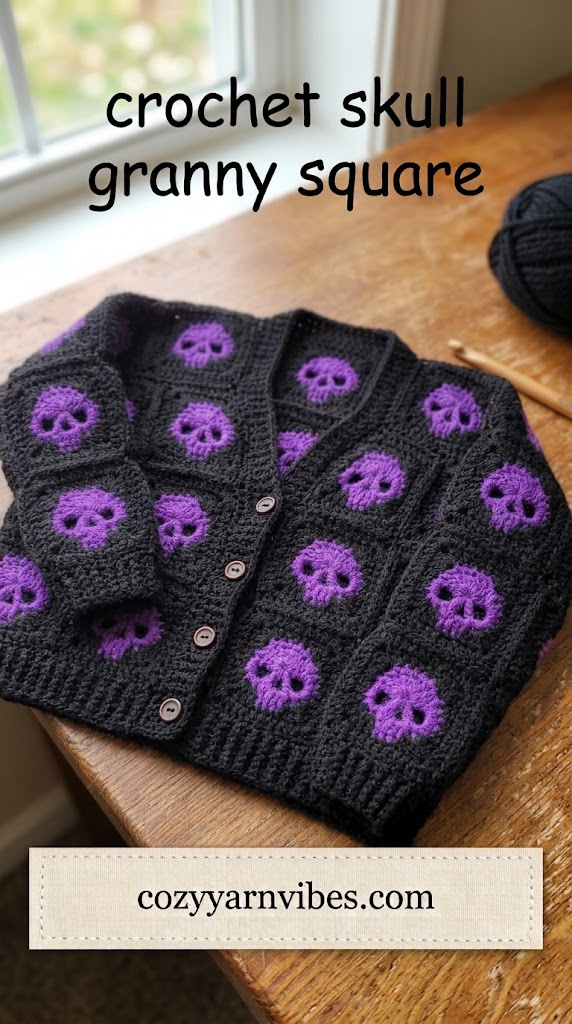
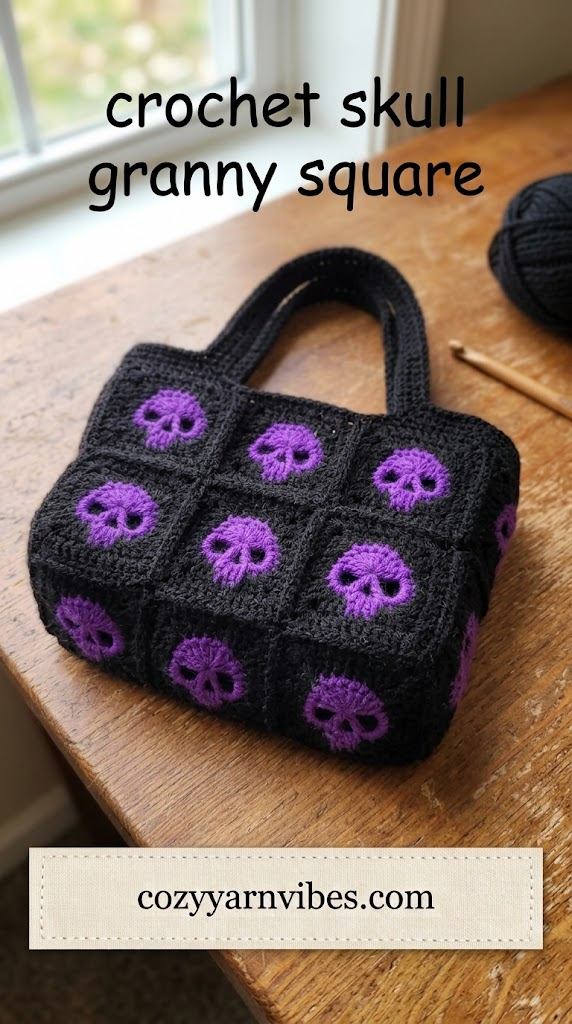
Looking for a fun Halloween crochet project with a spooky twist? This Crochet Spooky Skull granny square is a perfect project for adding creepy-cute charm to your seasonal decor. The skull motif gives a classic Halloween feel, while the granny square construction makes it easy to use in blankets, pillows, bags, wall hangings, and other crochet projects.
The Crochet Spooky Skull is also a great stash-busting project because you can use small amounts of contrasting yarn to create the skull, eyes, and surrounding square. Make several squares in different Halloween colors to create a coordinated spooky collection.
Easy Crochet Spooky Skull Granny Square Tutorial
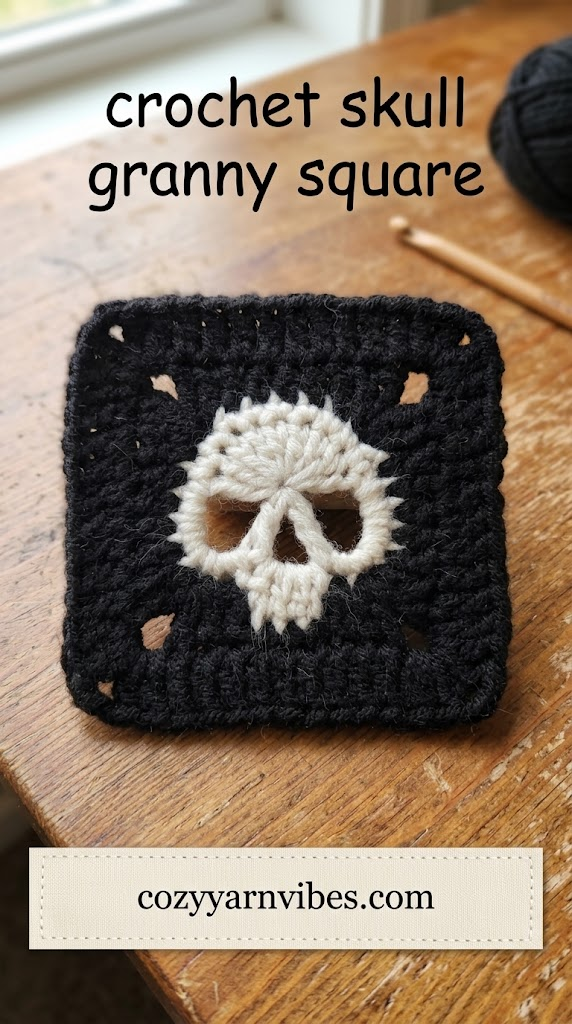
This Crochet Spooky Skull granny square combines a traditional crochet square with a spooky skull design. The skull can be created in a contrasting color so that its shape stands out clearly against the background.
The square is worked carefully in rounds, with color changes used to build the Halloween-inspired design. Once your square is complete, you can use it on its own as a decorative piece or join it with other granny squares to make a larger project.
Choose classic Halloween shades such as black, white, orange, gray, purple, or deep green. You can also use pastel colors if you prefer a cute rather than scary Halloween look.
Why You’ll Love This Pattern
- Fun Halloween-inspired crochet project
- Creates a spooky skull motif
- Great for using small amounts of leftover yarn
- Easy to customize with different colors
- Can be used in blankets, pillows, bags, and accessories
- Perfect for Halloween decorating
- Makes a unique handmade gift
- Easy to combine with other granny squares
Skill Level
Beginner to Easy Intermediate
If you are comfortable with basic crochet stitches, working in rounds, changing colors, and joining granny squares, you should be able to follow this Crochet Spooky Skull pattern.
Finished Size
The finished size will depend on your yarn weight, crochet hook, and tension.
For a traditional granny square, aim for a square that is approximately 5–6 inches across. You can make the square smaller or larger by using a different yarn weight, hook size, or adding additional border rounds.
Materials Needed
Yarn
- Worsted weight yarn (#4)
- Black yarn for the background
- White or cream yarn for the skull
- Gray, black, or dark yarn for the skull details
- Optional orange, purple, green, or red yarn for additional Halloween details
You do not need a large amount of each color, which makes this project a useful way to use leftover yarn from other crochet projects.
Color
For a traditional Halloween look, use a black background with a white or cream skull. For a softer version, try charcoal gray with ivory, or purple with a pale gray skull.
Additional Supplies
- 4 mm (G) crochet hook
- Yarn needle
- Scissors
- Stitch marker
- Measuring tape
- Optional blocking mat and pins
Stitches & Abbreviations (US Terms)
This Crochet Spooky Skull pattern uses US crochet terminology.
Ch chain
Sc single crochet
Hdc half double crochet
Dc double crochet
sl st slip stitch
St stitch
Sts stitches
How to Make These Stitches
Chain (ch)
Yarn over and pull the yarn through the loop on your hook to create a chain.
Single Crochet (sc)
Insert the hook into the indicated stitch. Yarn over and pull up a loop. Yarn over again and pull through both loops on the hook.
Half Double Crochet (hdc)
Yarn over and insert the hook into the indicated stitch. YO and pull up a loop. Yarn over once more and pull through all three loops on the hook.
Double Crochet (dc)
Yarn over and insert the hook into the indicated stitch. YO and pull up a loop. YO and pull through two loops. Yarn over again and pull through the remaining two loops.
Slip Stitch (sl st)
Insert the hook into the indicated stitch, yarn over, and pull the yarn through both the stitch and the loop on your hook.
Pattern Notes
- This pattern uses US crochet terminology.
- Keep your tension consistent throughout the square.
- Use a stitch marker if you find it difficult to identify the beginning of each round.
- When changing colors, make the color change neatly so the skull design remains clear.
- Carry yarn only when practical, and weave in loose ends as you work.
- Do not pull your stitches too tightly, as this can cause the square to curl.
- Block the finished square if necessary to give it a clean shape.
- The skull motif looks best when the background and skull colors have strong contrast.
Crochet Spooky Skull Granny Square Step-By-Step Process
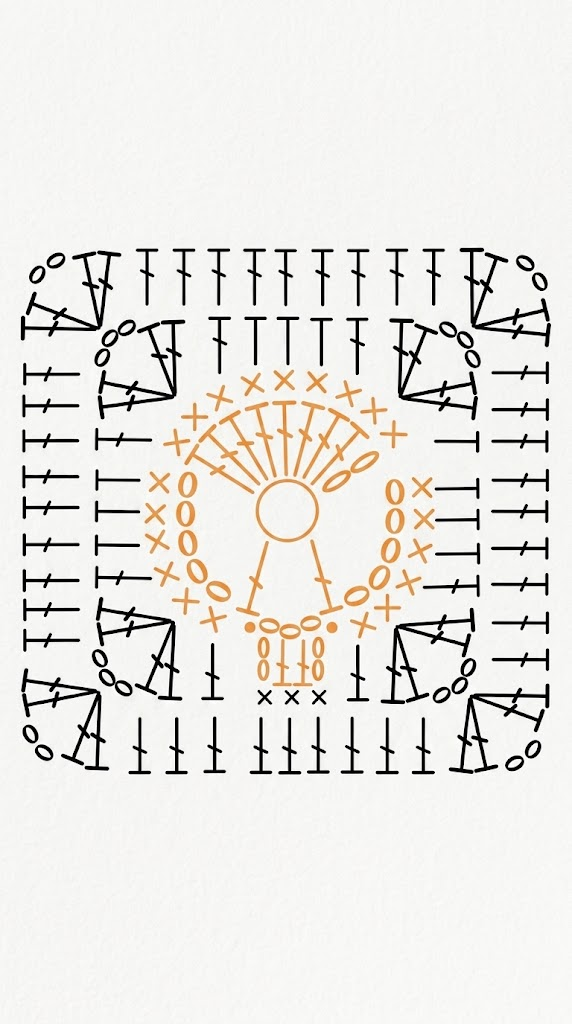
This Crochet Spooky Skull granny square is worked in four rounds. The first two rounds create the skull, including its mouth detail. The third round begins forming the granny square around the skull, while the fourth round completes the square. The chart uses different stitch groups to define the skull, sides, and four corners of the granny square.
Round 1: Create the Skull Center
Start with a magic ring and chain 4 to form the center of the skull.
Next, chain 9. Then work 8 consecutive double crochets around the magic ring.
After completing the 8 double crochets, chain 5.
Next, work 1 double crochet in the next stitch, then chain 3, and work another double crochet in the next stitch.
The section made with 1 dc, ch 3, and 1 dc is important because it forms the foundation for the skull’s mouth. This section will be worked into more fully in the next round.
At the end of Round 1, you should have the basic center structure shown in the chart, with the skull beginning to take shape around the magic ring.
Round 2: Shape the Skull and Create the Mouth
For Round 2, begin working single crochet stitches around the skull section.
Work 1 single crochet in each stitch, following the stitches around the skull and keeping the stitches evenly spaced.
Continue working single crochet around the entire skull section until you reach the special section from Round 1 where you made 1 dc, ch 3, and 1 dc.
This section will now be used to create the skull’s mouth.
Insert your hook into the first double crochet of this section and make a slip stitch.
Next, chain 2.
Work 2 double crochets into the chain-3 space below.
Then chain 2 again.
Finally, make a slip stitch into the last double crochet of the section.
This creates the small raised mouth detail in the center of the skull. The chart shows this section clearly at the bottom of the skull motif.
Continue working around the remaining skull stitches as shown in the chart. Once the round is complete, the skull shape should be clearly visible, including the mouth detail.
Round 3: Begin the Granny Square
Round 3 introduces three different stitch sections: the skull mouth section, the sides of the square, and the four corners.
Begin at the skull section. Work 3 single crochets into the stitches forming the mouth of the skull.
Next, work 1 double crochet into the following stitch.
You will now reach the first corner of the granny square.
Create the First Corner
For the corner, work a V-stitch using 4 double crochets and a chain-3 space.
To make the corner V-stitch, work 2 double crochets into the same stitch, chain 3, and then work another 2 double crochets into the same stitch.
This creates the first corner and begins giving the skull motif its granny-square shape.
Work the First Side
After completing the corner, work 1 double crochet in the next stitch.
Then work 3 half double crochets across the next 5 stitches.
After the half double crochet section, work 1 double crochet in the next stitch.
Continue toward the next corner, following the stitch placement shown in the chart.
Create the Second Corner
When you reach the next corner, work the same V-stitch as before.
Work 2 double crochets into the corner stitch, chain 3, and then work another 2 double crochets into the same stitch.
This creates the second corner of the granny square.
Continue Around the Skull
Continue working the same arrangement of stitches around the remaining sides of the skull.
The sides are worked using the specified double crochet and half double crochet stitches, while each corner is formed with the same 2 dc, ch 3, 2 dc V-stitch.
Continue this pattern around the entire skull until all four corners have been formed.
The third round should now clearly transform the skull motif into the beginning shape of a granny square.
Round 4: Complete the Granny Square
Round 4 is the final round of the Crochet Spooky Skull granny square.
Begin by working the V-stitch at the first corner in the same way as Round 3.
Work 2 double crochets into the corner stitch, chain 3, and then work another 2 double crochets into the same stitch.
Continue along the side of the square.
For all the remaining stitches, work 1 double crochet into every stitch without skipping any stitches.
When you reach the next corner, work the same V-stitch: 2 dc, ch 3, and 2 dc in the corner stitch.
Continue working double crochets across the side of the square, placing 1 double crochet in every stitch.
Repeat the same corner and side pattern around the entire square.
At each of the four corners, use the same 2 dc, ch 3, 2 dc V-stitch. Across all other stitches, work 1 dc in every stitch without skipping.
Once you have worked around all four sides and reached the beginning of the round, close the round according to the chart.
Finishing the Crochet Spooky Skull Granny Square
After completing Round 4, your Crochet Spooky Skull granny square is complete.
Check that all four corners are clearly defined and that the sides of the square are even. Gently shape the square with your hands if necessary.
Fasten off the yarn and use a yarn needle to weave in the remaining ends securely on the back of the square.
If needed, lightly block the finished square to straighten the edges and give the corners a clean, defined shape.
Your Crochet Spooky Skull granny square is now ready to use for Halloween blankets, bags, pillows, cardigans, wall hangings, and other seasonal crochet projects.
Customization Ideas
Classic Halloween Skull
Use a black background, white skull, and black facial details. This is the most recognizable color combination for a traditional Halloween Crochet Spooky Skull.
Purple and White Skull
Replace the black background with deep purple. Use white or cream for the skull and black for the facial details.
Cute Skull
Use pastel pink, lavender, mint, or baby blue as the background. Keep the skull light and add simple facial features for a playful Halloween design.
Glow-Inspired Skull
Use bright white or neon yarn for the skull against a dark background. This can give your finished square a glow-in-the-dark-inspired appearance.
Colorful Halloween Skull
Try orange, purple, green, black, and white together. Different colors can be used for the border and skull details to create a fun Halloween palette.
Styling Ideas
Your Crochet Spooky Skull granny square can be used in many different ways around Halloween.
- Join several squares to make a Halloween blanket.
- Use one large square as the front of a decorative pillow.
- Add squares to a crochet tote bag.
- Create a Halloween wall hanging.
- Use several motifs to make a table runner.
- Add the square to a cardigan or sweater.
- Make a spooky crochet cushion cover.
- Use individual squares as decorative panels.
- Combine skull squares with pumpkin and ghost granny squares.
For a coordinated Halloween project, combine your Crochet Spooky Skull with other seasonal motifs such as pumpkins, bats, ghosts, spiders, and witch hats.
Other Variations to Try
- Make a skull in every color of the rainbow.
- Add an orange border for a traditional Halloween look.
- Use black and white for a monochrome design.
- Add small crocheted bats around the skull.
- Embroider tiny stars or spider webs into the background.
- Create alternating skull and pumpkin granny squares.
- Make smaller squares for a Halloween garland.
- Use chunky yarn to create a larger decorative skull motif.
- Add a contrasting border around the finished square.
- Combine several skull squares into a spooky Halloween blanket.
Care Instructions
Hand wash your finished Crochet Spooky Skull granny square or finished project in cool or lukewarm water using a mild detergent.
Avoid bleach and harsh cleaning products, especially when using dark or brightly colored yarn.
Gently squeeze out excess water without twisting the crochet piece.
Lay the square flat on a clean towel and allow it to air dry completely.
If the square becomes misshapen after washing, gently reshape it while damp and allow it to dry flat.
Conclusion
This Crochet Spooky Skull granny square is a fun way to bring handmade Halloween style into your crochet projects. The skull motif gives the classic granny square a spooky seasonal update, while the simple square shape makes it easy to incorporate into larger projects.
Whether you make one Crochet Spooky Skull for a Halloween pillow or create an entire collection for a blanket, you can customize the colors, size, facial features, and border to match your style.
Add this Crochet Spooky Skull to your Halloween crochet list and experiment with different spooky motifs to create a handmade collection that is perfect for the season. For more interesting Crochet ideas, read our latest blog post on Crochet pumpkin coaster for seasonal decor.
Frequently Asked Questions
Is this Crochet Spooky Skull beginner-friendly?
Yes. The granny square construction is suitable for crocheters who are comfortable with basic stitches and working in rounds. The skull motif requires a little more attention because of the color changes and facial details.
What yarn is best for a Crochet Spooky Skull?
Worsted weight yarn is a good option because it produces a sturdy square while making the skull design easy to see. Cotton, acrylic, or a cotton-acrylic blend can all work depending on the finished project.
What colors should I use for a Halloween skull granny square?
Black and white are classic choices, but you can also use purple, orange, green, gray, cream, or burgundy. Choose contrasting colors so the skull stands out clearly from the background.
Can I make the Crochet Spooky Skull bigger?
Yes. You can use a larger hook and heavier yarn, or continue adding border rounds around the completed motif. This makes it easy to turn the square into a larger decorative panel.
Can I use this skull granny square in a blanket?
Absolutely. Make several squares in matching or contrasting colors and join them together to create a Halloween blanket. You can also alternate skull squares with pumpkin, ghost, bat, or other seasonal granny squares.
Can I make the skull look cute instead of scary?
Yes. Use softer colors, smaller eye sockets, a simple smiling mouth, and a colorful border. Pastel backgrounds can give your Crochet Spooky Skull a cute Halloween aesthetic instead of a spooky one.
What can I make with a Crochet Spooky Skull granny square?
You can use the square for blankets, pillows, bags, wall hangings, table runners, clothing, garlands, and Halloween decorations. A collection of matching squares can also make a thoughtful handmade seasonal gift.