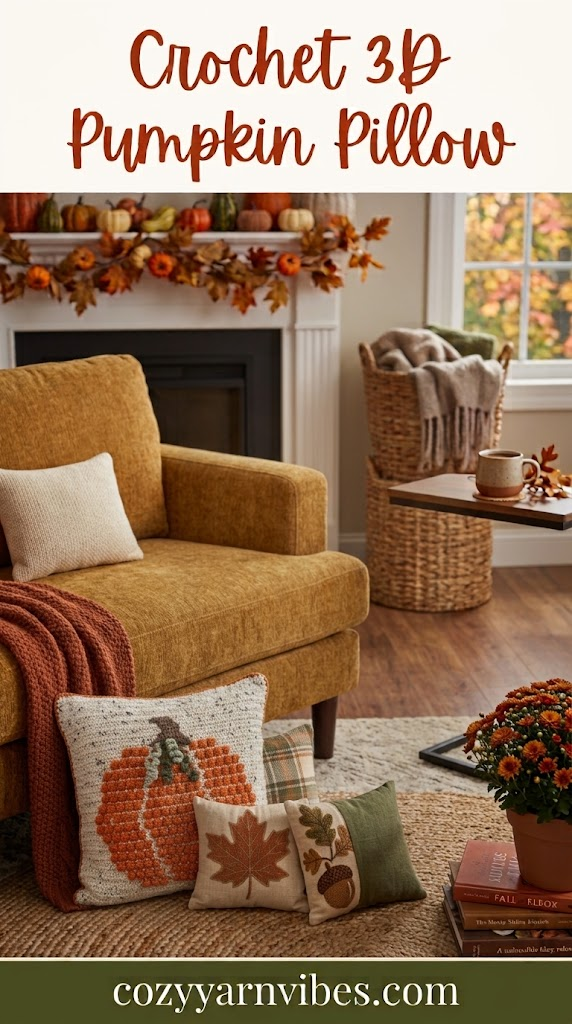
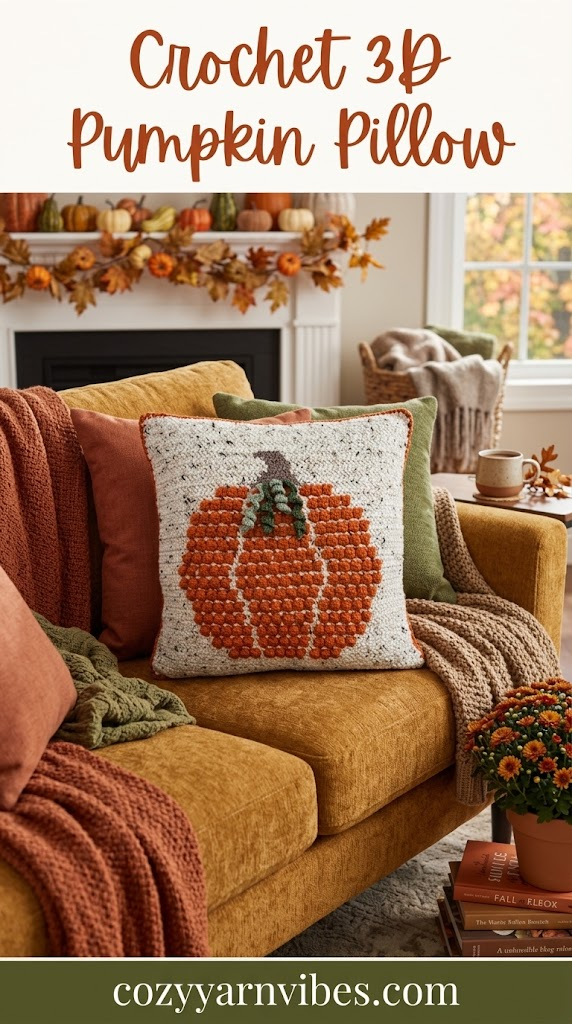
Looking for a cozy crochet project to bring a little extra texture to your fall décor? This Crochet 3D Pumpkin Pillow is a fun and decorative project featuring raised pumpkin sections that give the finished pillow a dimensional look. It is perfect for adding handmade autumn charm to sofas, armchairs, beds, and seasonal displays.
The Crochet 3D Pumpkin Pillow is also a wonderful way to experiment with texture and traditional fall colors. Choose pumpkin orange, rust, cream, mustard, brown, or olive green to create a warm autumn palette. You can make one pillow as an accent piece or crochet several in different shades for a coordinated fall collection.
Easy Crochet 3D Pumpkin Pillow Cover Tutorial
This Crochet 3D Pumpkin Pillow combines a textured pumpkin motif with a crochet pillow cover to create a dimensional fall decoration. The raised pumpkin sections give the front of the pillow a three-dimensional appearance instead of leaving the design completely flat.
Once the pumpkin front is complete, add the stem and crochet a simple back panel to create an envelope-style opening. This makes it easy to insert and remove a pillow form whenever you want to wash or store the cover.
Why You’ll Love This Pattern
- Eye-catching 3D pumpkin texture
- Perfect for fall and Thanksgiving décor
- Great for adding handmade texture to your home
- Uses classic crochet stitches
- Easy to customize with different autumn colors
- Works well with leftover yarn
- Can be made as a seasonal handmade gift
- Creates a cozy decorative pillow for your home
Skill Level
Beginner to Easy Intermediate
If you are comfortable with basic crochet stitches, increasing, decreasing, and working separate panels, you can follow this Crochet 3D Pumpkin Pillow pattern. The raised sections require careful stitch placement, but the construction is straightforward.
Finished Size
The finished size depends on the pillow insert and the gauge used for your project.
For a standard decorative pillow, choose an insert that matches the dimensions of your completed crochet cover. You can also adjust the size by changing the number of stitches and rows or by using a larger or smaller hook and yarn.
Materials Needed
Yarn
- Worsted weight yarn (#4)
- Orange or pumpkin-colored yarn for the pumpkin
- Brown or green yarn for the stem
- Cream, beige, mustard, rust, or other fall colors for the pillow background or border
- Yarn for joining and finishing
Cotton or acrylic yarn can be used depending on the texture and appearance you want. Acrylic gives the pillow a soft, cozy feel, while cotton provides a firmer stitch definition.
Color
For a traditional Crochet 3D Pumpkin Pillow, try combining:
- Pumpkin orange
- Burnt orange
- Rust
- Cream
- Mustard
- Brown
- Olive or sage green
For a softer farmhouse-inspired look, use cream and beige as the main colors with a muted orange pumpkin. In Halloween season, orange and black make a striking combination.
Additional Supplies
- Crochet hook suitable for your yarn
- Yarn needle
- Scissors
- Stitch markers
- Pillow insert or fiberfill
- Measuring tape
Stitches & Abbreviations
This free pattern is written using US crochet terms.
- bo — bobble
- ch — chain
- hdc — half double crochet
- hhdc — herringbone half double crochet
- rsc — reverse single crochet
- sc — single crochet
- sl st — slip stitch
- st — stitch
How to Make These Stitches
Chain (ch)
Yarn over and pull the yarn through the loop on your hook to make a chain.
Single Crochet (sc)
Insert the hook into the stitch, yarn over, and pull up a loop. Yarn over again and pull through both loops on the hook.
Half Double Crochet (hdc)
Yarn over, insert the hook into the stitch, yarn over, and pull up a loop. Yarn over again and pull through all three loops on the hook.
Double Crochet (dc)
Yarn over and insert the hook into the stitch. YO and pull up a loop. Yarn over and pull through two loops. YO again and pull through the remaining two loops.
Slip Stitch (sl st)
Insert the hook into the stitch, yarn over, and pull the yarn through both the stitch and the loop on your hook.
Herringbone Half Double Crochet (hhdc)
Yarn over and insert your hook into the stitch. YOand pull through the stitch and the next loop on your hook. Yarn over again and pull through the remaining two loops on the hook.
Bobble (bo)
The bobble is worked as a dc4tog cluster in the same stitch.
Yarn over and insert your hook into the desired stitch. Yarn over and pull through the stitch, then yarn over and pull through two loops. Repeat this process four times in the same stitch.
You will have five loops on your hook. Yarn over and pull through all five loops at once. The bobble is complete. Work the next stitch as a single crochet.
Reverse Single Crochet (rsc)
Reverse single crochet, also called crab stitch, is worked in the opposite direction from regular single crochet.
For right-handed crocheters, insert the hook into the stitch to your right. Yarn over and pull up a tall loop. Yarn over again and pull through both loops on the hook.
Pattern Notes
- The pillow is made from two flat panels worked in rows and joined around a pillow insert.
- The front panel follows the pumpkin chart shown with the pattern.
- The chart is worked from the bottom upward, beginning at the black arrow.
- The ch 1 used for turning does not count as a stitch.
- The pumpkin is created with bobble stitches, which give the front panel its raised 3D texture.
- A row of hhdc is worked after each bobble row so that all the bobbles are pushed toward the same side.
- When changing colors, change yarn during the final pull-through of the previous stitch.
- Unused yarn can be carried across the back of the panel when instructed.
- Because the wrong side of the panels will be inside the pillow, there is no need to cut the yarn after every color change. Drop the unused color and pick it up again when needed.
- When working the bobble stitches, you will be looking at the wrong side of the bobbles.
- The pumpkin stem is worked with regular hdc, not hhdc.
- The pattern uses US crochet terms.
Crochet 3D Pumpkin Pillow Step-by-Step
Front Pumpkin Panel
The front panel creates the raised pumpkin design shown in the chart. Work the background in Ivory Tweed or your chosen background color, then follow the chart for the pumpkin, stem, and color changes.
Foundation Chain
With Ivory Tweed or your chosen background color, chain 63.
Row 1
Work 1 hhdc in the second chain from the hook and in each chain across.
Chain 1 and turn.
You should have 62 hhdc.
Rows 2–9
Work 1 hhdc in each stitch across.
At the end of each row, chain 1 and turn.
Continue until you have completed Row 9. Each row should contain 62 hhdc.
Following the Pumpkin Chart
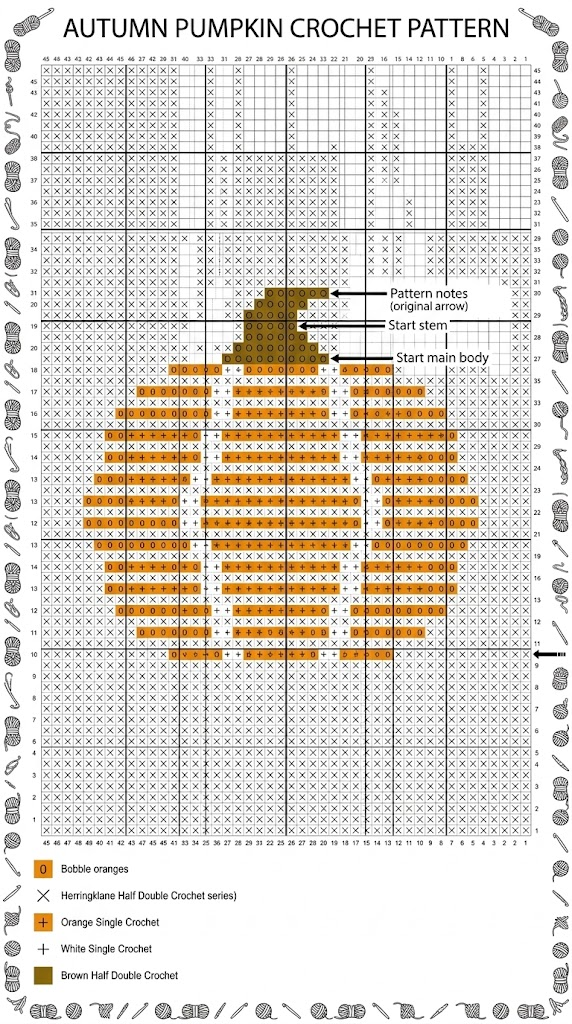
From Row 10 onward, follow the pumpkin chart provided with the pattern. The black arrow on the chart shows where Row 10 begins.
The chart creates the pumpkin using orange bobbles and single crochet stitches, with Ivory Tweed forming the background. A row of hhdc follows each bobble row to keep the raised bobbles on the same side of the fabric.
Rows 10 and 11 are written out below as an example of how to read and follow the chart.
Row 10
With Ivory Tweed, work 1 hhdc in each of the first 20 stitches.
When completing the 20th hhdc, change to orange during the final pull-through. Carry the unused Ivory Tweed yarn across the back of the work until it is needed again.
Work the following sequence:
Work 1 bobble in the next stitch, then 1 sc in the next stitch. Repeat this sequence twice.
Work 1 bobble in the next stitch. When completing the bobble, change back to Ivory Tweed.
Work 1 sc in each of the next 2 stitches using Ivory Tweed.
Change back to orange during the final pull-through of the second sc.
Work 1 bobble in the next stitch, then 1 sc in the next stitch. Repeat this sequence three times.
Work 1 bobble in the next stitch. When completing the bobble, change back to Ivory Tweed.
Work 1 sc in each of the next 2 stitches using Ivory Tweed.
Change back to orange during the final pull-through of the second sc.
Work 1 bobble in the next stitch, then 1 sc in the next stitch. Repeat this sequence twice.
Work 1 bobble in the next stitch. When completing the bobble, change back to Ivory Tweed and drop the orange yarn.
Work 1 sc in the next stitch using Ivory Tweed.
Finish the row by working 1 hhdc in each of the next 20 stitches.
Chain 1 and turn.
You should have 62 stitches total: 40 hhdc, 10 bobbles, and 12 sc.
Row 11
Using Ivory Tweed, work 1 hhdc in each stitch across.
Chain 1 and turn.
You should have 62 hhdc.
Do not carry unused yarn through this row. The bobbles from Row 10 should now appear raised on the front of the panel.
Rows 12–52: Follow the Chart
Continue working Rows 12 through 52 by following the pumpkin chart.
Pay close attention to the color changes shown in the chart. The orange sections form the pumpkin body, while the background remains Ivory Tweed. Work the bobble stitches wherever they are marked and follow each bobble row with the required hhdc row.
As the pumpkin becomes wider and then narrower, the chart will show where to place the bobbles and background stitches. Continue following each row from one side of the chart to the other.
When you reach the pumpkin stem section, follow the chart for the brown stitches.
Pumpkin Stem
When the chart indicates the pumpkin stem, change to brown yarn.
The stem is worked using regular half double crochet, not herringbone half double crochet.
Continue following the chart until the stem is complete and then return to the background stitches as indicated.
Complete Row 52 according to the chart.
Fasten off and weave in the ends. Since the wrong side of the panel will be inside the finished pillow, you can also tuck the yarn ends toward the inside when assembling the pillow.
Making the Pumpkin Vines
The Crochet 3D Pumpkin Pillow includes four small green vines attached around the base of the pumpkin stem.
Make 4 vines using green yarn.
Vine Row 1
Chain 20.
Work 2 sc in the second chain from the hook and continue working 2 sc in each chain across.
Fasten off, leaving a yarn tail for attaching the vine.
Repeat to make a total of 4 vines.
Use the yarn tails to tie each vine securely around a stitch at the base of the pumpkin stem. Attach all four vines to the front panel before assembling the pillow.
Back Panel
The back panel is worked entirely in the background color. Unlike the front, it does not contain a pumpkin design.
With Ivory Tweed or your chosen background color, chain 63.
Row 1
Work 1 hhdc in the second chain from the hook and in each chain across.
Chain 1 and turn.
You should have 62 hhdc.
Rows 2–52
Work 1 hhdc in each stitch across.
At the end of each row, chain 1 and turn.
Continue until Row 52 is complete.
Fasten off and weave in the ends.
Assembling the Crochet 3D Pumpkin Pillow
Once the front and back panels are complete, place them together with the wrong sides facing inward. The right sides of the panels should face outward.
Line up the stitches and row ends as closely as possible. Small differences in tension are normal, but matching the edges will help create a neat finished pillow.
Joining the Panels
Attach orange yarn at one corner by making a slip stitch through both panels.
Chain 1.
Begin working reverse single crochet evenly around the outside edges of both panels.
Keep the rsc stitches loose and pull the working loop up slightly before making each stitch. This helps prevent the edges from becoming too tight or puckering.
Along the top and bottom edges, you can generally place 1 rsc in each stitch.
Along the side edges, place approximately 1 rsc every other row, adjusting the spacing as needed to keep the edge flat.
Working the Corners
When you reach a corner, work 1 rsc just before the corner.
Rotate your work and continue with 1 rsc just after the corner.
Keep the corner stitches loose enough for the pillow cover to lie flat.
Stuffing the Pillow
Continue working the rsc around three sides of the pillow.
When three sides are joined, insert the 18-inch pillow form through the open side.
Adjust the pillow insert so that the corners are filled and the raised pumpkin design sits evenly on the front.
Finishing the Final Side
Continue working rsc across the final open side until you reach the point where you started.
Slip stitch to the base of the first rsc to join.
Fasten off and weave in the yarn end securely.
Your Crochet 3D Pumpkin Pillow is now complete. The bobble stitches create the raised pumpkin sections, while the hhdc background gives the pillow a neat and textured finish.
Customization Ideas
Classic Orange Pumpkin
Use a traditional pumpkin-orange yarn for the raised pumpkin sections and a cream or beige background for a classic fall appearance.
Rustic Fall Pumpkin
Combine rust, burnt orange, mustard, cream, and brown for a warm farmhouse-inspired Crochet 3D Pumpkin Pillow.
Neutral Pumpkin
Try cream, taupe, beige, brown, and muted orange for a softer neutral design that can stay on display throughout the entire autumn season.
Colorful Pumpkin
Use several shades of orange, rust, mustard, and green to create a playful autumn color combination.
Halloween Pumpkin
Use orange and black for a Halloween-inspired pillow. You can also embroider a small jack-o’-lantern face onto the pumpkin for an extra festive detail.
Styling Ideas
Your Crochet 3D Pumpkin Pillow can be displayed in many areas around your home during fall.
Place it on:
- Sofas
- Armchairs
- Beds
- Reading chairs
- Entryway benches
- Window seats
- Cozy reading corners
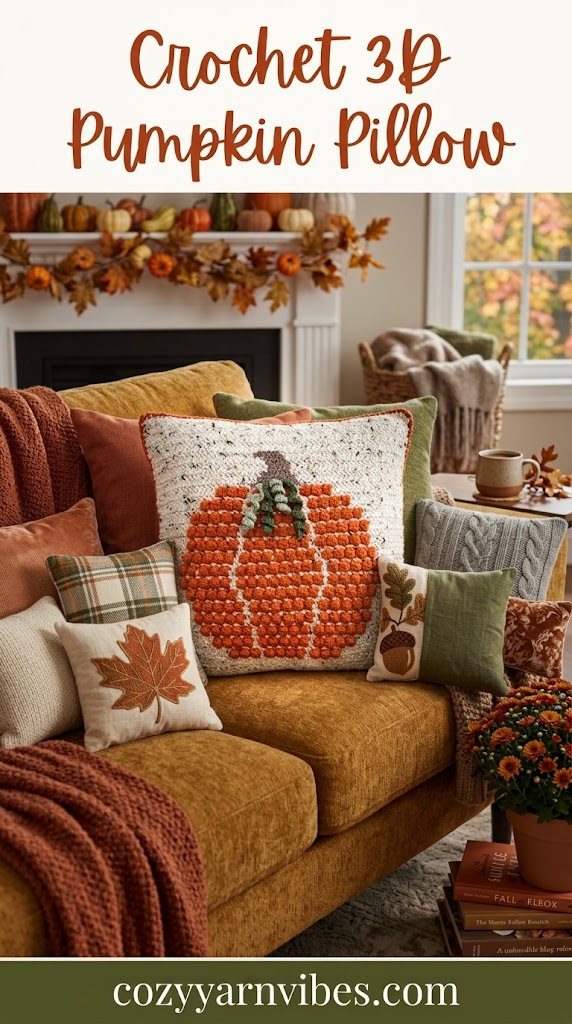
Pair the Crochet 3D Pumpkin Pillow with crocheted leaves, mini pumpkins, fall blankets, candles, and other warm-colored cushions for a coordinated seasonal display.
For Thanksgiving, combine the pillow with cream, rust, brown, mustard, and orange decorations to create a warm autumn arrangement.
Other Variations to Try
- Make the pumpkin in different shades of orange and rust.
- Add a crocheted leaf beside the stem.
- Embroider a jack-o’-lantern face for Halloween.
- Use a solid cream background for a neutral design.
- Make a smaller version for a decorative accent pillow.
- Increase the dimensions to fit a larger pillow insert.
- Add a contrasting crochet border around the finished cover.
- Make matching pumpkins in orange, rust, cream, and mustard.
- Use leftover fall yarn scraps to create a colorful version.
Care Instructions
Check the washing instructions for the yarn you use before cleaning your Crochet 3D Pumpkin Pillow.
If the pillow cover is removable, take out the pillow insert before washing.
For handmade crochet pillows, gentle hand washing is a good option when the yarn allows it.
Avoid harsh detergents and bleach because they can fade the colors and affect the fibers.
Do not wring the pillow cover. Gently squeeze out excess water and lay it flat to dry.
Keep the finished Crochet 3D Pumpkin Pillow away from prolonged direct sunlight to help preserve its autumn colors.
Conclusion
This Crochet 3D Pumpkin Pillow is a fun way to bring texture, color, and handmade charm into your home for fall. The raised pumpkin sections give the design a dimensional appearance, while the seasonal color combinations make it easy to coordinate with your existing autumn décor.
You can customize your Crochet 3D Pumpkin Pillow with traditional pumpkin orange, rustic neutrals, Halloween colors, or your favorite fall shades. Add a crocheted stem or leaf to make the pumpkin motif even more recognizable.
Whether you make one for your sofa or create several for different rooms, this cozy pillow cover is a lovely addition to your fall crochet projects.
For more amazimg crochet pillow ideas read our latest blog post about Granny Squares Crochet Pumpkin Pillow.
Frequently Asked Questions
Is the Crochet 3D Pumpkin Pillow beginner-friendly?
Yes. The Crochet 3D Pumpkin Pillow is suitable for beginners who are comfortable with basic crochet stitches and working separate panels. The 3D sections require careful stitch placement, but the overall construction is simple.
What yarn is best for a Crochet 3D Pumpkin Pillow?
Worsted weight yarn is a versatile choice. Cotton or acrylic yarn can both work well depending on the texture, stitch definition, and care requirements you prefer.
Can I make the Crochet 3D Pumpkin Pillow larger?
Yes. You can make a larger Crochet 3D Pumpkin Pillow by increasing the dimensions of the front panel and adjusting the back pieces to match. Make sure the proportions remain balanced so the pumpkin design stays clearly defined.
Can I use different colors for the Crochet 3D Pumpkin Pillow?
Absolutely. Try orange, rust, mustard, cream, brown, olive, sage, or burgundy. You can use one main shade or combine several colors for a patchwork-inspired fall design.
Can I make a Halloween version of the Crochet 3D Pumpkin Pillow?
Yes. Use orange and black yarn and add embroidered facial details to turn your Crochet 3D Pumpkin Pillow into a festive Halloween decoration.