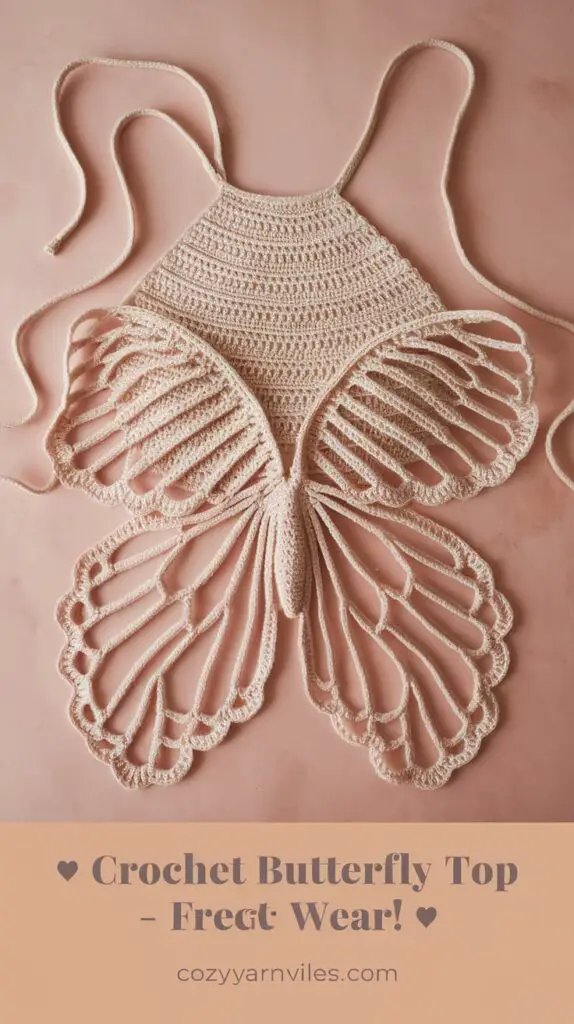
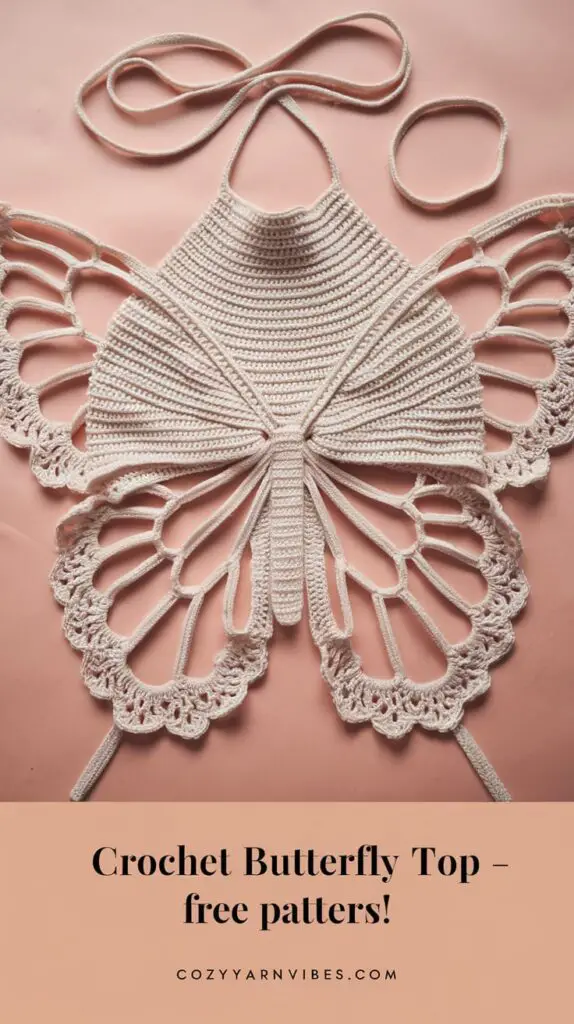
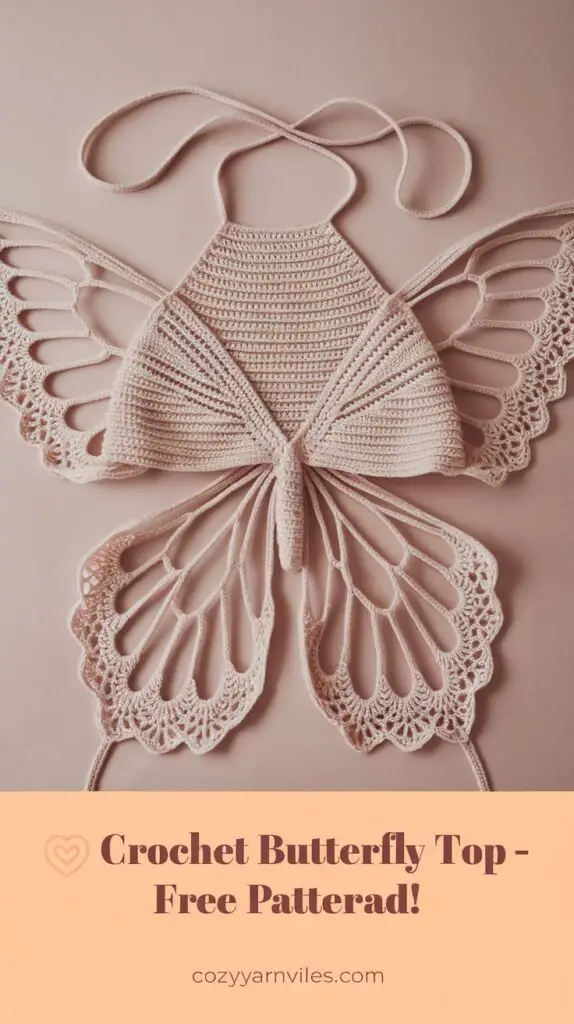
✨ Crochet Butterfly Top – Free Pattern! 🦋
Looking for a trendy and stylish crochet project? This Crochet Butterfly Top is a must-make! With its beautiful, butterfly-inspired design, it’s perfect for summer outings, music festivals, or just adding a handmade touch to your wardrobe.
This top is beginner-friendly, easily customizable, and works up quickly. Whether you’re making one for yourself, a gift, or even to sell, this pattern will be a favorite in your crochet collection!
Let’s get started! 🧶✨
🌟 Why You’ll Love This Crochet Butterfly Top
✅ Beginner-friendly: Uses simple stitches and works up fast!
✅ Trendy & Stylish: A unique and eye-catching design.
✅ Perfect for Summer: Light, airy, and comfortable to wear.
✅ Easily Customizable: Adjust the size, add straps, or experiment with colors!
🧶 Materials Needed
- Yarn: Worsted weight (Category 4) cotton yarn
- Recommended: Lion Brand Pima Cotton or any soft, breathable cotton yarn.
- Hook Size: 3.75mm (F) crochet hook
- Other Supplies: Scissors, measuring tape, tapestry needle
📏 Sizing Guide
The top is designed to be adjustable and can fit multiple sizes depending on how you style it.
| Size | Bust Measurement |
|---|---|
| S/M | 28-34 inches |
| M/L | 34-40 inches |
| L/XL | 40-46 inches |
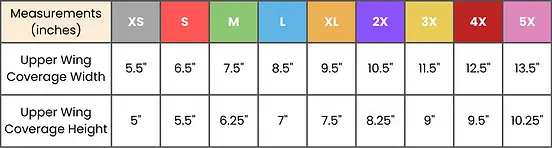
📝 Tip: For a looser fit, add more stitches to widen the wings.
🔤 Stitches & Abbreviations
- Ch – Chain
- Dc – Double crochet
- Inc – Increase (two dc in one stitch)
- Sl st – Slip stitch
- St(s) – Stitch(es)
🦋 Crochet Butterfly Top Pattern
This pattern is worked in two main sections: the center body of the butterfly and the wings that give it its signature shape. The design is simple but creates a stunning, eye-catching result!
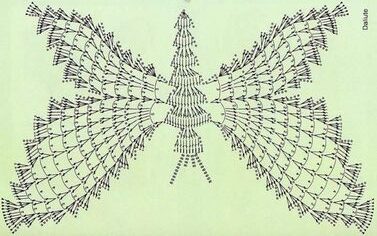
Butterfly Body (Middle of Top)
Rows 1-7 (Creating the Body)
- Row 1: Chain 4. Work 4 double crochets (dc) into the first chain. (4 stitches)
- Rows 2-3: Chain 3, turn. Double crochet across. (4 stitches)
- Row 4: Chain 3, turn. Increase (inc) in the first stitch, double crochet across until one stitch remains, increase in the last stitch. (6 stitches)
- Row 5: Repeat Row 4. (8 stitches)
- Row 6: Turn. Slip stitch (slst) into the second stitch from the hook. Chain 3, dc in the same stitch, dc across until one stitch remains. Leave the last stitch unworked. (6 stitches)
- Row 7: Chain 3, turn. Double crochet across. (6 stitches)
Neck Straps
- Chain 100 (or adjust for your preferred length). Turn.
- Starting in the 2nd chain from the hook, slip stitch down the chain.
- When you reach the butterfly’s body, slst across Row 7 to the first stitch.
- Chain 100 (or the same amount as the first strap). Repeat the previous step, slip stitching down to the body.
- Slst into the body and fasten off (f/o).
Butterfly Wings (Make 2)
Row 1 (Wing Setup)
- Attach yarn to the top of Row 5 of the butterfly body, into the stitch with no double crochet.
- Chain 5, dc in the same stitch where the yarn was attached.
- Chain 5, dc between Rows 4 & 5 of the body.
- Chain 2, dc in the same stitch.
- Chain 3, dc between Rows 3 & 4 of the body.
- Chain 2, dc in the same stitch.
Row 2 (Expanding the Wing)
- Chain 3, turn. Work 4 dc in the first chain space, chain 1.
- [3 dc in the next chain space, chain 1] – repeat this once.
- 5 dc in the next chain space, chain 1.
- 3 dc in the last chain space.
- Place 1 more dc at the top of the chain-3 from the previous row. (19 stitches)
Row 3
- Turn. Slst in the 2nd and 3rd stitch.
- Chain 3, increase twice – once in the stitch where the chain 3 is, and once in the next stitch. (4 stitches)
- Chain 2, skip the chain space, increase in the next 5 stitches. (10 stitches)
- Chain 2, skip the chain space, place 3 dc in the middle stitch of the next 3-stitch group. (3 stitches)
- Chain 2, skip the chain space, increase in the next 3 stitches. (6 stitches)
- Chain 2, skip the chain space, increase in the next 2 stitches. Leave the last two stitches unworked. (4 stitches) (Total: 27 stitches)
Row 4
- Turn. Slst in the 2nd and 3rd stitch.
- Chain 3, increase twice. (4 stitches)
- Chain 2, skip the chain space, [increase, dc] – repeat 2 more times. (9 stitches)
- Chain 2, skip the chain space, 3 dc in the middle stitch of the next 3-stitch group. (3 stitches)
- Chain 2, skip the chain space, repeat [increase, dc] 5 times. (15 stitches)
- Chain 2, increase in the next 2 stitches, leaving the last two unworked. (4 stitches) (Total: 35 stitches)
Rows 5-6 (or more, based on size)
- Continue growing the wings following the pattern of increases, dc across, and ch spaces, depending on your size:
- S: 5 rows
- M: 6 rows
- L: 6 rows
- XL: 8 rows
- 2X: 8 rows
- 3X: 10 rows
- 4X: 12 rows
- 5X: 12 rows
Upper Wing Section
- Keep increasing in the middle sections but only once per row instead of twice.
- Continue alternating between increasing rows until you reach a total of:
- XS: 9 rows
- S: 11 rows
- M: 13 rows
- L: 15 rows
- XL: 17 rows
- 2X: 21 rows
- 3X: 23 rows
- 4X: 25 rows
- 5X: 27 rows
Lower Wing Section
- Attach yarn to the outer dc stitches in the middle 3 stitches from Row 6 of the body.
- Continue shaping the lower wing similarly to the upper wing, following the stitch increases and pattern.
- Stop once you have completed 14-32 rows, depending on the size.
Final Straps and Assembly
- Attach long back straps by chaining:
- XS: 170 chains
- S: 190 chains
- M: 200 chains
- L: 220 chains
- XL: 240 chains
- 2X: 260 chains
- 3X: 280 chains
- 4X: 300 chains
- 5X: 320 chains
- Slip stitch back through the entire chain, attach to the top of the butterfly, and fasten off.
How to Tie the Top
1️⃣ Neck Straps: Tie the top straps around your neck.
2️⃣ Back Straps:
- Cross the longer straps over your back.
- Pull them through the upper wing’s widest opening.
- Cross them again and pull them through the lower wing’s widest opening.
- Tie the ends securely at your back.
Finishing Touches
Once both wings are complete, it’s time to add the final details!
✅ Weave in all loose ends using a tapestry needle.
✅ Add straps if you want extra support—these can be made with simple chains or braided yarn.
✅ Block the top (optional) by lightly steaming or wet-blocking it to shape the wings.
✨ Pro Tip: If you want a more dramatic butterfly effect, add a row of single crochets around the edges to define the shape!

🎨 Customization & Variations
🌈 Color Play: Try ombré or variegated yarns for a unique butterfly look.
🪶 Boho Vibes: Add fringe or beaded tassels to the bottom.
💖 Extra Support: Attach halter or shoulder straps for a secure fit.
🛍 How to Style Your Butterfly Top
☀️ Summer Chic: Pair it with high-waisted shorts or a flowy skirt.
🎤 Festival Ready: Wear it over a bralette with layered jewelry.
🏝 Beach Vibes: Use lightweight cotton yarn for the perfect bikini top cover-up.
❓ FAQs
🔹 Can I make this in a different size?
Yes! Simply adjust the number of foundation stitches and wing rows.
🔹 What if I don’t like sewing?
You can crochet the straps and attach them directly!
🔹 Can I use acrylic yarn?
Cotton is recommended for breathability, but acrylic works for cooler seasons.
🧼 Care Instructions
🫧 Hand wash or machine wash on a gentle cycle.
🌬 Lay flat to dry to maintain shape.
🎁 Perfect for Gifting & Selling!
🎀 Handmade Gifts: A unique, thoughtful present for friends and family!
🛍 Market Favorite: A trendy, in-demand item at craft fairs and online shops.
✨ Final Thoughts
This Crochet Butterfly Top is a show-stopper! Whether you’re making one for yourself or selling at markets, this fun and fashionable pattern is sure to impress.
📸 Tag your finished tops with #CozyYarnVibes – I’d love to see your creations! 🦋💖