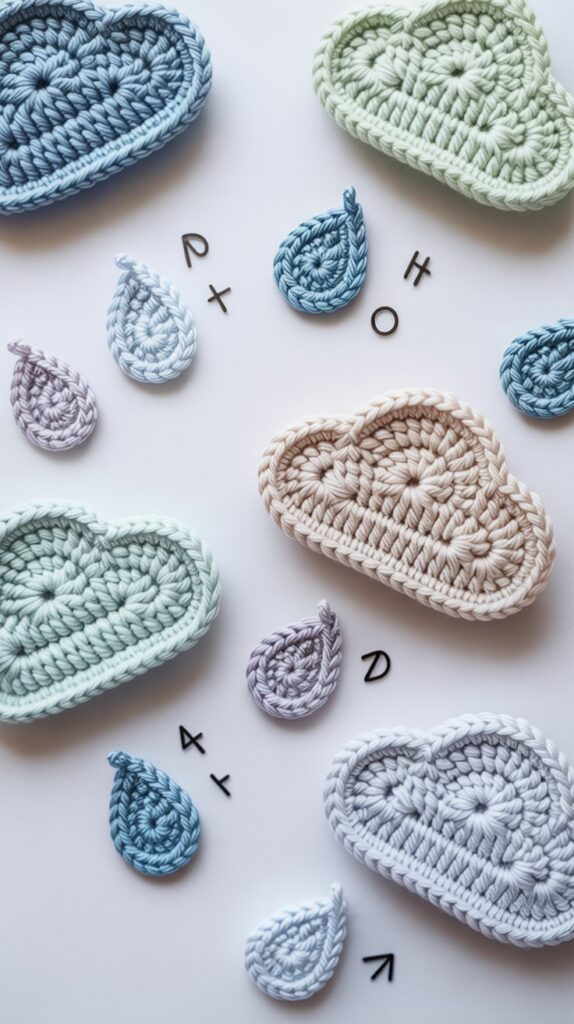
☁️ Crochet Cloud & Raindrop Appliqués – Free Pattern
Looking to add a dreamy touch to your baby blankets, nursery wall hangings, or weather-themed projects? These adorable Crochet Cloud & Raindrop Appliqués are perfect for beginners and add a soft, whimsical charm to any handmade item.
✨ Finished Size
- Cloud: Approx. 3.5″ x 2.5″
- Raindrop: Approx. 1.5″ tall
(Sizes may vary depending on your yarn and hook.)
🧶 Materials
- DK or worsted weight yarn in any cloud color (white, blue, grey)
- 3.5 mm or 4.0 mm crochet hook
- Tapestry needle
- Scissors
Crochetta Crochet Kit for Beginners, Crochet Kit Step-by-Step Video Tutorials, Crochet Starter Kit Learn to Crochet Kits for Adults Beginners, Jumbo 3 Colorful Octopus (40%+ Yarn Content)
$26.99 (as of March 3, 2026 10:19 GMT +00:00 – More infoProduct prices and availability are accurate as of the date/time indicated and are subject to change. Any price and availability information displayed on [relevant Amazon Site(s), as applicable] at the time of purchase will apply to the purchase of this product.)
The Woobles Hello Kitty Crochet Kit – Beginners Wooble Crochet Animal Kit Crafts with Easy Peasy Yarn as seen on Shark Tank – with Step-by-Step Video Tutorials (Cinnamoroll)
$44.99 (as of March 3, 2026 10:19 GMT +00:00 – More infoProduct prices and availability are accurate as of the date/time indicated and are subject to change. Any price and availability information displayed on [relevant Amazon Site(s), as applicable] at the time of purchase will apply to the purchase of this product.)
The Woobles Beginners Crochet Kit with Easy Peasy Yarn as seen on Shark Tank – with Step-by-Step Video Tutorials – Snoopy
$39.96 (as of March 3, 2026 10:19 GMT +00:00 – More infoProduct prices and availability are accurate as of the date/time indicated and are subject to change. Any price and availability information displayed on [relevant Amazon Site(s), as applicable] at the time of purchase will apply to the purchase of this product.)
Yarniss Crochet Kits for Beginners,All in One Crochet Kits with 840 Yards Crochet Yarn,Ergonomic Crochet Hooks Set with Yarn for Adults,Navy
$20.99 (as of March 3, 2026 10:19 GMT +00:00 – More infoProduct prices and availability are accurate as of the date/time indicated and are subject to change. Any price and availability information displayed on [relevant Amazon Site(s), as applicable] at the time of purchase will apply to the purchase of this product.)☁️ Cloud Crochet Appliqué (Pattern Based on Chart)
🧵 Stitches & Abbreviations (US Terms)
- ch – chain
- sc – single crochet
- dc – double crochet
- tr – treble crochet
- sl st – slip stitch
- st(s) – stitch(es)
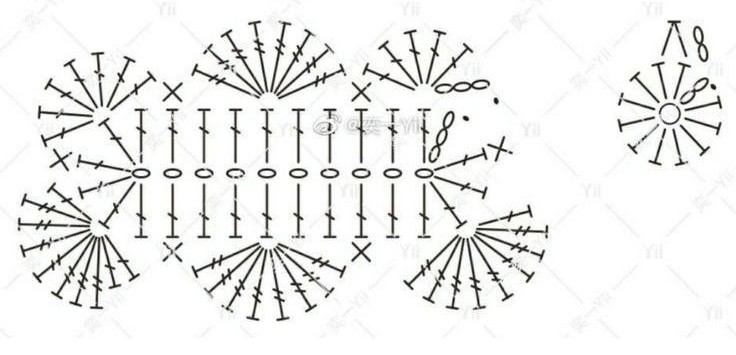
🌥 Cloud Pattern Instructions
Round 1 (Foundation Oval):
- Ch 10
- In 4th ch from the hook (counts as first dc), work 1 dc
- Dc in each of the next 6 ch
- In the last ch, work 6 dc (this curves around to the other side)
- Working along the other side of the chain, dc in the next 6 ch
- In the first ch, work 4 dc
- Join with a sl st to the top of the beginning ch-3
Round 2 (Cloud Bumps):
This round creates the puffy cloud texture using a combination of dc, tr, and sc stitches.
- In the first dc (after sl st), ch 3 (counts as dc), then work 5 dc in the same stitch (total 6 dc)
- Skip 1 st, sc in the next stitch
- Skip 2 sts, in the next stitch: 8 tr
- Skip 2 sts, sc in next stitch
- Skip 1 st, in the next stitch: 7 dc
- Sc in the next stitch
- Skip 1 st, in the next stitch: 1 dc, 7 tr, 2 dc (all in same stitch)
- Skip 1 st, sc in next stitch
- Skip 2 sts, in the next stitch: 8 tr
- Skip 2 sts, sc in the next stitch
- Skip 2 sts, in the next stitch: 8 tr, 1 dc (in same stitch)
- Skip 1 st, sc in the next
- Join with sl st to beginning ch-3
- Fasten off and weave in the ends.
✅ Optional
- You can lightly block the cloud to shape it.
- Stitch it onto blankets, keychains, bags, or wall hangings!
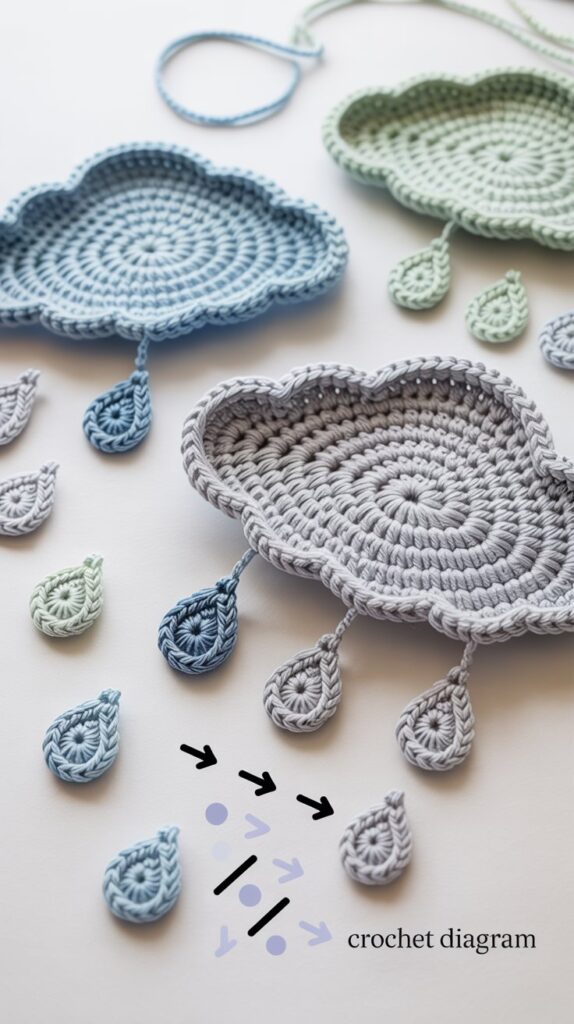
💧 Crochet Raindrop Pattern
🧵 Stitches & Abbreviations (US Terms)
- mr – magic ring
- ch – chain
- hdc – half double crochet
- hdc2tog – half double crochet two together (decrease)
- sl st – slip stitch
Raindrop Pattern
Round 1:
- Start with a magic ring
- Ch 2 (does not count as a stitch)
- Work 11 hdc into the magic ring
- Sl st to the first hdc to join (11 sts total)
Round 2:
Fasten off and weave in ends
Ch 2
(hdc2tog): Yarn over, insert hook into the next stitch, yarn over and pull up a loop (3 loops on hook). Yarn over, insert hook into the next stitch, yarn over and pull up a loop (5 loops on hook). Yarn over and pull through all 5 loops on the hook. You’ve decreased two stitches into one.
Repeat this hdc2tog one or two more times, depending on the shape you want — typically two decreases make the top pointed enough
Work a few hdc around the bottom to smooth the curve
Finish with a sl st to the starting ch-2
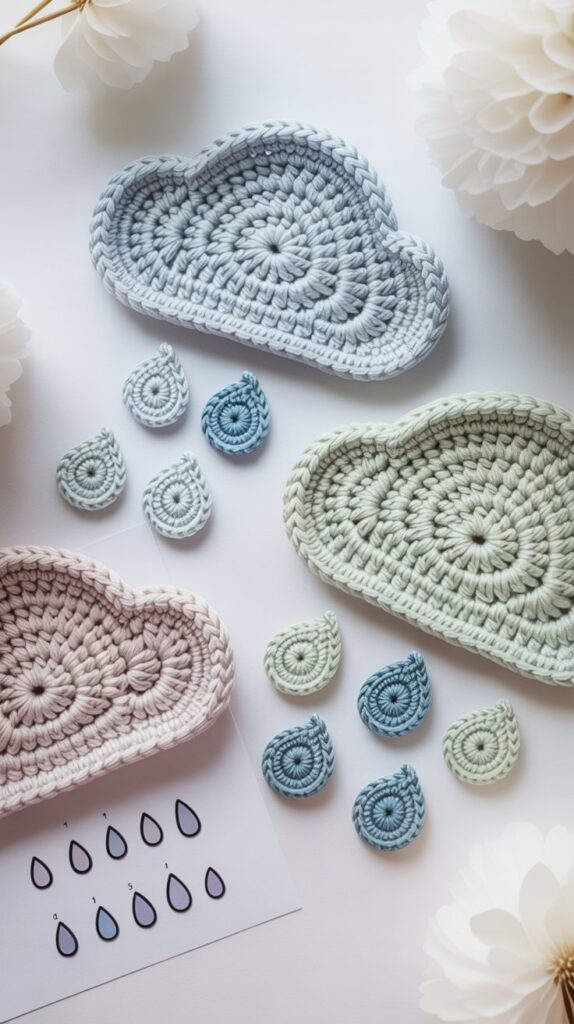
🎨 Customization Ideas
- Use pastel yarn for nursery mobiles
- Create a “rainy day” themed garland
- Attach clouds on sweaters or baby hats
- Embroider little faces for a kawaii-style effect
- Add beads or sequins as “sparkling rain”
🌟 Tips for Beginners
- Use stitch markers to help identify starting points
- Block the finished appliqués to shape them nicely
- Stiffen with white glue and water for wall decor
📌 Pin & Save for Later
Looking for more cute weather-themed crochet? Don’t forget to check out my Rainbow Bookmark and Crochet Rainbow Sunglasses Holder projects on CozyYarnVibes.com
🔁 Pattern Use
You’re welcome to sell finished items made from this pattern, just credit Cozy Yarn Vibes as the designer. Please don’t republish the pattern itself.