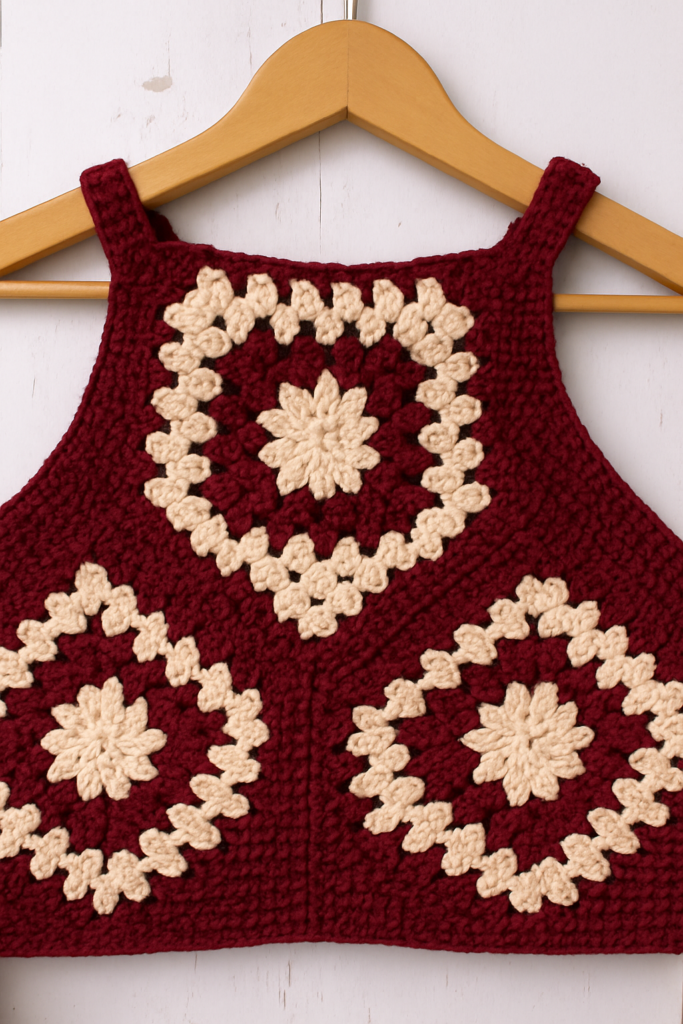
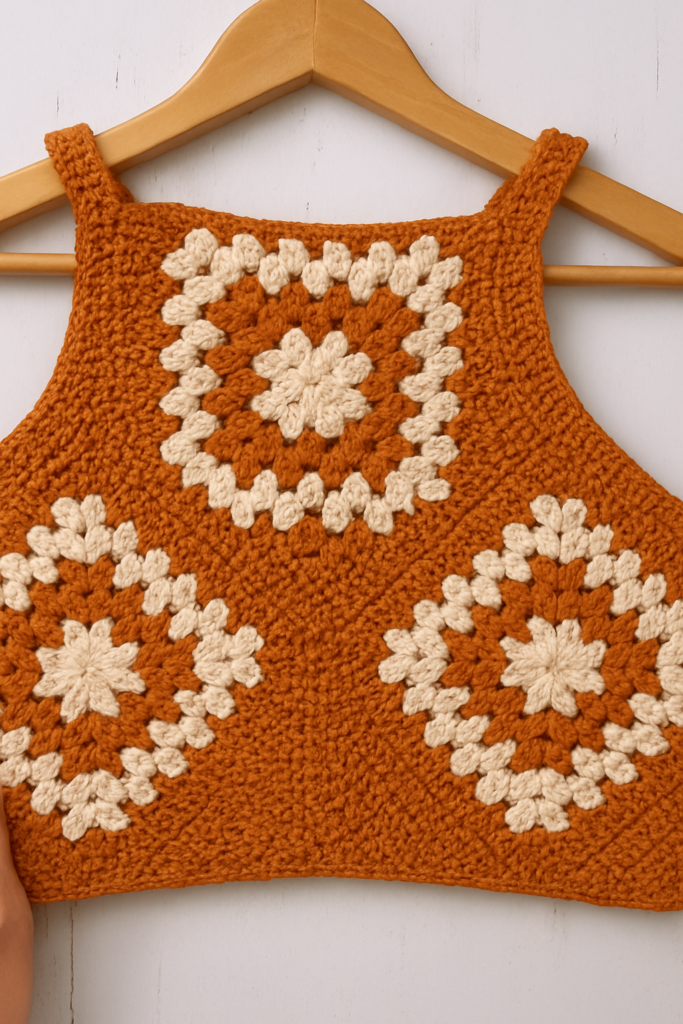
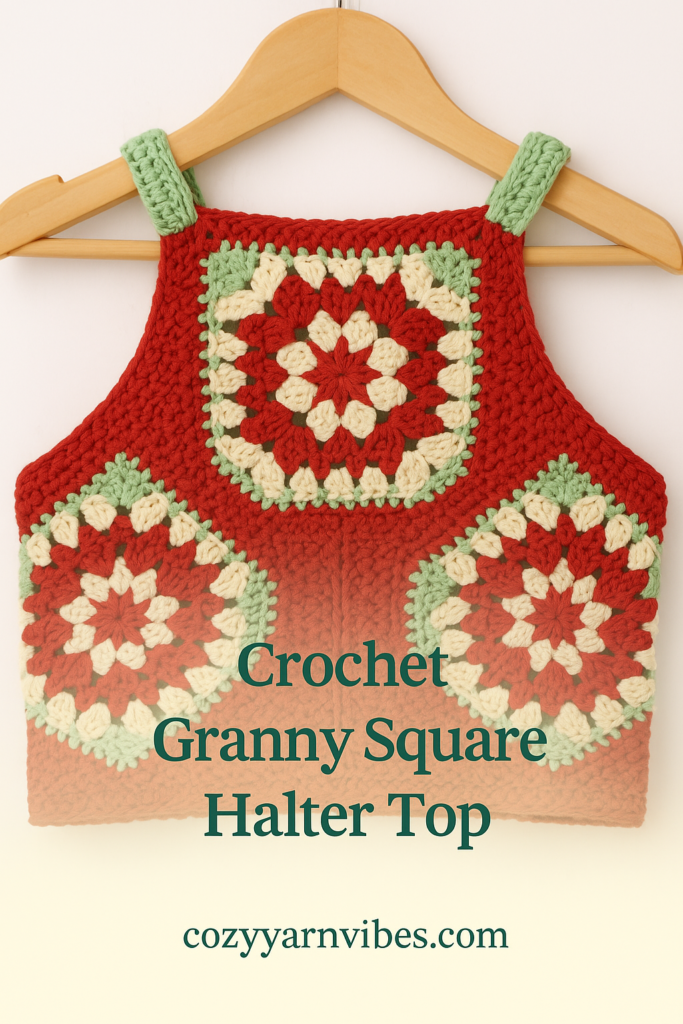
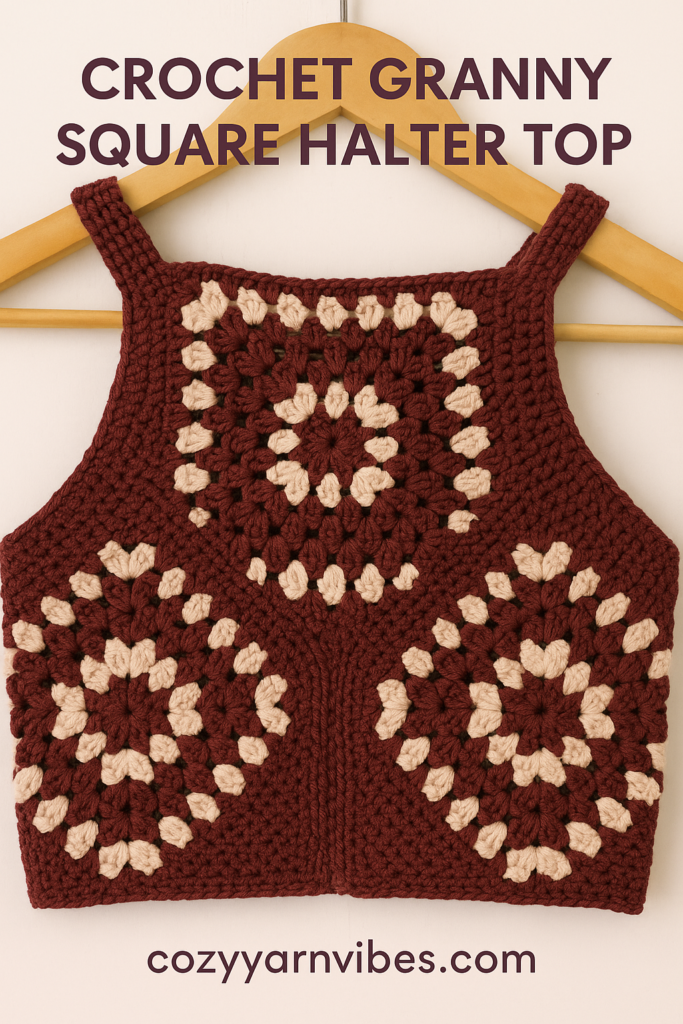
🌼 Crochet Granny Square Halter Top – Free Pattern + Style Guide
Looking for a trendy yet timeless crochet project? This Granny Square Halter Top is the perfect summer piece to elevate your handmade wardrobe! With bold color contrasts and a breathable fit, it’s great for festivals, picnics, or casual weekend wear.
🧶 Materials Needed
- Yarn: 100% cotton yarn (DK or worsted weight)
- Color A (Light Pink/Beige): ~100g
- Color B (Navy or Black): ~150g
- Hook: 4.0 mm (or size needed for gauge)
- Scissors
- Tapestry needle for weaving in ends
- Measuring tape
- Stitch markers (optional)
Crochet Kit for Beginners – 2 PCS Dachshund Crochet Kits with Step-by-Step Video Tutorials, Beginner Crochet Kit for Adults, Crochet Animal Kit, Dog Craft Knitting Kit Crochet Gifts Valentine’s Day
$16.99 (as of March 3, 2026 10:19 GMT +00:00 – More infoProduct prices and availability are accurate as of the date/time indicated and are subject to change. Any price and availability information displayed on [relevant Amazon Site(s), as applicable] at the time of purchase will apply to the purchase of this product.)
Crochetta Crochet Kit for Beginners, Beginner Crochet Kit for Adults with Step-by-Step Video Tutorials, DIY Crochet Animal Kits Knitting Supplies, 3 Pack Turtle (40%+ Yarn)
$15.98 (as of March 3, 2026 10:19 GMT +00:00 – More infoProduct prices and availability are accurate as of the date/time indicated and are subject to change. Any price and availability information displayed on [relevant Amazon Site(s), as applicable] at the time of purchase will apply to the purchase of this product.)
Mnuizu Crochet Kit for Beginners, Animal Crochet kit for Starters with Instructional and Step-by-Step Video Tutorials, Complete Crochet Accessories, Crochet Kit for Adults,Easy Starter Present(Fox)
$9.49 (as of March 3, 2026 10:19 GMT +00:00 – More infoProduct prices and availability are accurate as of the date/time indicated and are subject to change. Any price and availability information displayed on [relevant Amazon Site(s), as applicable] at the time of purchase will apply to the purchase of this product.)
Beginners Easy to Start Crochet Kits for Beginners Halloween Pumpkin Animals Candy Bag Case Crochet Set DIY Gift for Starters Adult Kids Instruction and Video Tutorials
$9.49 (as of March 3, 2026 10:19 GMT +00:00 – More infoProduct prices and availability are accurate as of the date/time indicated and are subject to change. Any price and availability information displayed on [relevant Amazon Site(s), as applicable] at the time of purchase will apply to the purchase of this product.)📌 Skill Level
Beginner to Intermediate
If you’re confident with basic stitches and want to learn how to assemble granny squares into garments, this is a great pattern to try!
🧵 Stitches & Abbreviations (US Terms)
- ch – chain
- sl st – slip stitch
- sc – single crochet
- dc – double crochet
- sp – space
- beg – beginning
- rep – repeat
🧩 Construction Overview
- Create 3 identical granny squares (2 for front sides, 1 for center top).
- Seam them into a triangle halter shape.
- Work body shaping rows.
- Add straps and edging for a clean finish.
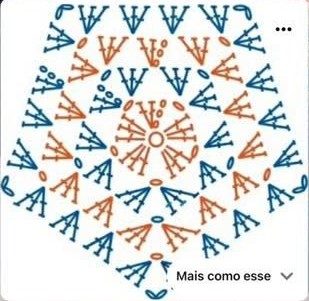
🧶 Granny Square Pattern
Round 1:
Make a magic ring.
ch 3 (counts as dc), 2 dc into ring, ch 2,
[3 dc into ring, ch 2] repeat 3 more times.
Join with sl st to top of ch 3. (4 corners)
Round 2:
sl st to next ch-2 space, ch 3 (counts as dc), 2 dc, ch 2, 3 dc in same space (corner made)
In next ch-2 space: 3 dc, ch 2, 3 dc.
Repeat around. Join with sl st to top of ch 3.
Round 3–5:
Continue in pattern, working (3 dc, ch 2, 3 dc) in corners, and 3 dc in each sp along the sides.
Alternate yarn colors if desired:
- Round 1–2: Color A
- Round 3–5: Color B
Make 3 granny squares total.
🪡 Assembly Instructions
- Lay the top granny square centered above the two lower squares.
- Seam using slip stitch or whip stitch along edges to form a triangle-shaped halter.
- Optional: Add 2 or 3 additional rounds of dc around the full top to shape the body.
- Seam sides if you want a fitted top or leave open for a looser fit.
👗 Straps & Edging
- Straps: Attach yarn at the top two corners.
Ch 40–50 (adjust length as needed), sl st back into starting point for sturdy strap.
Repeat for both sides. - Bottom Edging (Optional):
Work 1–2 rows of sc or picot edging to stabilize and decorate the hem.
🎨 Customization Ideas
- Try it in pastel rainbow colors for a dreamy cottagecore look.
- Add shell edging or fringe at the hem.
- Make it longer with extra rounds of granny squares or dc rows.
🧼 Care Tips
- Hand wash recommended with cold water
- Lay flat to dry to maintain shape
❤️ Why You’ll Love This Project
- Great for stash-busting small yarn amounts
- Beginner-friendly but highly customizable
- Stylish and functional for warm weather
- A quick weekend project!
ABC Coloring Book: Color 100+ Animals, Birds, Vehicles, Fruits, Toys & Alphabets For Boys & Girls | Coloring Book for Toddlers and Preschool Kids | … Book and Coloring Pages (Kids Ages 3-5)
$3.99 (as of March 3, 2026 10:17 GMT +00:00 – More infoProduct prices and availability are accurate as of the date/time indicated and are subject to change. Any price and availability information displayed on [relevant Amazon Site(s), as applicable] at the time of purchase will apply to the purchase of this product.)