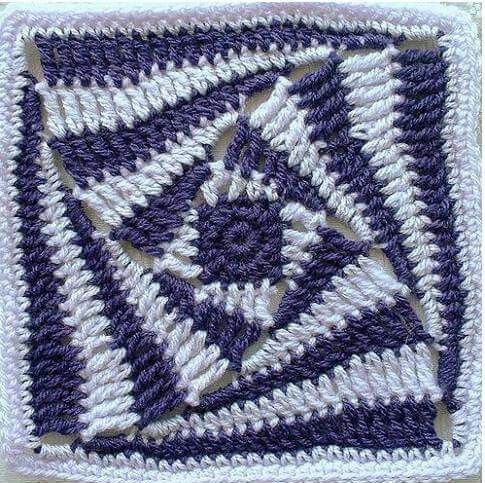
Textured Spiral Granny Square Crochet Pattern (With Stitch Chart)
Introduction
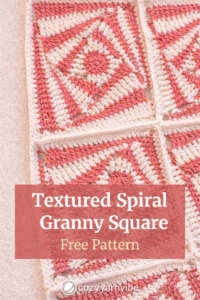
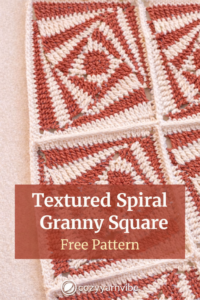
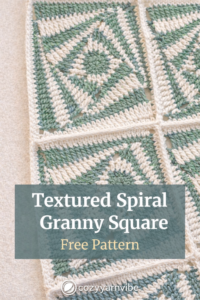
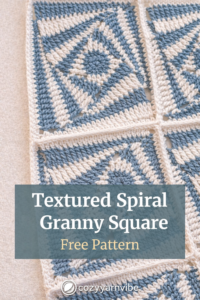
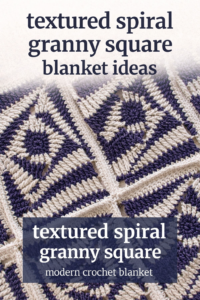
This textured spiral granny square is a bold and modern twist on the classic granny square. Featuring a rotating, geometric design with raised texture, this square creates stunning visual movement while still being worked in simple rounds. It’s perfect for adding interest to blankets, cushion covers, bags, and statement crochet projects.
This tutorial breaks down the stitch chart into written instructions, making it easy to follow even if you’re new to chart-based crochet.
Skill Level
Intermediate
Best for crocheters who are comfortable with double crochet, working in the round, and reading stitch charts.
Finished Size
- Approx. 6 x 6 inches (size depends on yarn and hook)
- Easily adjustable with border rounds
Materials Needed
- Yarn:
- Medium weight (worsted / category 4)
- Two contrasting colors for best texture definition
- Hook:
- 4.0 mm – 5.0 mm (adjust for tension)
- Yarn needle
- Scissors
💡 High-contrast colors highlight the spiral effect beautifully.
Crochet Kit for Beginners, Beginner Crochet Starter Kit w Step-by-Step Video Tutorials, Learn to Crochet Kits for Adults & Kids, DIY Knitting Supplies, 6-Pack Donut Family(40%+ Yarn Content)
$14.27 (as of March 17, 2026 23:44 GMT +00:00 – More infoProduct prices and availability are accurate as of the date/time indicated and are subject to change. Any price and availability information displayed on [relevant Amazon Site(s), as applicable] at the time of purchase will apply to the purchase of this product.)
8Pcs Crochet Kit for Beginners, 2026 Great Christmas Gift for Crochet Lovers, DIY Craft for Adults and Kids, Crocheting Animal Kits with Step by Step Videos, Yarn, Crochet Hook, Birthday Holiday Gift
$23.99 (as of March 17, 2026 23:44 GMT +00:00 – More infoProduct prices and availability are accurate as of the date/time indicated and are subject to change. Any price and availability information displayed on [relevant Amazon Site(s), as applicable] at the time of purchase will apply to the purchase of this product.)
Gipony Crochet Kit for Beginners Animal,Crochet Animal Kits,Crochet Pet Toys Kits,Learn to Crochet with Step-by-Step Video Tutorials,Beginners Crochet Kits for Adults(2 Pack French Bulldog)
$16.99 (as of March 17, 2026 23:44 GMT +00:00 – More infoProduct prices and availability are accurate as of the date/time indicated and are subject to change. Any price and availability information displayed on [relevant Amazon Site(s), as applicable] at the time of purchase will apply to the purchase of this product.)
Crochetta Crochet Kit for Beginners, Beginner Crochet Kit for Adults with Step-by-Step Video Tutorials, DIY Crochet Animal Kits Knitting Supplies, 3 Pack Turtle (40%+ Yarn)
$15.98 (as of March 17, 2026 23:44 GMT +00:00 – More infoProduct prices and availability are accurate as of the date/time indicated and are subject to change. Any price and availability information displayed on [relevant Amazon Site(s), as applicable] at the time of purchase will apply to the purchase of this product.)Stitches & Abbreviations
- ch – chain
- sl st – slip stitch
- sc – single crochet
- hdc – half Double crochet
- dc – double crochet
- ch-sp – chain space
- rep – repeat
How to Do the Main Stitches
- Double Crochet (dc): Yarn over, insert hook, pull up a loop, yarn over, pull through 2 loops twice.
- Working in the Round: Each round is worked continuously with turning points that create the spiral effect.
Construction Overview
This square is built in rotating rounds:
- Circular center
- Spiral-style increases
- Gradual squaring of corners
- Solid border to finish
The square rotates slightly each round, creating the illusion of movement.
Step-by-Step Instructions (Follow Chart)
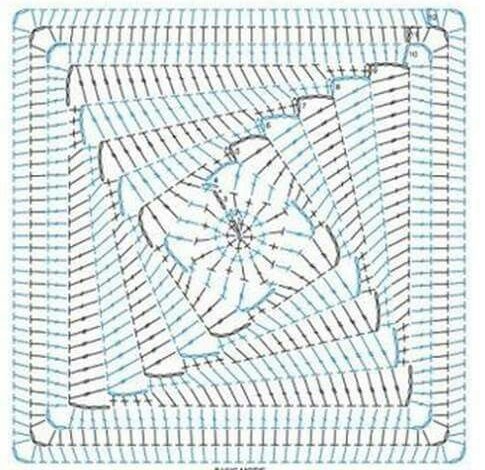
Round 1 – Center
- Create a magic ring
- Ch 3 (counts as dc), work 8 dc into the ring
- Join with sl st (9 dc total)
Round 2 – Begin Spiral
- Ch 3, 2 dc in next st
- 1 dc in next st, 2 dc in next st
- Repeat around, do NOT align increases directly above the previous ones
Round 3 – Rotating Texture
- Ch 3, 1 hdc in next st, sc, hdc, dc hdc, sc, hdc, dc,hdc,sc,hdc,dc,hdc,sc,hdc,sl st.
Round 4 – Squaring the Shape
- Ch 3, sc in next st, then hdc, dc, dc, chain 4. Repeat
- (At corners:add 4 chains)
- Corners appear gradually rather than sharply
Round 5- 9– Spiral Round
- ch 3 , 2 sc, 2 hdc, 4 dc ch 4 repeat.3 time then slip stitich
- Round 6 : ch 3 , 3 sc , 3hdc, 6dc , ch 4 repeat 3 times slip stitich.
- Round 7 : ch 3, 4 sc, 4 hdc , 8 dc . repeat
- Round 8: ch 3 4sc, 6hdc, 10 dc repeat.
- Round 9: ch 3, 4sc, 8hdc, 12 dc , repeat .
Round 10- 12 – Border Round
- ch 3 dc in each round at the corner make 3 chain as shown in graph.
Customization Ideas
- Use 3–4 colors for dramatic effect
- Make it larger by repeating corner rounds
- Use as:
- blanket squares
- cushion covers
- tote bags
- wall decor

Styling & Project Ideas
- Modern crochet blankets
- Geometric throw pillows
- Patchwork cardigans
- Statement wall hangings
Care Instructions
- Hand wash recommended
- Lay flat to dry
- Block lightly to square edges
FAQs
Is this a granny square?
Yes. It’s a modern, textured granny square worked in the round.
Can beginners make this?
Advanced beginners can try it, but intermediate skill is ideal.
Can I join this with classic granny squares?
Yes—add a solid border round for easier joining.
A really good blog and me back again.