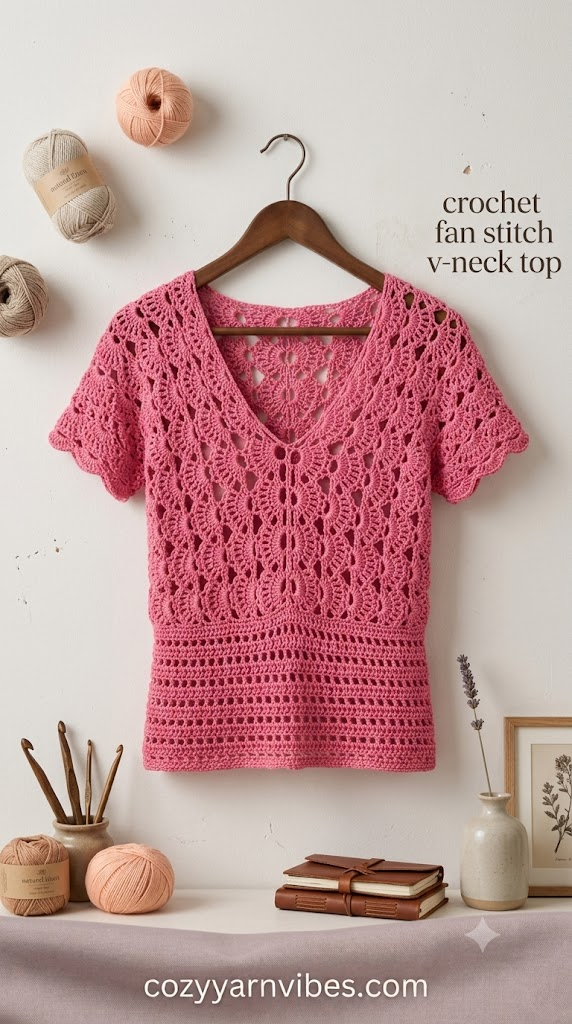
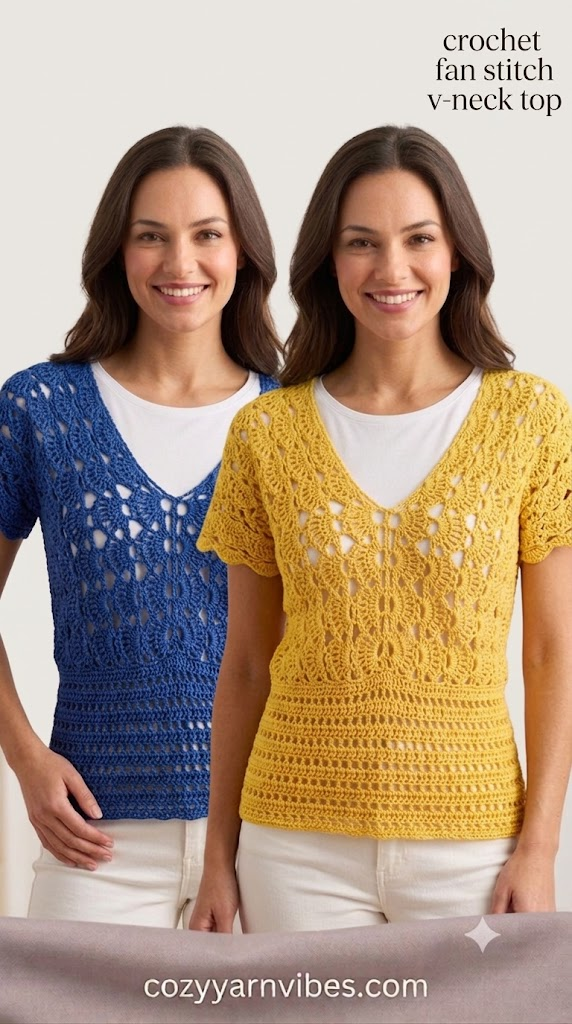
Looking for an easy Crochet Fan Stitch V-Neck Top Tutorial that you can easily learn and work on? This gorgeous crochet top is ideal for beginners because all you need is knowledge of the basic crochet stitches. With its stunning fan stitch design, this top is soft and elegant with an airy touch that makes it ideal for wearing during the warm seasons. You can wear it with jeans, skirts, shorts, and even dresses to make a stylish homemade outfit.
Easy Crochet Fan Stitch V-Neck Crop Top Tutorial
Crochet fan stitch V-Neck top tutorial will teach you how to construct this beautiful top. The construction of this crochet top begins with creating two pieces individually because there will be one for the front and the other for the back.
The work starts with a fitted waistline to add some form to the top, and then the fan stitch is applied upwards to build up the main body of the top. The two panels are then sewn together at the shoulders and side seams and finally, the sleeves and neck border are added.
The crocheted top is light and airy and ideal for spring and summer.
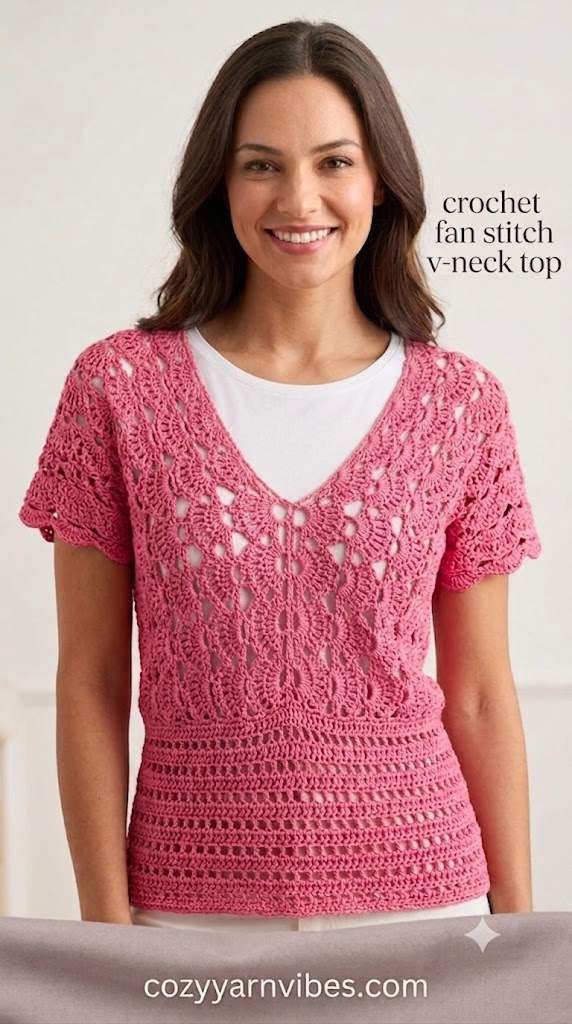
Why You’ll Love This Pattern
- Beginner-friendly pattern
- Beautiful fan stitch design
- Soft and lightweight
- Perfect for warm weather
- Easy to customize in any color
- Comfortable to wear
- Works up faster than you might think
Skill Level
Beginner to Easy Intermediate
If you already know how to make chains, single crochet, and double crochet, you can easily complete this crochet fan stitch V-neck crop top.
Finished Size
Approximately:
- Width: 18 inches
- Length: 18 inches
- Sleeve Length: 6 inches
You can easily make the top longer, shorter, wider, or more fitted by adding or removing rows.
Materials Needed
Yarn
- Worsted Weight Cotton Yarn (#4)
- About 450–550 yards
Cotton yarn is recommended because it feels soft, keeps its shape well, and is comfortable to wear during warm weather.
Color
- Dark Brown (or any color you like)
Additional Supplies
- 5 mm (H) Crochet Hook
- Stitch Markers
- Yarn Needle
- Scissors
- Measuring Tape
Susan’s Family 4Ply Yarn Combo 10×50g/131Yards – Terminator | 60% Cotton 40% Acrylic Yarn for Knitting & Crochet, DIY Scarf & Blanket Pattern & Video Tutorials, Handmade Gift
$18.90 (as of September 14, 2026 19:32 GMT +00:00 – More infoProduct prices and availability are accurate as of the date/time indicated and are subject to change. Any price and availability information displayed on [relevant Amazon Site(s), as applicable] at the time of purchase will apply to the purchase of this product.)
CODGP Crochet Kit for Beginners, 13-Inch Elephant Crochet Kit for Adults | Crochet Starter Kit Gift, Animal Amigurumi Kit, Durable Chenille Yarn, Full Supplies, Step-by-Step Videos, for Crochet Lovers
$26.98 (as of September 14, 2026 19:32 GMT +00:00 – More infoProduct prices and availability are accurate as of the date/time indicated and are subject to change. Any price and availability information displayed on [relevant Amazon Site(s), as applicable] at the time of purchase will apply to the purchase of this product.)
Red Heart Amigurumi Ross The Elephant Kit
(as of September 14, 2026 19:32 GMT +00:00 – More infoProduct prices and availability are accurate as of the date/time indicated and are subject to change. Any price and availability information displayed on [relevant Amazon Site(s), as applicable] at the time of purchase will apply to the purchase of this product.)
Hello Kitty® and Friends Crochet Kit – Cinnamoroll™ Bag Charm, Sanrio Crochet Kit for Beginners with Yarn, Starter Hooks, Step-by-Step Tutorials, DIY Craft, Great Teen Gifts
$11.51 (as of September 14, 2026 19:32 GMT +00:00 – More infoProduct prices and availability are accurate as of the date/time indicated and are subject to change. Any price and availability information displayed on [relevant Amazon Site(s), as applicable] at the time of purchase will apply to the purchase of this product.)Stitches & Abbreviations (US Terms)
- ch = chain
- sc = single crochet
- dc = double crochet
- sl st = slip stitch
- sp = space
- st = stitch
- rep = repeat
How to Make These Stitches
Chain (ch)
To make a chain stitch, first yarn over the hook and then pull the yarn through the loop already on your hook. Continue repeating this step until you reach the required number of chains. This stitch creates the foundation for many crochet projects, including this crochet top.
Single Crochet (sc)
To make a single crochet stitch, first insert your hook into the required stitch. Next, yarn over and pull up a loop so that you have two loops on your hook. Then, yarn over once again and pull through both loops. As a result, you will create one complete single crochet stitch that gives the fabric a firm and neat texture.
Double Crochet (dc)
To make a double crochet stitch, first yarn over before inserting your hook into the required stitch. Then, pull up a loop so that you have three loops on your hook. Next, yarn over and pull through the first two loops. After that, yarn over once more and pull through the remaining two loops. This stitch creates a taller and more open fabric, making it perfect for lightweight crochet projects like this top.
Fan Stitch
The fan stitch is created by working several double crochet stitches into the same chain space. As you continue repeating this stitch, it forms a beautiful fan-shaped design that gives the crochet top its elegant, airy, and decorative appearance. In addition, the open pattern makes the top lightweight and comfortable, making it a perfect choice for spring and summer wear.
Pattern Notes
This crochet top is worked from the bottom upward, which makes it easy to adjust the length as you crochet. First, the front and back panels are crocheted separately, and it is important to make sure that both panels are the same size so they fit together perfectly.
Throughout the project, keep your tension even because this helps the stitches look neat and gives the top a better shape.
Also, remember to count your stitches after every row to avoid mistakes and ensure both panels remain even. After both panels are finished, join them together before crocheting the sleeves and the neckline. Finally, if you would like a longer top instead of a crop top, you can simply add more rows before finishing the body.
Crochet Fan Stitch V-Neck Top Tutorial: Step-By-Step Process
Step 1: Making the Base of the Crochet Fan Stitch V-Neck Top Tutorial
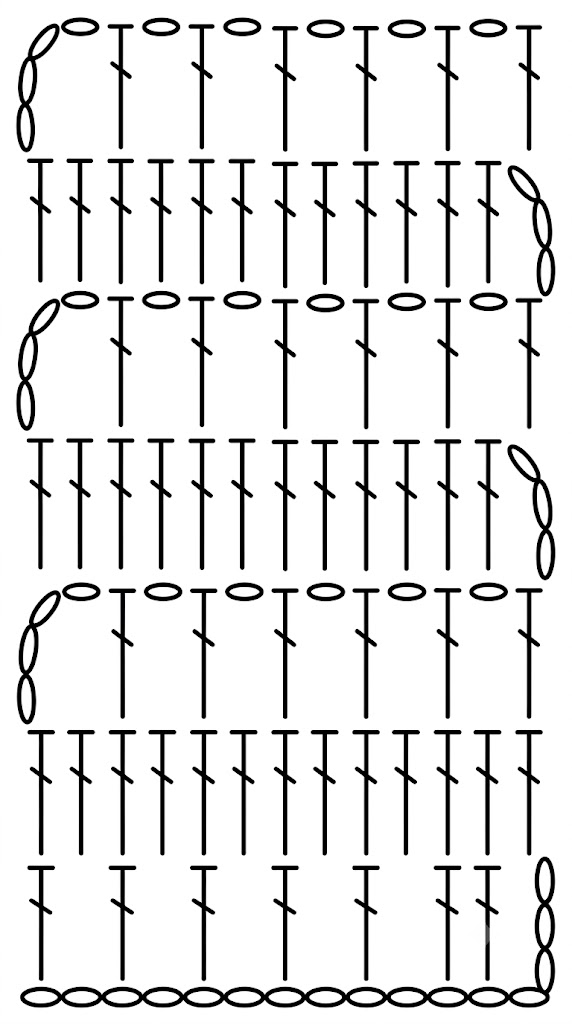
Let’s start making the base of the top. This base will be made in two panels; front and back, so start by making a chain of 40. This number of chains will be different for everyone, as it is decided by the width of your waist, so make sure to measure your waist and then start making the foundation chain.
Next, make 2-3 rows of sc all around the chain to give it a sturdy look. At the end of the last row, make sure to make a ch 3.
After 2-3 rows of sc, we will start the row with the ch 3. Starting from the ch 3, work 1 dc, skip a stitch, 1 dc, skip a stitch, and continue this pattern all around the sc stitches, and then, at the end, make ch 3 again for the next row.
In the next row, you need to make a complete row of dcs without skipping any stitches as shown in the chart, and make a ch 3 at the end.
Now, from the chain 3 (counts as first dc) +1 chain for the space; skip a stitch, dc in next stitch, chain 1, skip a stitch, dc in next, and repeat the rows. Join to the 3rd chain at the round start. This will give a floretti look.
Repeat the same pattern using the chart till you reach the desired length of your base part. Continue for 16 total alternating rounds (dc round / fioretti round) if you want to make the exact shirt size in the image, finishing on a dc round. Finish the bottom edge with 1 round of single crochet.
Make another panel by following the exact same steps and then join them using a snitch stitch.
Step 2: Making the First Rectangle Panel of Crochet Fan Stitch V-Neck Top
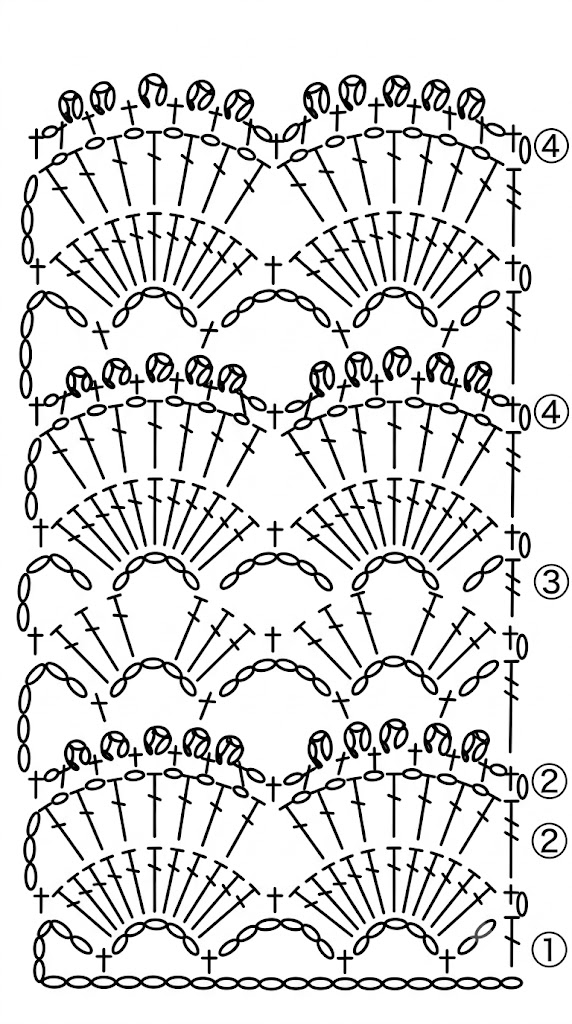
Now we will start making the upper part of the top, that will be made in 2 rectangles. We will join the rectangles at the end to give it a v-neck shape.
Let’s start. Foundation row:
Start by making a ch 40-50 depending on the size of the top you want. Remember that this will be the half of the top and other half part will be made separately.
Starting the Row 1
- Chain 4, work 1 sc in the 8th chain from hook (this makes your first small loop).
- Alternate chain arches: chain 5, skip 3, sc in next; then chain 6, skip 4, and sc in next.
- Continue alternating 5-chain and 6-chain arches across the row.
- End the row with chain 2, skip 2, and then 1 half double crochet in the last stitch.
Continue to Row 2 (fan/shell row):
- Chain 1, turn.
- In each 5-chain arch: work 11 double crochets (this creates the “fan”).
- Then, in each 6-chain arch: work 1 single crochet.
- Alternate across the whole row, ending with a slip stitch into the starting chain space.
Next Row 3 (chain-1 spaced dc row):
- Chain 3 to start (counts as first dc), turn.
- Skip the first and last stitch of each 11-dc fan group.
- Work: 1 dc, chain 1, into each remaining stitch of the fan, giving 7 dc total per fan, each separated by a chain-1 space.
- Between fans, skip to the 2nd dc of the next fan group and repeat.
- Continue this pattern all the way around/across.
Final Row 4 (3-chain arch row):
- Chain 1, turn. Sc into the first dc.
- In each chain-1 space from the row below: work sc, chain 3, sc into the next space — building arches of 3 chains.
- Repeat until you’ve made 5 of these 3-chain arches per fan section, then move to the next fan and repeat.
- Close the round with a slip stitch into the starting chain.
Then repeat the arch rows (4-chain/5-chain alternating) to set up for the next fan row, and repeat the whole 4-row sequence (arches → fans → spaced dc → 3-chain arches) until you have 6 full pattern repeats because this gives you the rectangle’s full length.
Step 3: Making the Second Rectangle Panel of Crochet Fan Stitch V-Neck Top
Now, make the second rectangle panel by using all the same steps listed above and by using the pattern chart provided.
Step 4: Assembling The Patterns
- Fold all four rectangles in half right side out (the dc/fan side is flatter and should be shown; the other side is more curved/rug).
- Place two folded rectangles in such a way that the starting chain edge will face the center of the work because this position will create the circle/neckline.
- Center front seam: join and sew 4 fan motifs in the center front, being careful not to go past the place where there will be one crochet stitch between arches and don’t seam center fans (this place will become the neckline opening).
- Center back seam: repeat above instructions, sewing 4 fan motifs in the center back and leaving the center ones unseamed.
- Side seams: matching wrong sides (so that right side will face outwards), seam 5 fan motifs on each side for the hips. Leave the top open for armholes/sleeves.
- Turn the work right side out. The result is: front and back sewn together, both side seams done, and two armholes open.
Step 5: Adding the Sleeves
Next we will add the sleeve pattern to give it a nice finished look. For this, there will be two arch types left there: one from the side-seam area, one from the sleeve cap
- The first arch (which is smaller): make 1 sc.
- In the second arch (which is larger): make 1 sc.
- Third arch (which is also larger): make 9 dc (the fan).
- Repeat: in the small arch, make sc and in the larger arch, make 9 dc fan – all the way around, trying to get 7 fans in total on each sleeve.
- Fasten off with sl st into the first stitch of the round.
Other Variations to Try
You can easily customize this crochet top in many different ways to match your personal style. For example, you can use two or three different yarn colors to create beautiful stripes throughout the top, giving it a bright and unique look. In addition, you can crochet a shell stitch border around the sleeves and neckline to add a delicate and decorative finish.
If you prefer more coverage, simply add extra rows of fan stitches to make the top longer so it can be worn as a regular blouse instead of a crop top. Likewise, you can replace the short sleeves with long sleeves to turn your top into a lightweight crochet sweater that is perfect for cooler weather.
Customization Ideas
Solid Color Top
Crochet the entire top using one solid yarn color for a simple, elegant, and timeless look.
Colorful Fan Stitch Top
Use different colored yarns for each few rows or every fan stitch section to create a bright and unique crochet top.
Longer Crochet Shirt
Add more fan stitch rows before finishing the body to turn the crop top into a regular-length crochet shirt.
Different Sleeve Lengths
Make cap sleeves, short sleeves, elbow-length sleeves, or long sleeves depending on the style you like.
Oversized Summer Top
Increase the width of both panels and add extra rows to make a loose and comfortable oversized crochet top.
Styling Ideas
This crochet fan stitch V-neck crop top looks beautiful with many different outfits, making it a versatile piece that you can wear on many occasions. For a relaxed and casual everyday look, pair it with high-waisted jeans or denim shorts. If you prefer a more elegant outfit, wear it with a flowy maxi skirt, wide-leg pants, or comfortable linen trousers. In addition, you can layer the top over a simple summer dress to create a stylish handmade look.
It also looks wonderful with beach outfits and a pair of comfortable sandals, making it perfect for vacations, seaside walks, and warm summer days. You can complete your outfit by adding simple jewelry, a woven handbag, and a sun hat for a fresh and fashionable look.
Whether you are going shopping, meeting friends, enjoying a picnic, or spending a day at the beach, this crochet top is a comfortable and stylish choice for any casual occasion.
The finished top is perfect for summer vacations, beach trips, casual outings, brunch, shopping, and everyday wear.
Care Instructions
To keep your crochet top looking beautiful for a long time, wash it gently in cold or lukewarm water using a mild detergent. At the same time, avoid using bleach or harsh cleaning products because they may damage the yarn and affect the shape of the top.
After washing, gently squeeze out the extra water without twisting or wringing the fabric. Next, lay the top flat on a clean towel and allow it to air dry completely.
In addition, keep it away from direct heat and do not use a dryer, as high temperatures can damage the fibers. Finally, once the top is completely dry, fold it neatly and store it in a cool, dry place to help it maintain its shape.
Frequently Asked Questions
Is this crochet top suitable for beginners?
Yes, because this crochet top uses basic crochet stitches like chain, single crochet, double crochet, and fan stitch and if you already know these stitches, you can easily complete this project.
Can I make this crochet top longer?
Simply continue adding more fan stitch rows before finishing the body to make a regular-length shirt or even a tunic.
Can I use acrylic yarn instead of cotton yarn?
You can use acrylic yarn, however, cotton yarn is recommended because it is more breathable, keeps its shape better, and is more comfortable to wear during warm weather.
Can I make this top in different colors?
Of course. You can use one solid color, pastel shades, bright colors, striped yarns, or even multiple colored yarns to create your own unique crochet top.
How can I make the top fit my size?
You can easily adjust the size by changing the foundation chain, adding or removing rows, and making the front and back panels wider or narrower until you achieve the perfect fit.
Conclusion
Crochet Fan Stitch V-Neck Top Tutorial is an ideal project for all those people who love to make fashionable outfits on their own. It will be a delightful choice to wear this crochet top during the season of spring and summer due to its attractive fan stitch pattern and comfortable V-neck design.
If you wish to make this crochet top for yourself or as a handmade gift for your loved one or to sell in the craft fairs or online, this pattern can be easily customized as per your personal preference. You simply need to make changes in its color, length, sleeve type or size and you will end up with a delightful crochet top as per your own choice.
Read our detailed article on how to make a seashell lace tote bag for this summer season.