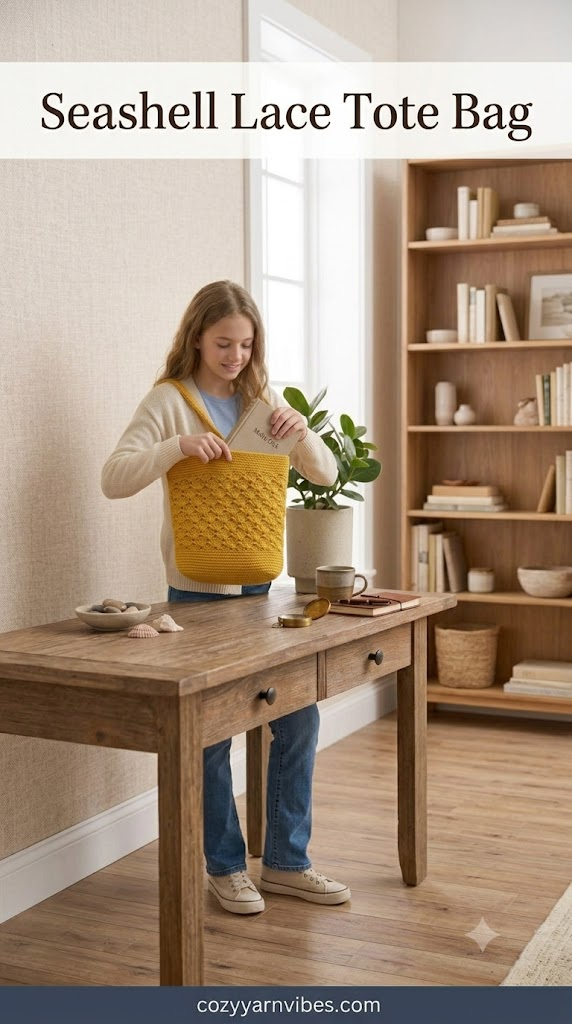
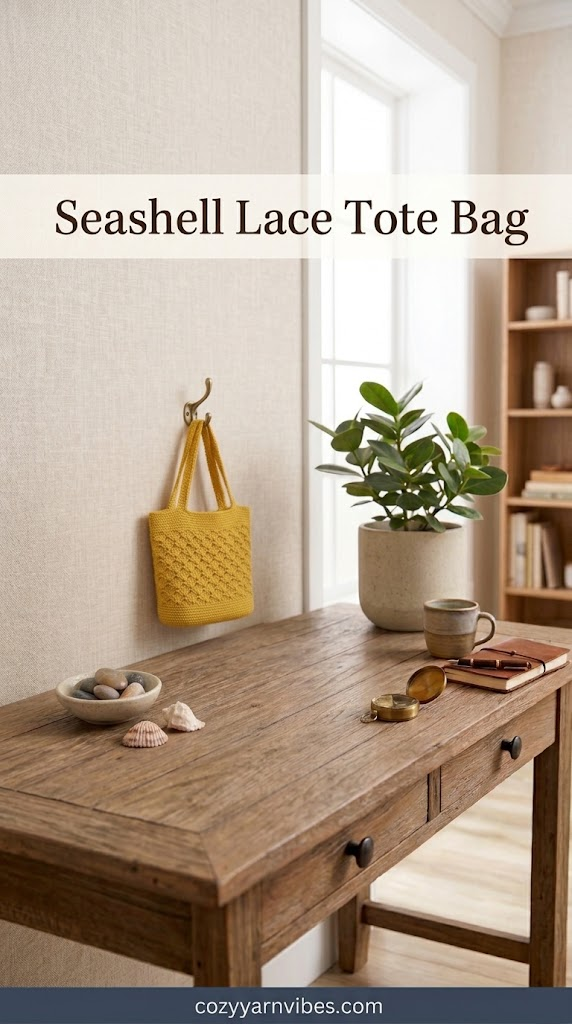
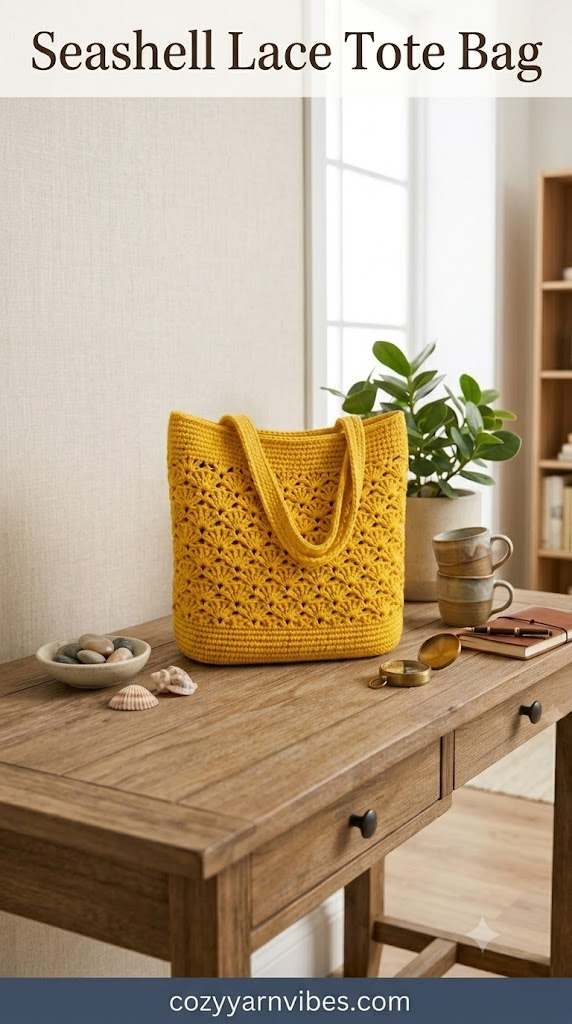
Looking for a simple crochet tote bags tutorial that is easy to follow? This pretty lace tote bag is the perfect project for beginners and anyone who loves handmade bags. The open lace design makes it light, stylish, and perfect for daily use and you can also carry books, groceries, beach items, or your favorite crochet supplies. With only a few basic stitches, you can create a bag that looks beautiful and feels strong enough for everyday use.
Easy Lace Crochet Tote Bag Tutorial
This tote bag crocheted from the bottom up, is constructed. The first step is crocheting a sturdy rectangular bottom and the second step includes crocheting the lovely lace design around the tote bag to the required height. At last, you need to add easy-to-crochet handles.
This crocheted tote bag is soft, light-weight and ideal for hot weather.
Why You’ll Love This Pattern
- Beginner-friendly pattern
- Beautiful lace design
- Lightweight but strong
- Perfect for shopping and everyday use
- Easy to make in any color
- Makes a lovely handmade gift
- Works up faster than you might think
Skill Level
Beginner to Easy Intermediate
If you already know how to make chains, single crochet, and double crochet, you can easily complete this crochet tote bags tutorial.
Finished Size
Approximately:
- Width: 14 inches
- Height: 15 inches
- Handle Drop: 9 inches
You can easily make the bag taller or wider by adding more rows.
Materials Needed
Yarn
- Worsted Weight Cotton Yarn (#4)
- About 500–600 yards
Cotton yarn is recommended because it helps the bag keep its shape.
Color
- Mustard Yellow (or any color you like)
Additional Supplies
- 5 mm (H) Crochet Hook
- Stitch Markers
- Yarn Needle
- Scissors
- Measuring Tape

Wimmsie Crochet Animal Kit for Beginners – Easy Beginner Crochet Kit for Kids – Amigurumi Chicken Chick & Egg – 3 Kawaii Stuffed Animals – Cute DIY Yarn Plush
$20.99 (as of September 15, 2026 19:39 GMT +00:00 – More infoProduct prices and availability are accurate as of the date/time indicated and are subject to change. Any price and availability information displayed on [relevant Amazon Site(s), as applicable] at the time of purchase will apply to the purchase of this product.)
INSCRAFT 113 Piece Crochet Kit with Yarn Set– 1600 Yards Assorted Yarn for Knitting and Crochet, 73PCS Crochet Accessories Set Including Ergonomic Hooks, Knitting Needles & More Ideal Beginner Kit
$31.99 (as of September 15, 2026 19:39 GMT +00:00 – More infoProduct prices and availability are accurate as of the date/time indicated and are subject to change. Any price and availability information displayed on [relevant Amazon Site(s), as applicable] at the time of purchase will apply to the purchase of this product.)
The Woobles Minecraft Crochet Kit for Beginners (Creeper) | As seen on Shark Tank, Officially licensed Minecraft Creeper: Easy Peasy Yarn, hook, safety eyes, stuffing, video tutorials
$44.99 (as of September 15, 2026 19:39 GMT +00:00 – More infoProduct prices and availability are accurate as of the date/time indicated and are subject to change. Any price and availability information displayed on [relevant Amazon Site(s), as applicable] at the time of purchase will apply to the purchase of this product.)
MAGIMUSE Halloween Crochet Kit for Beginners, Crochet Starter Knitting Kits for DIY Amigurumi Knitting Hooks Yarn Set with Step-by-Step Video Tutorials, Candy Corn, Goblin, Pumpkin (40%+ Yarn)
$22.99 (as of September 15, 2026 19:39 GMT +00:00 – More infoProduct prices and availability are accurate as of the date/time indicated and are subject to change. Any price and availability information displayed on [relevant Amazon Site(s), as applicable] at the time of purchase will apply to the purchase of this product.)Stitches & Abbreviations (US Terms)
- ch = chain
- sc = single crochet
- dc = double crochet
- sl st = slip stitch
- sp = space
- st = stitch
- rep = repeat
How to Make These Stitches
Chain (ch)
Yarn over and pull through the loop on the hook.
Single Crochet (sc)
Insert the hook into the stitch.
Yarn over.
Pull up a loop.
Yarn over again.
Pull through both loops.
Double Crochet (dc)
Yarn over.
Insert the hook into the stitch.
Pull up a loop.
Yarn over and pull through two loops.
Yarn over again.
Pull through the last two loops.
Shell Stitch
The shell stitch used to make this bag is made by making:
5 double crochets into the same chain space because this stitch makes the beautiful fan which gives this tote bag an elegant lace look.
V Stitch
The V stitch is made as:
(dc, ch 1, dc) in the same space.
Pattern Notes
- The bag is worked from the bottom upward.
- The body is crocheted in joined rounds.
- The lace pattern repeats around the bag.
- Keep your tension even for the best result.
- Count your stitches after every round.
- The handles are crocheted directly onto the bag, so no sewing is needed.
Crochet Tote Bags Tutorial Step-By-Step Process
Let’s start our crochet adventure and see how this beautiful and unique bag can be made with just few steps. Here are all the steps that you need to follow:
Step 1: Making the Base
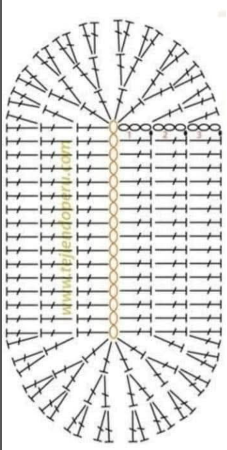
The first step is making the base of the bag. For the base, we will start with a chain of 40-50. This chain length will determine the width of your bag, so you can adjust it accordingly. However, the base must have good length and width, so it can support the bag.
The base will be oval in shape, so you can consider that the chain is in the core, while all other further stitches revolve around it from all sides.
After forming the chain, we will start creating double crochet stitches all around the chain. In this step, on the straight ends, there will be 1 dc in each stitch, while on the round ends, you need to stitch multiple dc (almost 4-5) in one chain stitch because this will give the edges a round shape.
Also, make sure that when you complete this row of dc around the chain, you make a ch 3 to start the next row.
Now start the second row from the ch 3. The pattern is the same as the 1st row, except at the rounded edges, you need to stitch 2 dcs in one dc from the last row. In this way, if you made 5 dcs in the 1st row, you will make 10 dcs in the 2nd row and stitch 2 dcs in 1 dc from the last row to give it a tight rounded shape. Make a ch 3 at the end.
Make another row in the same pattern starting from the ch 3, and this will make you a complete base. You can alter its width and length by increasing or decreasing the number of rows you make.
Step 2: Making The Front Panel
Now we are going to start making the bag’s front part. For this, start by making a foundation ch 40 and then, create 6 to 7 rows of single crochet (sc). You should make at least 6-7 rows of sc because these rows will help your bag stand straight perfectly and give it strength.
Next, we will start making the seashell design of Seashell Lace Tote Bag.
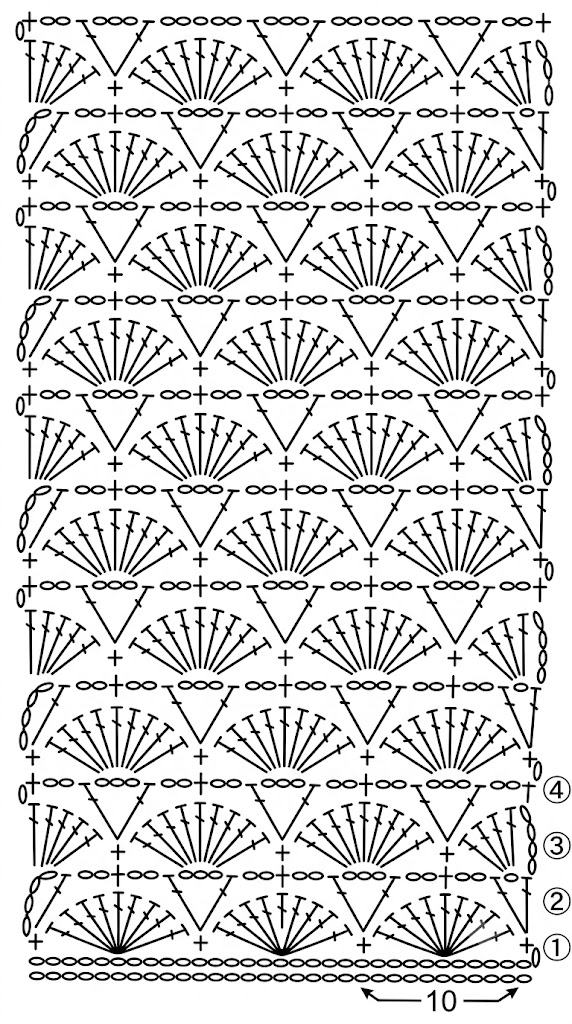
In the first row of the shell pattern, make a sc, skip 4 stitches, and make 9 dcs in the next same stitch, skip 4 stitches, and then make a sc in the next stitch. Repeat this pattern till your first row is complete. Make sure to leave a ch 4 at the end for the next row.
In the second row, start with ch 4, then make a dc that is stitches in the sc in the last row. Then, make ch 2, sc stitches in the dc of the shell in the last row, ch 2, and then make a V stitch. The V stitch will be made by creating a dc, ch 3, and another dc stitched in the same sc of the last row. This step will create spaces and a shell pattern as shown in the bag. This process can be a bit difficult, but it gives your bag a dreamy shell shape. Repeat this pattern till you complete your second row. At the end of each row, make sure to make ch 4 to continue the next row.
Repeat the same alternate pattern in all the rows till you reach your desired panel height. For instance, rows 1, 3, and 5 will have the same pattern, and rows 2, 4, and 6 will have the same pattern. Complete the desired height of your bag using the pattern chart given above, and if you are making the exact same bag in the image, then you need to make at least 8-10 similar rows.
At the end, make another 6-7 rows of sc to give the bag an elegant and sturdy look.
Step 3: Making The Back Panel
Make the back panel just like you made the front panel by repeating the same steps, and you will have 2 panels.
Step 4: Attaching The Lining
Before stitching the base and panels together, add lining to the front and back panels. Cut two pieces of lining fabric that match the size of the front and back panels and sew the lining to the wrong side of each panel. This helps the bag become stronger and keeps small items from slipping through the holes in the shell pattern.
Step 5: Make the Handles
Crochet two long handles using rows of single crochet and make sure that both handles have the same length and width.
If you would like stronger handles, work a few extra rows of single crochet until each handle feels firm and sturdy.
Step 4: Join the Front and Back Panels to the Base
Place the oval base between the front and back panels with the right sides facing outward, and make sure all the edges line up correctly.
Using a yarn needle and matching yarn, sew the front panel to one side of the base and continue sewing until the entire edge is joined.
Next, sew the back panel to the other side of the base in the same way.
Take your time while sewing so the seams stay straight and even.
Step 5: Close the Side Seams
After the base is attached, sew both side edges of the front and back panels together, therefore, use the same joining method all the way to the top of the bag.
Make sure all the seams are secure so the bag is strong enough for everyday use.
Step 6: Attach the Handles
Place the handles evenly on the top edge of the bag and check that both handles are the same distance from the sides.
Using a yarn needle and matching yarn, sew each end of the handles securely to the bag and go over the attachment points two or three times to make the handles extra strong.
Customization Ideas
Classic Everyday Tote
Work in one solid color for classic and elegant styling.
Summer Beach Bag
Select vibrant colors such as yellow, coral, sky blue, or turquoise to create a summery bag.
Bohemian Style
Select earthy colors such as cream, olive green, mustard, and brown to create a natural-looking, handmade bag.
Color Block Tote
Alternate colors after every couple of rounds to create stripes and unique design.
Large Shopping Bag
Increase number of rounds in the bag’s body and work longer straps for a spacious bag.
Styling Ideas
This lace crochet tote bag looks beautiful with:
- Casual jeans and a T-shirt
- Summer dresses
- Beach outfits
- Crochet tops
- Picnic clothes
- Shopping outfits
- Weekend travel looks
The finished bag is perfect for carrying groceries, books, yarn projects, beach towels, and everyday essentials.
Other Variations to Try
- Use two or three different yarn colors to create beautiful striped sections throughout the bag because this gives the tote a fresh and colorful look.
- Add a zipper or a magnetic button at the top of the bag to keep your belongings safe and make the bag more secure.
- Crochet a small matching flower, bow, or leaf and sew it onto the front of the bag for a cute handmade touch.
- Make the bag larger by adding more shell stitch rows or a wider oval base. This version is perfect for shopping, travel, or carrying beach essentials.
- Replace the crochet handles with bamboo, wooden, or leather handles to give the bag a modern and elegant style while keeping the beautiful shell stitch design.
Care Instructions
Hand wash your crochet tote bag in cool or lukewarm water using a mild detergent.
Do not use bleach or harsh cleaning products, because they may damage the yarn.
Gently squeeze out the extra water without twisting the bag.
Lay the bag flat on a clean towel and let it air dry completely.
Avoid placing it in direct heat or a dryer.
Store your tote bag folded in a dry place when it is not in use to help it keep its shape.
Conclusion
This crochet tote bags tutorial is an excellent tutorial for any individual who loves crafting useful items. This bag is a great combination of beauty and function due to its use of simple stitches and easy-to-work with lightweight lace fabric as well as its strong handles.
Regardless of whether you are crocheting the bag for yourself, as a handmade gift, or even selling it in craft fairs, this tutorial is very easy to adapt according to your choice of color and preferred size of the tote. Once you’ve completed this crochet tote bags tutorial, you will have an exquisite tote bag to take pride in.
Read our detailed guide on crochet symbols and learn how to read them efficiently and effectively in no time.
Frequently Asked Questions
Is this a crochet tote bag that beginners can make?
Yes, absolutely. This crochet tote bag is made in beginner crochet patterns using chain, single crochet, double crochet, shell stitch, and V stitch. If you have basic knowledge about how to crochet, you can make this tote bag easily.
Is it possible for me to make this bag bigger?
Yes, of course. The size of the bag can be increased by simply making more rounds for the body. Also, you may make the base larger or elongate before working on the lace part to increase the size of the tote bag.
Is it possible to make this using acrylic yarn instead of cotton yarn?
Yes, you can make it. But the cotton yarn is the best option because it is stronger and less stretchable than acrylic yarn.
Can I make the bag using different colors?
Of course, you can. This crochet tote bag can be made in whatever color combinations you want. It may be done using a single color, pastel colors, bright colors, or striped yarns.