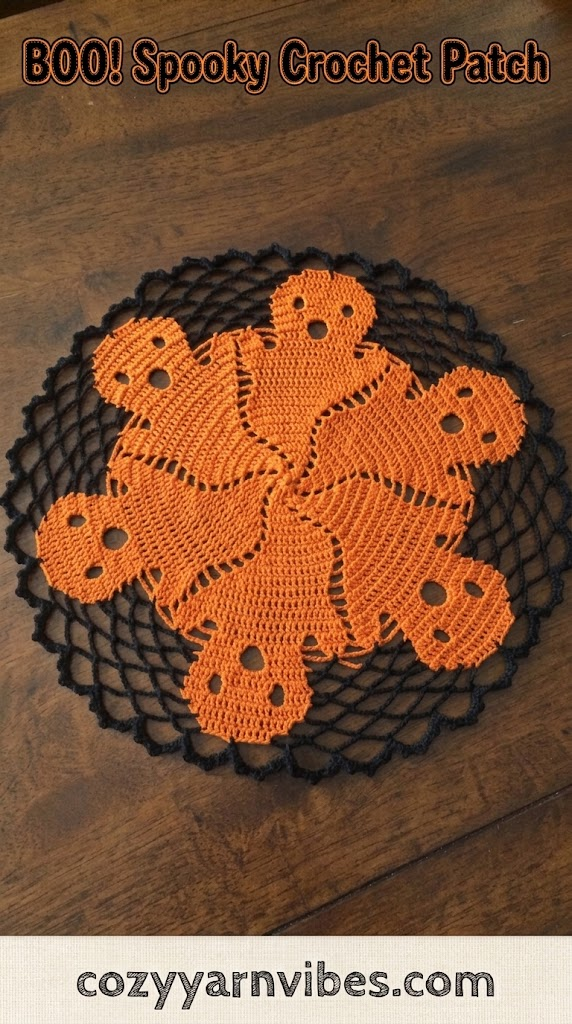
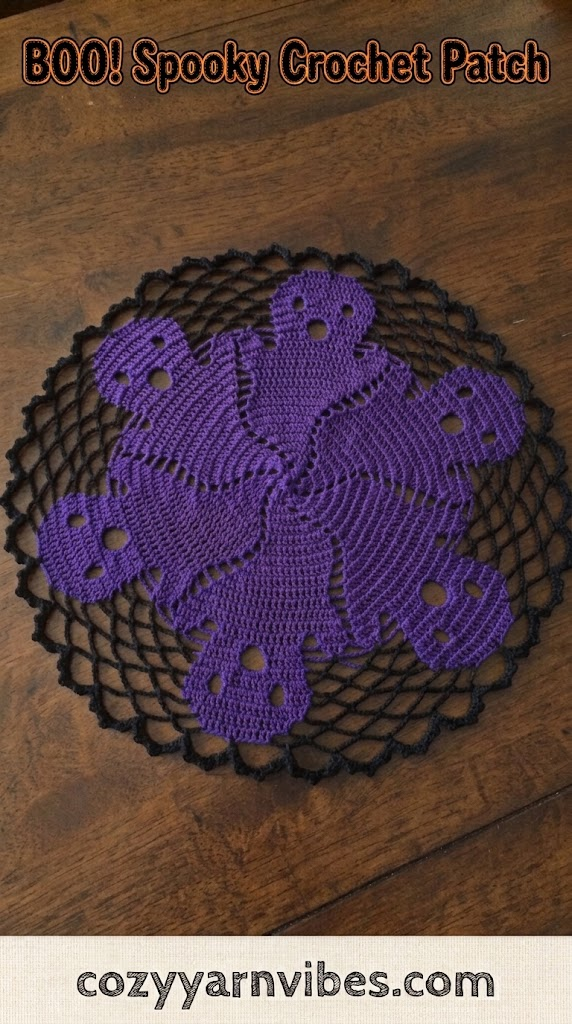
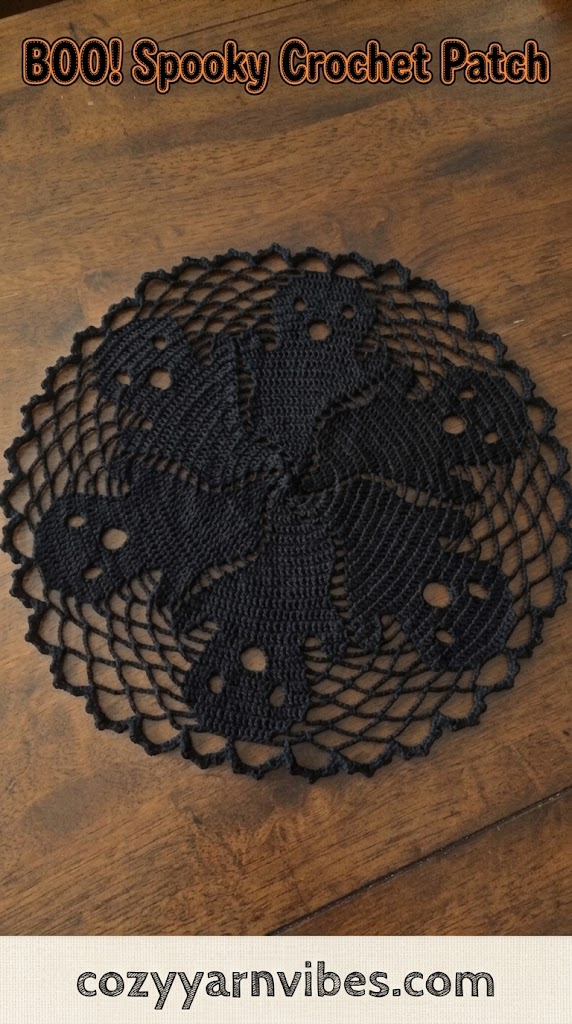
Looking for a fun Halloween crochet project to add a spooky touch to your home? This BOO! Spooky Crochet Patch is a playful handmade decoration that brings Halloween spirit to walls, doors, baskets, bags, pillows, blankets, and other seasonal projects. The detailed crochet design is worked in rounds, gradually building the shape with double crochet stitches, chain spaces, single crochet details, and decreases.
The BOO! Spooky Crochet Patch is also a great project for crocheters who enjoy detailed motifs and Halloween-themed crafts. You can make it in classic black, orange, white, purple, or green, or choose colors that coordinate with your existing Halloween decorations.
Easy BOO! Spooky Crochet Patch Tutorial
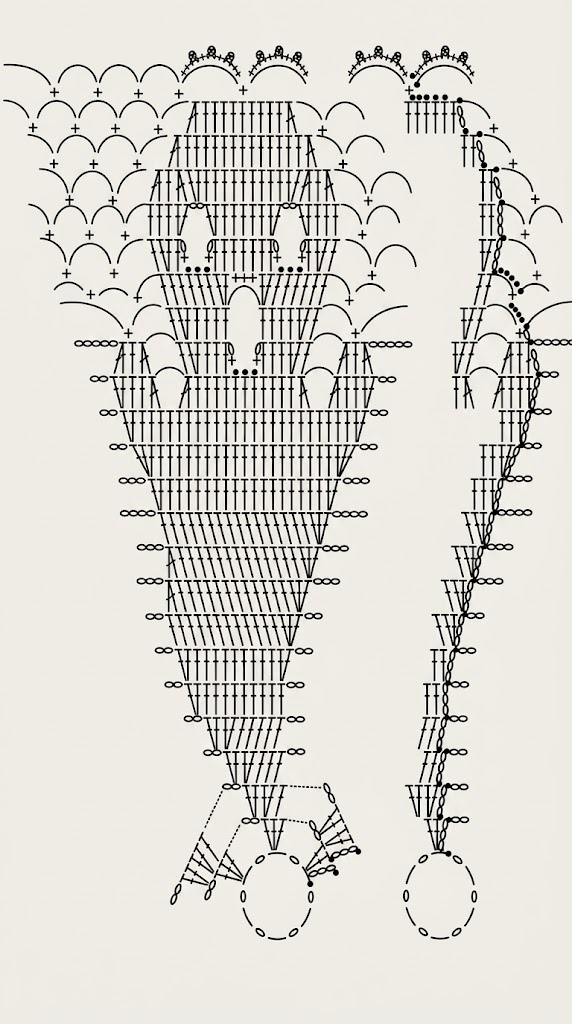
This BOO! Spooky Crochet Patch is worked in 25 rounds, beginning with a small crocheted circle and gradually expanding into the finished Halloween motif. The first several rounds establish the base and outer shape, while the later rounds introduce the detailed sections that create the spooky character of the patch.
The pattern uses double crochet stitches for most of the structure, with single crochet stitches, slip stitches, chain spaces, and dc2tog decreases used to create the finer details. Follow the stitch counts carefully as you move through the rounds.
Why You’ll Love This Pattern
- Fun Halloween crochet project
- Creates a spooky decorative motif
- Great for seasonal home decor
- Can be attached to different crochet projects
- Uses basic crochet stitches with one special decrease
- Easy to customize with Halloween colors
- Works well as a patch or applique
- Perfect for adding handmade Halloween details
Skill Level
Easy to Intermediate
This BOO! Spooky Crochet Patch uses familiar crochet stitches, but the later rounds require careful attention to stitch placement, skipped stitches, chain spaces, and decreases. Beginners who are comfortable working in rounds and following detailed written instructions can try this pattern at their own pace.
Finished Size
The finished size is not specified in the supplied pattern and will depend on your yarn weight, crochet hook, and tension. Use the same yarn and hook throughout the project to maintain consistent proportions.
Materials Needed
Yarn
- Yarn in your chosen Halloween colors
- A small amount of contrasting yarn if you want to emphasize the details
- Choose a yarn weight and hook size that work well together
Color Ideas
Classic Halloween colors such as black, orange, white, purple, and green work especially well for this BOO! Spooky Crochet Patch. A black and orange combination gives the project a traditional Halloween appearance, while black and white creates a simple spooky look.
You can also use one main color for the entire patch or introduce contrasting colors for specific details.
Additional Supplies
- Crochet hook appropriate for your yarn
- Yarn needle
- Scissors
- Stitch marker, if needed
- Measuring tape, if desired
- Optional blocking supplies
Stitches & Abbreviations (US Terms)
This BOO! Spooky Crochet Patch pattern uses US crochet terminology.
St stitch
Slst slip stitch
Ch chain stitch
Sc single crochet stitch
Dc double crochet stitch
Hdc half double crochet stitch
Sp space
Sk skip
Special Stitch
Double Crochet Two Together (dc2tog)
The dc2tog is a decrease made by working two double crochet stitches together. It counts as one stitch.
To make a dc2tog, yarn over and insert your hook into the first stitch. Yarn over and pull up a loop. YO and pull through the first two loops on your hook. Yarn over again and insert your hook into the second stitch. YO and pull up a loop. Yarn over and pull through the first two loops. YO once more and pull through all three remaining loops on your hook.
How to Make These Stitches
Chain (ch)
Yarn over and pull the yarn through the loop on your hook to make a chain stitch.
Single Crochet (sc)
Insert your hook into the indicated stitch or space. Yarn over and pull up a loop. Yarn over again and pull through both loops on your hook.
Half Double Crochet (hdc)
Yarn over and insert your hook into the indicated stitch. YOand pull up a loop. Yarn over again and pull through all three loops on your hook.
Double Crochet (dc)
Yarn over and insert your hook into the indicated stitch. YO and pull up a loop. Yarn over and pull through two loops. YO again and pull through the remaining two loops.
Slip Stitch (slst)
Insert your hook into the indicated stitch, yarn over, and pull the yarn through both the stitch and the loop on your hook.
Pattern Notes
- This pattern is written using US crochet terminology.
- A slip stitch does not count as a stitch and is not included in the stitch count.
- The beginning chain 3 counts as a double crochet unless otherwise stated.
- The beginning chain 2 in Round 16 begins a dc2tog.
- Keep your tension even throughout the project.
- Pay close attention to skipped stitches and chain spaces in the later rounds.
- The stitch count is included after each round to help you check your work.
- You may substitute a magic circle for the chain-5 base if preferred.
- Use a stitch marker to help identify the beginning of a round if needed.
BOO! Spooky Crochet Patch Step-By-Step Process
Work the BOO! Spooky Crochet Patch in rounds, following the instructions carefully. The first rounds build the base and gradually increase the motif. From Round 15 onward, decreases, chain spaces, single crochet stitches, and slip stitches create the detailed spooky design.
Base: Create the Starting Ring
Chain 5 and join with a slst to the first chain to form a circle.
If preferred, you may substitute a magic circle for the starting ring.
Round 1: Build the Center
Ch 3, counting as the first dc. Work 1 dc into the circle.
Repeat ch 1, 2 dc in the circle a total of 5 times.
Ch 1 and join with a slst to the top of the initial ch-3.
Stitch count: 12 dc, 6 ch-1 spaces.
Round 2: Begin the Increase Pattern
Slst into the next dc. Ch 3, counting as the first dc, then work 2 dc in the same dc.
Repeat ch 2, sk 1 dc, 3 dc in the next dc 5 times.
Ch 2 and join with a slst to the top of the initial ch-3.
Stitch count: 18 dc, 6 ch-2 spaces.
Round 3: Continue Increasing
Slst into the next dc. Ch 3, counting as the first dc, then work 2 dc in the next dc.
Work 2 dc into the first ch of the ch-2 sp. Ch 2 and sk the next dc.
Repeat dc in next dc, 2 dc in next dc, 2 dc in first ch of ch-2 sp, ch 2, sk next dc 5 times.
Join with a slst to the top of the initial ch-3.
Stitch count: 30 dc, 6 ch-2 spaces.
Round 4: Expand the Motif
Slst into the next dc. Ch 3, counting as the first dc. Work dc in the next 2 dc, 2 dc in the next dc, and 2 dc in the first ch of the ch-2 sp.
Ch 2 and sk the next dc.
Repeat dc in next 3 dc, 2 dc in next dc, 2 dc in first ch of ch-2 sp, ch 2, sk next dc 5 times.
Join with a slst to the top of the initial ch-3.
Stitch count: 42 dc, 6 ch-2 spaces.
Round 5: Continue the Increase
Slst into the next dc. Ch 3, counting as the first dc. Work dc in the next 4 dc, 2 dc in the next dc, and 2 dc in the first ch of the ch-2 sp.
Ch 2 and sk the next dc.
Repeat dc in next 5 dc, 2 dc in next dc, 2 dc in first ch of ch-2 sp, ch 2, sk next dc 5 times.
Join with a slst to the top of the initial ch-3.
Stitch count: 54 dc, 6 ch-2 spaces.
Round 6: Build the Outer Section
Ch 3, counting as the first dc. Work dc in the next 8 dc, then work 2 dc in the first ch of the ch-2 sp. Ch 2.
Repeat dc in next 9 dc, 2 dc in first ch of ch-2 sp, ch 2 5 times.
Join with a slst to the top of the initial ch-3.
Stitch count: 66 dc, 6 ch-2 spaces.
Round 7: Shape the Outer Corners
Ch 3, counting as the first dc. Work dc in the same dc, then dc in the next 9 dc. Work 2 dc in the next dc and ch 2.
Repeat 2 dc in next dc, dc in next 9 dc, 2 dc in next dc, ch 2 5 times.
Join with a slst to the top of the initial ch-3.
Stitch count: 78 dc, 6 ch-2 spaces.
Round 8: Continue the Outer Shape
Ch 3, counting as the first dc. Work 2 dc in the same dc, then dc in the next 12 dc. Ch 2.
Repeat 3 dc in next dc, dc in next 12 dc, ch 2 5 times.
Join with a slst to the top of the initial ch-3.
Stitch count: 90 dc, 6 ch-2 spaces.
Round 9: Introduce the Decreases
Ch 3, counting as the first dc. Work 2 dc in the same dc, then dc in the next 12 dc.
Work 1 dc2tog and ch 3.
Repeat 3 dc in next dc, dc in next 12 dc, dc2tog, ch 3 5 times.
Join with a slst to the top of the initial ch-3.
Stitch count: 90 dc, 6 dc2tog, 6 ch-3 spaces.
Round 10: Continue the Shaping
Ch 3, counting as the first dc. Work 2 dc in the same dc, then dc in the next 13 dc.
Work 1 dc2tog and ch 3.
Repeat 3 dc in next dc, dc in next 13 dc, dc2tog, ch 3 5 times.
Join with a slst to the top of the initial ch-3.
Stitch count: 96 dc, 6 dc2tog, 6 ch-3 spaces.
Round 11: Create Larger Spaces
Ch 3, counting as the first dc. Work 2 dc in the same dc, then dc in the next 16 sts. Ch 4.
Repeat 3 dc in next dc, dc in next 16 sts, ch 4 5 times.
Join with a slst to the top of the initial ch-3.
Stitch count: 114 dc, 6 ch-4 spaces.
Round 12: Continue Increasing
Ch 3, counting as the first dc. Work dc in the same dc, then dc in the next 17 dc. Work 2 dc in the next dc and ch 3.
Repeat 2 dc in next dc, dc in next 17 dc, 2 dc in next dc, ch 3 5 times.
Join with a slst to the top of the initial ch-3.
Stitch count: 126 dc, 6 ch-3 spaces.
Round 13: Add the Next Increase
Ch 3, counting as the first dc. Work 2 dc in the same dc, then dc in the next 19 dc. Work 3 dc in the next dc and ch 2.
Repeat 3 dc in next dc, dc in next 19 dc, 3 dc in next dc, ch 2 5 more times.
Join with a slst to the top of the initial ch-3.
Stitch count: 150 dc, 6 ch-2 spaces.
Round 14: Complete the Base Shaping
Ch 3, counting as the first dc. Work dc in the same dc, then dc in the next 23 dc. Work 2 dc in the next dc and ch 2.
Repeat 2 dc in next dc, dc in next 23 dc, 2 dc in next dc, ch 2 5 times.
Join with a slst to the top of the initial ch-3.
Stitch count: 162 dc, 6 ch-2 spaces.
Round 15: Begin the Detailed Design
Ch 3, counting as the first dc. Work dc in the same dc, then dc in the next 2 dc.
Then, work a dc2tog, ch 4, sk 1 dc, and dc2tog. Work dc in the next 11 dc.
Work dc2tog, ch 4, sk 1 dc, dc2tog, then dc in the next 2 dc. Next work 2 dc in the next dc and ch 2.
Repeat 2 dc in next dc, dc in next 2 dc, dc2tog, ch 4, sk 1 dc, dc2tog, dc in next 11 dc, dc2tog, ch 4, sk 1 dc, dc2tog, dc in next 2 dc, 2 dc in next dc, ch 2 5 times.
Join with a slst to the top of the initial ch-3.
Stitch count: 162 dc, 6 ch-2 spaces.
Round 16: Form the Arms and Mouth
Ch 2 and dc in the next dc, which counts as a dc2tog. Work dc in the next dc, then dc2tog to finish the arm. Ch 5.
Work dc in the next st, 2 dc in the next dc, and dc in the next 3 dc to begin the mouth.
Ch 1, sc in the same dc, slst in the next 3 dc, sc in the next dc, ch 1, dc in the same dc, dc in the next 2 dc, 2 dc in the next dc, and dc in the next st.
Ch 5. Work dc2tog, dc in the next dc, and dc2tog to finish the arm. Ch 5.
*Repeat the following sequence 5 times: dc2tog, dc in next dc, dc2tog (finish arm), ch 5, dc next st, 2 dc in next dc, dc next 3 dc (begin mouth), ch 1, sc same dc, slst next 3 dc, sc next dc, ch 1, dc same dc, dc next 2 dc, 2 dc next dc, dc next st, ch 5, dc2tog, dc in next dc, dc2tog (finish arm), ch 5.
Join with a slst in the top of the initial dc2tog.
Stitch count: 84 dc, 24 dc2tog, 12 sc, 18 ch-5 spaces, 12 ch-1 spaces.
Round 17: Shape the Motif
Ch 1. This does not count as a st.
Work sc in the next dc, ch 7, and sk the next dc2tog on the arm.
On the body, work dc in the next dc, 2 dc in the next dc, and dc in the next 4 dc. Ch 5, then sk the scs and slsts.
Work dc in the next 4 dc, 2 dc in the next dc, and dc in the next dc.
Ch 7, sk the dc2tog, and sc in the next dc. Ch 9, then sk the next two dc2togs, one on each arm.
Repeat the complete sequence 6 times.
Join with a slst to the top of the initial sc.
Stitch count: 84 dc, 6 ch-9 spaces, 12 ch-7 spaces, 6 ch-5 spaces.
Round 18: Build the Face and Outer Sections
Slst into each of the next 4 chs.
*Repeat the following sequence 6 times: sc into ch-7 sp, ch 4, dc in next 6 dc, 2 dc in next dc, 3 sc in ch-5 sp, 2 dc in next dc, dc in next 6 dc, ch 4, sc in ch-7 sp, ch 8, sc in ch-9 sp, ch 8.
Join with a slst to the top of the initial sc.
Stitch count: 96 dc, 36 sc, 12 ch-8 spaces, 12 ch-4 spaces.
Round 19: Create the Eyes
Slst into each of the next 4 ch, then slst into the next dc. Ch 3, counting as a dc.
Repeat the following sequence 6 times: work 2 dc in the next dc, dc in the next dc.
To begin the first eye, ch 1, sc in the same dc, slst in the next 3 dc, sc in the next dc, ch 1, and dc in the same dc.
Work dc in the next 6 sts.
To begin the second eye, ch 1, sc in the same dc, slst in the next 3 dc, sc in the next dc, ch 1, and dc in the same dc.
Work 2 dc in the next dc and dc in the next dc. Ch 7, sc in the next ch-8 sp, ch 9, sc in the next ch-8 sp, ch 7, and dc in the next dc.
Repeat the complete sequence 6 times, replacing the final dc in the last repeat with a slst in the top of the initial ch-3.
Stitch count: 15 dc, 36 sc, 6 ch-9 spaces, 12 ch-7 spaces, 24 ch-1 spaces.
Round 20: Complete the Eyes
Ch 3, counting as a dc.
Repeat the following sequence 6 times: dc in the next 2 dc, 2 dc in the next dc, ch 2, sk the scs and slsts, 2 dc in the next dc to complete the eye, dc in the next 5 dc, 2 dc in the next dc, ch 2, sk the scs and slsts, 2 dc in the next dc to complete the eye, dc in the next 3 dc, ch 4, sc in the next ch-7 sp, then ch 8, sc in the next sp 2 times, ch 4, dc in the next dc.
Replace the final dc in the last repeat with a slst in the top of the initial ch-3.
Stitch count: 114 dc.
Round 21: Shape the Outer Edge
Ch 2 and dc in the next dc, counting as a dc2tog.
Repeat the following sequence 6 times: dc in the next dc, dc2tog, 2 dc in the ch-2 sp, dc in the next 9 dc, 2 dc in the ch-2 sp, dc2tog, dc in the next dc, dc2tog, ch 9, sc in the next ch-8 sp, ch 10, sc in the next ch-8 sp, ch 9, dc2tog beginning in the next dc.
Replace the final dc2tog in the last repeat with a slst in the top of the initial dc2tog.
Stitch count: 78 dc, 24 dc2tog, 12 ch-9 spaces, 6 ch-10 spaces.
Round 22: Continue the Outer Edge
Slst into the next dc. Ch 2 and dc in the next dc, counting as a dc2tog.
*Repeat the following sequence 6 times: dc in next 13 dc, dc2tog, ch 8, sc into next sp, ch 10, sc into next sp, ch 10, sc into next ch-9 sp, ch 8, sk dc2tog, dc2tog.
Replace the final dc2tog in the last repeat with a slst in the top of the initial dc2tog.
Stitch count: 54 dc, 24 dc2tog, 12 ch-10 spaces, 12 ch-8 spaces.
Round 23: Narrow the Shape
Slst into the next dc. Ch 2 and dc in the next dc, counting as a dc2tog.
*Repeat the following sequence 6 times: dc in next 9 dc, dc2tog, ch 7, sc into next sp, ch 10, sc into next sp, ch 10, sc into next sp, ch 10, ch 7, sk dc2tog, dc2tog.
Replace the final dc2tog in the last repeat with a slst in the top of the initial dc2tog.
Stitch count: 54 dc, 12 dc2tog, 18 ch-10 spaces, 12 ch-7 spaces.
Round 24: Create the Final Open Spaces
Slst in the next 5 dc, then sc in the same dc.
Repeat the following sequence 6 times: ch 10, sc in next sp 5 times, ch 10, sk dc2tog and 4 dc, sc in next dc.
Replace the final sc in the last repeat with a slst in the top of the initial sc.
Stitch count: 36 sc, 36 ch-10 spaces.
Round 25: Finish the Border
Work 3 sc into the next ch-10 sp.
Repeat ch 3, 3 sc into the same ch-10 sp 3 times.
Repeat the larger sequence 3 sc into next ch-10 sp, ch 3, 3 sc into same ch-10 sp 36 times around the motif.
Join with a slst to the initial sc.
Stitch count: 432 sc, 108 ch-3 spaces.
Finishing the BOO! Spooky Crochet Patch
After completing Round 25, fasten off the yarn and leave a tail for weaving in the end.
Use a yarn needle to weave the loose end securely through the stitches on the back of the patch. Trim any excess yarn.
Gently shape the finished motif so it lies flat. If needed, lightly block the piece to help define the edges and open chain spaces.
Your BOO! Spooky Crochet Patch is now complete and ready to use as Halloween home decor or as an applique on another project.
Customization Ideas
Classic Halloween Black
Make the entire patch in black yarn for a traditional spooky look. This works especially well when the patch will be attached to a lighter-colored crochet project.
Black and Orange
Use orange as the main color and black for contrasting details. This classic Halloween combination gives the patch a bright seasonal appearance.
Purple and Black
Try a deep purple background with black details for a slightly different Halloween color palette.
White Ghostly Look
Use white yarn for the main motif and add black or gray details. This creates a simple ghost-inspired appearance that works well with neutral Halloween decor.
Colorful Halloween Patch
Experiment with green, orange, purple, white, and black to create a playful Halloween color combination.
Styling Ideas
There are many ways to use your BOO! Spooky Crochet Patch around the home during Halloween.
- Attach it to a crochet pillow.
- Use it as an applique on a blanket.
- Sew it onto a Halloween tote bag.
- Add it to a crochet basket.
- Use it as part of a Halloween wall display.
- Attach it to a seasonal table mat.
- Add it to a Halloween wreath.
- Use several patches to decorate a larger crochet project.
You can also combine this patch with other handmade Halloween motifs such as pumpkins, bats, spiders, ghosts, skulls, and witch hats.
Other Variations to Try
- Make the patch in different Halloween colors.
- Use a contrasting color for the facial details.
- Sew the patch onto a crochet or fabric project.
- Make several patches for a coordinated Halloween collection.
- Add embroidered details after finishing.
- Use different yarn weights to create different sizes.
- Create matching Halloween patches for bags, pillows, and blankets.
- Experiment with black and white for a monochrome design.
Care Instructions
Care for your finished BOO! Spooky Crochet Patch according to the washing instructions recommended for your yarn.
If the patch becomes dirty, gently wash it using cool or lukewarm water and a mild detergent when the yarn allows it. Avoid harsh cleaning products and bleach, especially when using bright Halloween colors.
Do not twist or wring the patch. Gently squeeze out excess water and lay it flat to dry. Reshape the motif while damp if necessary.
Conclusion
The BOO! Spooky Crochet Patch is a fun way to bring handmade Halloween style into your home. Starting with a simple circular base, the pattern gradually develops into a detailed spooky motif using double crochet stitches, chain spaces, single crochet stitches, and decreases.
You can keep the design in traditional Halloween shades or customize it to match your seasonal decor. Once finished, the patch can be displayed on its own or attached to pillows, blankets, bags, baskets, wreaths, and other crochet projects.
Add the BOO! Spooky Crochet Patch to your Halloween crochet list and create a handmade decoration that you can bring out year after year.
Check out another great Halloween inspired crochet pattern at Crochet Web Spider Coasters For Halloween.
Frequently Asked Questions
Is the BOO! Spooky Crochet Patch beginner-friendly?
This pattern is best suited to crocheters who are comfortable with basic crochet stitches and working in rounds. The first rounds are straightforward, while the later rounds require careful attention to decreases, skipped stitches, chain spaces, and detailed stitch placement.
What crochet stitches are used in this patch?
The pattern uses chain stitches, single crochet, double crochet, slip stitches, and the special dc2tog decrease. Half double crochet is included in the abbreviation list but is not used in the supplied round-by-round instructions.
What does dc2tog mean?
Dc2tog means double crochet two stitches together. It combines two double crochet stitches into one stitch and is used as a decrease. The dc2tog counts as a single stitch.
Can I use a magic circle instead of the starting chain?
Yes. The supplied pattern starts with ch 5 joined with a slip stitch to form a circle, but it specifically notes that a magic circle can be substituted if you prefer.
Can I make the BOO! Spooky Crochet Patch in different colors?
Yes. You can use any Halloween color combination you like. Black, orange, white, purple, and green are all suitable choices, and contrasting colors can help the details stand out.
Can I use this as an applique?
Yes. Once completed and the loose ends are woven in, the patch can be sewn onto suitable crochet or fabric projects such as bags, blankets, pillows, baskets, and other Halloween decorations.
How do I keep the patch flat?
Keep your tension consistent while crocheting and avoid pulling the stitches too tightly. After finishing, gently shape the patch with your hands. Light blocking can also help the motif settle into its intended shape.
What can I make with this Halloween crochet motif?
The finished motif can be used as a decorative patch, applique, wall decoration, bag embellishment, pillow accent, blanket detail, basket decoration, or part of a larger Halloween display.