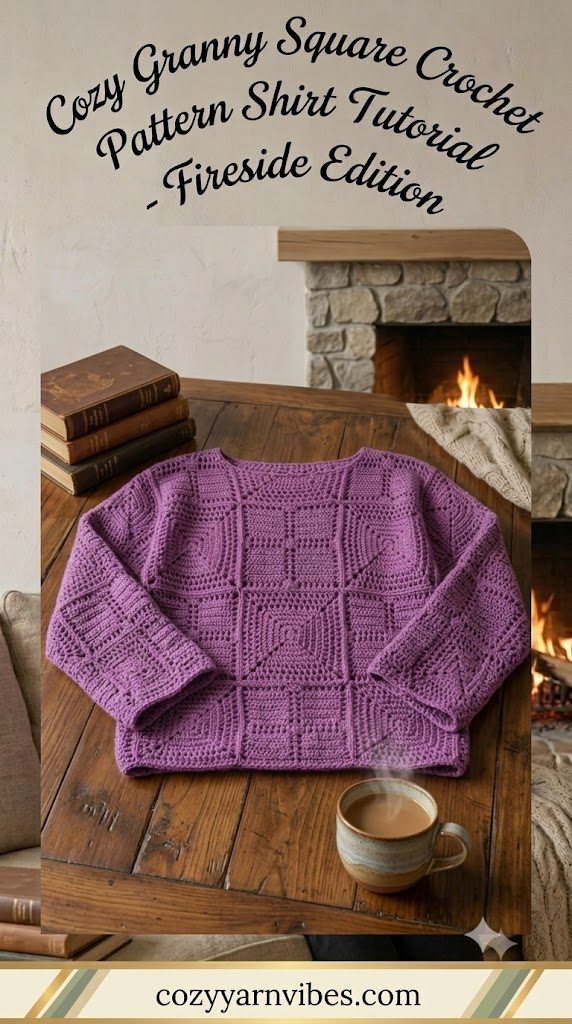
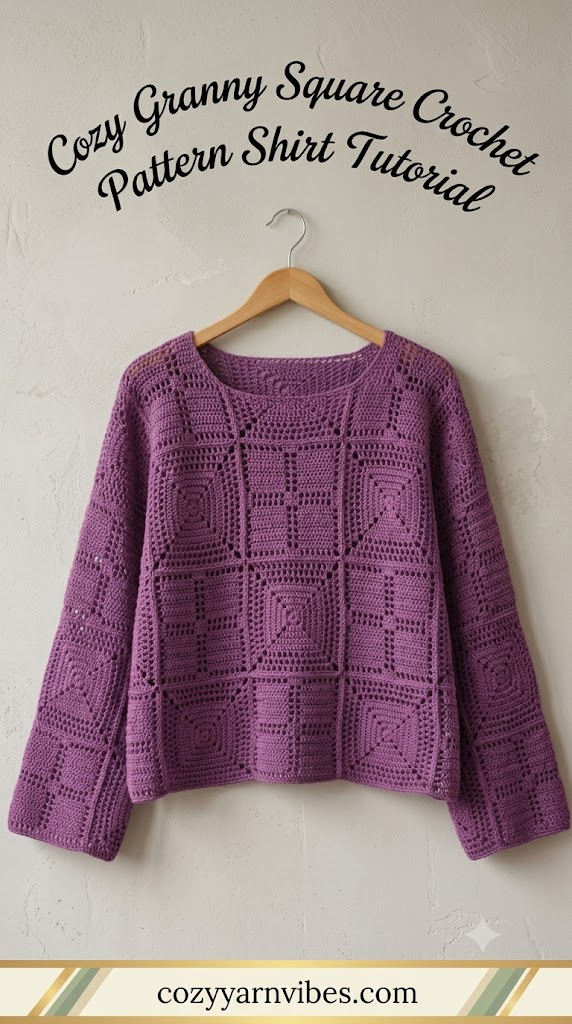
Are you searching for a fashionable and easy Cozy Granny Square Crochet Pattern Shirt Tutorial that you can include in your hand-made wardrobe collection? This amazing crochet shirt is created by attaching traditional granny squares into a cool, comfy, and everlasting shirt. The combination of granny squares in bright colors and simplicity of the technique ensures that the crochet pattern will be fun to create for crocheters at all levels of expertise.
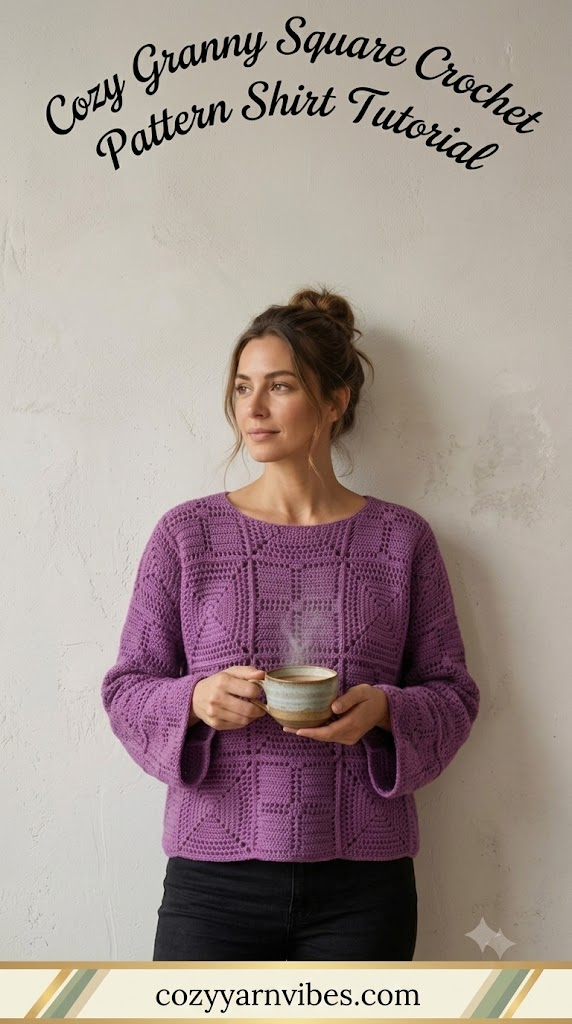
The Cozy Granny Square Crochet Pattern Shirt Tutorial provides a relaxed-fit shirt that will suit spring, summer, and even beginning autumn weather. You can combine it with jeans, shorts, linen pants or a skirt to create a fashionable outfit with hand-made touch. The best thing is that you can choose your own color scheme, sizes, sleeves length, and overall style of this fantastic shirt.
Cozy Granny Square Crochet Pattern Shirt Tutorial
In this Cozy Granny Square Crochet Pattern Shirt Tutorial, the shirt is created by first making separate granny square motifs and then sewing them together to create the shirt’s front, back, and sleeves. This method is very simple and easy to customize, because the shirt will be made by crocheting a number of separate granny squares and then joining them together.
The project is very easy and relaxing, because you have to repeat one pattern throughout the entire project. After finishing all granny squares, you join them together and receive a light-weight crochet shirt with unique vintage style.
This shirt has a loose-fitting silhouette, light-weight texture, and an un-trendy granny squares pattern, which will never go out of style.
Why You’ll Love This Pattern
- Easy granny square construction.
- Perfect project for beginners.
- Lightweight and breathable fabric.
- Comfortable oversized fit.
- Easy to customize for any size.
- Great way to use leftover yarn.
- Works beautifully in solid colors or colorful combinations.
- Perfect for spring and summer outfits.
- Classic crochet design that never goes out of style.
Skill Level
Beginner to Easy Intermediate
If you already know how to make chain stitches, slip stitches, double crochet stitches, and simple granny squares, you can easily complete this Cozy Granny Square Crochet Pattern Shirt Tutorial. Since every square follows the same pattern, the project becomes repetitive and relaxing after completing the first few motifs.
Finished Size
Approximately:
- Width: 20 inches
- Length: 22 inches
- Sleeve Length: 8 inches
Because the shirt is made using separate granny squares, adjusting the size is very simple. Add extra squares to increase the width or length, or remove squares for a smaller fit. You can also make longer sleeves or crop the shirt depending on your personal style.
Materials Needed
Yarn
- Worsted Weight Cotton Yarn (#4)
- Approximately 600–700 yards
Cotton yarn is recommended because it provides excellent stitch definition, breathability, and durability. Cotton blends or bamboo yarn can also be used for a softer drape.
Color
- Use multiple colors for a traditional granny square look, or choose a single color for a modern minimalist design.
Additional Supplies
- 5 mm (H) Crochet Hook
- Stitch Markers
- Yarn Needle
- Scissors
- Measuring Tape

Wimmsie Crochet Animal Kit for Beginners – Easy Beginner Crochet Kit for Kids – Amigurumi Chicken Chick & Egg – 3 Kawaii Stuffed Animals – Cute DIY Yarn Plush
$20.99 (as of September 16, 2026 20:11 GMT +00:00 – More infoProduct prices and availability are accurate as of the date/time indicated and are subject to change. Any price and availability information displayed on [relevant Amazon Site(s), as applicable] at the time of purchase will apply to the purchase of this product.)
Flickzo Stitch Markers, 200pcs Crochet Markers, 0.85″ Metal Bulb Safety Pins, 25+ Colorful Gourd Pins, Knitting Stitch Markers for Crocheting, Crochet Accessories for Fabric & Paper
$4.29 (as of September 16, 2026 20:11 GMT +00:00 – More infoProduct prices and availability are accurate as of the date/time indicated and are subject to change. Any price and availability information displayed on [relevant Amazon Site(s), as applicable] at the time of purchase will apply to the purchase of this product.)
The Woobles Hello Kitty Crochet Kit for Beginners (Keroppi) | As seen on Shark Tank, Officially licensed Hello Kitty Keroppi: Easy Peasy Yarn, hook, safety eyes, stuffing, video tutorials
$44.99 (as of September 16, 2026 20:11 GMT +00:00 – More infoProduct prices and availability are accurate as of the date/time indicated and are subject to change. Any price and availability information displayed on [relevant Amazon Site(s), as applicable] at the time of purchase will apply to the purchase of this product.)
MAGIMUSE Halloween Crochet Kit for Beginners, Crochet Starter Knitting Kits for DIY Amigurumi Knitting Hooks Yarn Set with Step-by-Step Video Tutorials, Candy Corn, Goblin, Pumpkin (40%+ Yarn)
$22.99 (as of September 16, 2026 20:11 GMT +00:00 – More infoProduct prices and availability are accurate as of the date/time indicated and are subject to change. Any price and availability information displayed on [relevant Amazon Site(s), as applicable] at the time of purchase will apply to the purchase of this product.)Stitches & Abbreviations (US Terms)
- ch = chain
- sl st = slip stitch
- sc = single crochet
- dc = double crochet
- sp = space
- st = stitch
- rep = repeat
How to Make These Stitches
Chain (ch)
Make a slip knot and place it on your hook. Yarn over and pull the yarn through the loop already on the hook. Continue repeating until you reach the required number of chains. Chain stitches form the foundation of every granny square.
Slip Stitch (sl st)
Insert your hook into the required stitch, yarn over, and pull the yarn through both the stitch and the loop already on your hook. Slip stitches are mainly used for joining rounds and connecting granny squares.
Single Crochet (sc)
Insert the hook into the stitch, yarn over and pull up a loop. Yarn over again and pull through both loops on the hook. Single crochet creates a firm and neat edging.
Double Crochet (dc)
Yarn over, insert your hook into the stitch, yarn over and pull up a loop. Yarn over and pull through two loops, then yarn over again and pull through the remaining two loops. Double crochet forms the open, airy texture that gives granny squares their classic appearance.
Pattern Notes for Cozy Granny Square Crochet Pattern Shirt Tutorial
In this Cozy Granny Square Crochet Pattern Shirt Tutorial, the individual squares are made first, and then all these squares are joined to make up the front, back, and sleeve of the garment. It is important that the squares be of uniform sizes before joining to make sure that the completed shirt is nicely fitting without any wrinkles.
You have the option of changing colors after every round or keeping all rounds in one color only for a contemporary look. Weaving in the ends of the yarn after every square makes the assembling process easier.
It is recommended that all squares be arranged prior to assembling. This will allow you to try different colors arrangements until you have the right balance.
The neckline is created through leaving the needed central squares open, and the shoulders are joined separately. The side seams are next, and after that the sleeves are attached. Finally, the neckline, the sleeves and the bottom border are added using simple single crochets.
Cozy Granny Square Crochet Pattern Shirt Tutorial: Step-by-Step
The shirt will be made in 4 panels. Front, back, and 2 sleeves. We need to make 2 types of granny squares for this shirt. First, we will make all the granny squares and then join them together to give it a nice shape of panels, and then the shirt.
You need to make at least 40 granny squares, 20 of each type. This shirt will have full sleeves. Each square is almost 15 cm in dimensions, so you can adjust the size and number of squares depending on your preferences.
Granny Square Type A
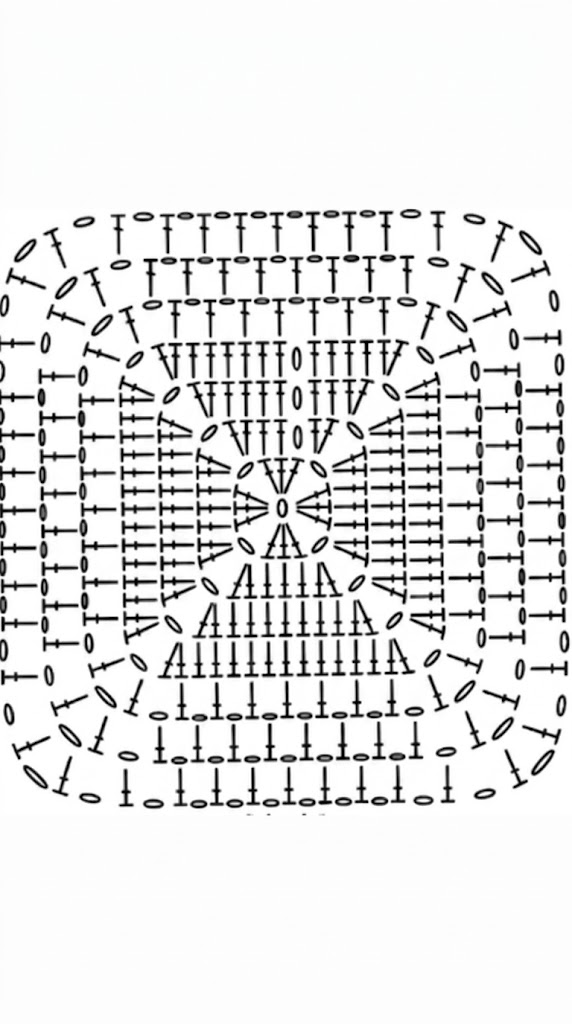
This granny square is worked from the center outward in joined rounds, following the crochet chart. Each round is completed with a slip stitch (sl st) to the top of the beginning chain before starting the next round. The square begins with a solid center and gradually expands into a classic granny square shape. In the later rounds, the stitch pattern changes to create an open mesh border, exactly as shown in the chart.
Round 1 (Foundation Round)
Begin with a Magic Ring.
Alternatively, chain 4 and join with a slip stitch to form a ring.
Chain 3 (counts as the first double crochet throughout the pattern).
Work 15 double crochet (dc) into the center ring.
To establish the four corners of the square, work 1 chain (ch 1) after every fourth double crochet.
The round is worked as follows:
Ch 3 (counts as first dc)
3 dc
Ch 1
4 dc
Ch 1
4 dc
Ch 1
4 dc
Ch 1
Join with a slip stitch to the top of the beginning chain-3.
At the end of this round, you will have:
– 16 double crochet stitches
– 4 chain-1 corner spaces
These four chain spaces mark the corners of the square and provide the foundation for all subsequent rounds.
Round 2
This round begins shaping the square by increasing at each corner while filling in the sides with solid double crochet stitches.
Work the Corners
In each chain-1 corner space, work:
2 dc, ch 1, 2 dc
All four stitches are worked into the same corner space. Repeat this corner increase in all four corners.
Work the Sides
After completing a corner, work 1 double crochet in every stitch across the side until you reach the next corner. Do not skip any stitches.
Repeat the same sequence on all four sides.
Each side should remain completely solid with no chain spaces between the double crochet stitches.
Join the round with a slip stitch to the top of the beginning chain.
Rounds 3-4
Continue working exactly as established in Round 2.
Corners
In every corner chain-1 space, work:
2 dc, ch 1, 2 dc
This increase keeps the square growing evenly while maintaining sharp, well-defined corners.
Sides
Work 1 dc in every dc stitch across each side until you reach the next corner. There are no chain spaces between the side stitches during these rounds.
As your square grows, each side will become longer while maintaining the same solid stitch pattern shown in the chart.
Join each round with a slip stitch before beginning the next round.
Rounds 5-7
Beginning with Round 5, the stitch pattern changes from solid double crochet to an open mesh design. This creates the decorative border visible around the outer edge of the chart.
Work the Corners
Instead of the previous corner increase, work the following into every corner chain-1 space:
1 dc, ch 1, 1 dc
These stitches are worked together into the same corner space. Repeat this corner pattern in all four corners.
Work the Sides
Between each pair of corners, work the following repeat:
Work 1 dc in the next stitch.
Chain 1.
Skip the next stitch.
Work 1 dc in the following stitch.
Chain 1.
Skip the next stitch.
Continue repeating this sequence evenly across the side until you reach the next corner.
The side repeat is:
Dc, ch 1, skip 1 st
This open mesh pattern creates evenly spaced openings while maintaining the square shape. Repeat the same stitch sequence on all four sides and join the round with a slip stitch.
Continue the Pattern
Continue repeating the stitch pattern established in Rounds 5-7 until your granny square reaches the desired size.
For every additional round, work 1 dc, ch 1, 1 dc into every corner chain space.
Across each side, continue repeating:
1 dc
Ch 1
Skip 1 stitch
As the square grows larger, maintain the same stitch placement so the open mesh remains evenly spaced and symmetrical on all four sides.
Finishing
When your square reaches the desired dimensions, fasten off and weave in all loose ends.
Your completed granny square should feature:
– A solid double crochet center.
– Well-defined corners created by regular increases.
– An evenly spaced open mesh border.
– A symmetrical square shape matching the crochet chart.
The square is now complete and ready to be joined with the remaining granny squares to create the front panel, back panel, sleeves, or any other project layout according to your chosen design.
Total Number of Squares:
Make a total of 20 granny squares, using the same pattern above.
Square Type B
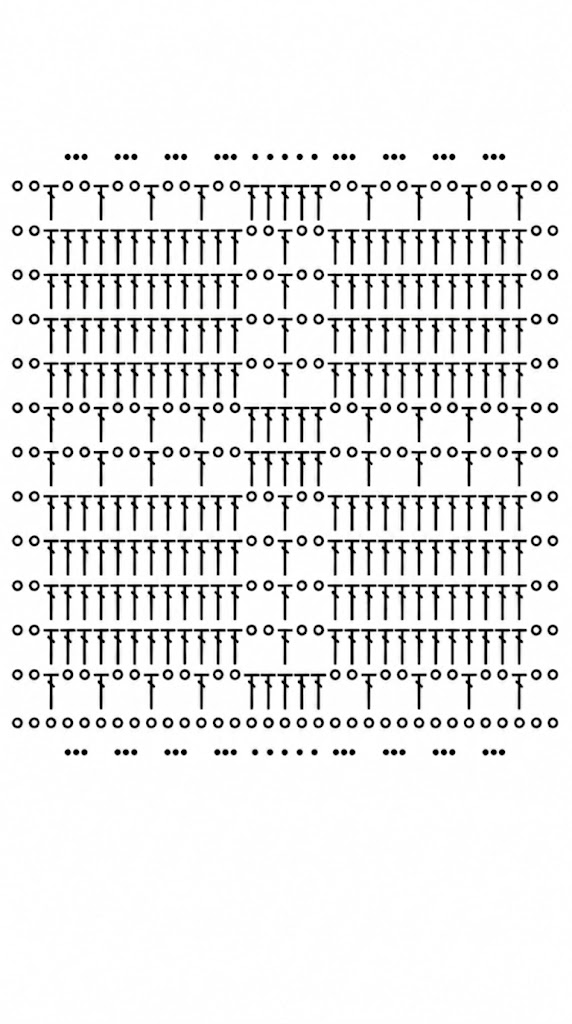
This square is worked in rows rather than in the round. It features alternating sections of solid double crochet and open chain spaces, creating a clean geometric design that complements the granny squares in the blanket. Adjust the foundation chain so the finished square measures approximately 15 × 15 inches, matching the dimensions of the granny squares.
Foundation Chain
Chain 35 to 40 stitches, or any number required to achieve a finished square measuring approximately 15 inches wide. The exact chain count may vary depending on your yarn weight, hook size, and personal tension.
Row 1
Chain 2 and turn. The turning chain does not count as a stitch.
Skip the first 2 foundation chains and work 1 double crochet into the next chain.
Chain 2, skip the next 2 chains, then work 1 double crochet into the following chain.
Repeat this sequence (chain 2, skip 2 chains, 1 double crochet) until you have completed the open mesh section shown on the left side of the chart.
Next, work 1 double crochet into each of the next 5 stitches.
These five consecutive double crochets should be positioned at the center of the row, exactly as illustrated in the chart. Depending on your foundation chain length, you may need to slightly adjust the number of mesh repeats so the group of five double crochets remains perfectly centered.
After completing the center section, resume the mesh pattern by working:
– Chain 2
– Skip the next 2 stitches
– Work 1 double crochet into the following stitch
Repeat this sequence across the remainder of the row.
Finish the row with Chain 2, leaving the final open space at the edge as shown in the chart.
Row 2
Chain 2 and turn.
Begin by creating the left mesh section following the chart. Work:
– Chain 2
– Skip the next 2 stitches
Then work 1 double crochet into each of the next 12 stitches.
These twelve double crochets create the first solid block of the pattern.
Once you reach the center opening created in the previous row, work:
– Chain 2
– Skip the next 2 stitches
– Work 1 double crochet into the next stitch
– Chain 2
– Skip the next 2 stitches
This forms the decorative center opening shown in the stitch chart.
Continue by working 1 double crochet into each of the next 12 stitches, forming the second solid block.
Finish the row with Chain 2 to complete the final open mesh section.
As with Row 1, the center chain-space section should remain aligned with the middle of the square. If your foundation chain differs slightly, adjust the number of stitches before and after the center opening to keep the design symmetrical.
Rows 3-5
Repeat Row 2.
Continue maintaining the two solid double crochet panels on either side while preserving the center chain-space section exactly as shown in the chart.
Rows 6-7
Repeat Row 1.
These rows recreate the open mesh design with the centered group of five double crochet stitches.
Rows 8-11
Repeat Row 2.
Work the solid double crochet sections and center opening exactly as established in the earlier rows, keeping all stitches aligned vertically with the chart.
Row 12
Repeat Row 1 to complete the final pattern repeat.
Finishing
Fasten off and weave in all loose ends securely.
Lightly block the finished square to straighten the mesh sections and even out the stitch definition. The completed square should measure approximately 15 × 15 inches, matching the size of the granny squares so they can be joined together evenly in the finished blanket.
Front Panel
Lay out the required granny squares on a flat surface according to your chosen size. Arrange the squares exactly as shown in the layout diagram, ensuring that Granny Square Type A and Square Type B are positioned correctly. Before joining, double-check that all squares are facing the same direction so the diagonal motifs align consistently across the panel.
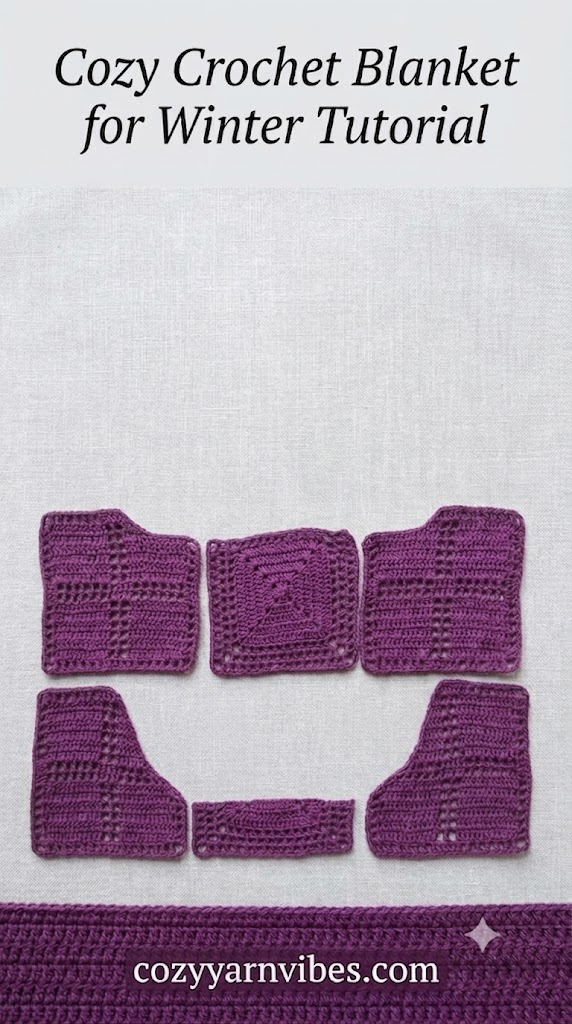
Joining the Granny Squares
The front panel is assembled by joining the individual squares using the Whip Stitch (Slip Stitch Seam).
Place two granny squares with their right sides facing each other. Insert the hook through the corresponding edge loops of both squares. Join the yarn in one corner and work a slip stitch (sl st) through both loops of each matching stitch across the entire edge.
Continue working one slip stitch into each corresponding stitch until you reach the opposite corner. Fasten off.
Repeat this process to join all remaining squares until the complete front panel is formed.
The whip stitch creates a neat, secure seam while allowing the decorative pattern of each granny square to remain the focal point of the design.
Shaping the Neckline
Once the front panel has been assembled, begin shaping the neckline.
The neckline is created by gradually decreasing the granny square pattern, following the diagonal shaping shown in Granny Square Type A. Instead of stopping the panel abruptly, continue working the established stitch pattern while leaving part of the square unworked to form a smooth curved neckline.
Continue crocheting in the established pattern until you reach the desired neckline depth.
At the beginning of the neckline shaping:
- Stop working across the full width of the panel.
- Leave the required center stitches unworked.
- Continue crocheting only the stitches that form the shoulder section.
For every following row, continue decreasing by following the diagonal shaping already established in the granny square chart.
Maintain the decorative eyelet pattern while reducing the number of stitches. The decreases should naturally follow the diagonal lines of the motif so the finished neckline blends seamlessly with the design instead of appearing as a straight cut.
Repeat the shaping until the desired neckline width has been reached.
Work the second shoulder in the same manner, making sure both sides are symmetrical.
Neckline Edging
After both shoulders have been completed and the neckline shaping is finished, join the yarn at any point around the neckline.
Work 2-3 rounds of single crochet (sc) evenly around the entire neckline.
Place one single crochet into each stitch and work additional stitches only where needed to maintain a smooth edge without puckering.
These finishing rounds help strengthen the neckline, prevent stretching, and create a clean, professional finish.
Back Panel
Assemble the back panel using the required arrangement of granny squares according to the layout diagram.
Arrange all squares before joining to ensure the motifs are aligned correctly.
Join each square using the same slip stitch seam (whip stitch) used for the front panel.
Work one slip stitch through the corresponding loops of both adjoining squares until every square has been joined into a single panel.
Back Neckline
Unlike the front panel, the back neckline is shaped much more shallowly.
Work the panel until it reaches the required height before beginning the neckline shaping.
Using the same decreasing method shown in Granny Square Type A, leave only a small number of center stitches unworked.
Continue crocheting each shoulder separately while maintaining the established stitch pattern and diagonal shaping.
The decreases should follow the existing diagonal lines of the granny square motif so the shaping appears continuous throughout the design.
Once both shoulders are complete, fasten off.
Back Neckline Edging
Join the yarn around the neckline and work 2-3 rounds of single crochet (sc) evenly around the entire opening.
This creates a neat finish and helps the neckline retain its shape during wear.
Sleeves (Make 2)
Make two identical sleeve panels.
Arrange the granny squares according to the sleeve layout shown in the assembly diagram.
Join all squares together using the slip stitch seam, working through the corresponding loops of adjoining squares.
Continue joining until both sleeve panels are complete.
Fold each sleeve panel in half lengthwise with the right sides facing together.
Join the underarm seam using the same slip stitch method, working from the cuff toward the armhole.
Fasten off.
Sleeve Edging
Join the yarn to the sleeve opening.
Work 2-3 rounds of single crochet (sc) evenly around each sleeve cuff.
Maintain an even stitch count around the opening so the cuff lays flat without gathering or flaring.
Repeat for the second sleeve.
The single crochet edging provides a smooth, structured finish while complementing the decorative granny square pattern.
Final Assembly
Place the front and back panels together with the right sides facing each other.
Join the shoulder seams using a slip stitch seam.
Next, position each sleeve evenly around the armhole, matching the center of the sleeve to the shoulder seam. Attach the sleeves using slip stitches, working evenly around the armhole to avoid stretching.
Once both sleeves have been attached, join the side seams of the body and continue sewing along the underside of each sleeve in one continuous seam.
Turn the shirt right side out and check that all seams are secure and evenly aligned.
Finally, inspect the neckline, sleeve cuffs, and all joined edges. If desired, lightly block the finished shirt to open the stitch pattern and give the garment a smooth, professional appearance.
Other Variations to Try
– Crochet the entire shirt using one solid color for a modern minimalist style.
– Alternate bright granny squares with neutral joining yarn for a colorful vintage-inspired design.
– Add additional granny square rows to transform the shirt into a tunic.
– Create bell sleeves by gradually adding extra granny squares toward the cuffs.
– Make an oversized beach cover-up by increasing both the width and length.
Customization Ideas
Classic Multicolor Shirt
Use a different yarn color for every granny square to create the traditional handmade granny square look full of personality and color.
Neutral Modern Shirt
Crochet all the granny squares in one neutral shade such as cream, beige, sage green, or soft gray for an elegant wardrobe staple.
Cropped Granny Square Shirt
Reduce the number of square rows to create a fashionable cropped crochet shirt that pairs beautifully with high-waisted jeans or skirts.
Long Sleeve Version
Continue adding granny square rows to the sleeves until they reach your preferred length for cooler seasons.
Oversized Relaxed Fit
Increase both the width and length by adding additional granny squares to create a loose-fitting, comfortable oversized shirt.
Styling Ideas
The Cozy Granny Square Crochet Pattern Shirt Tutorial is a timeless wardrobe piece that can be styled in countless ways.
Pair it with denim shorts and sandals for an effortless summer outfit, or wear it with high-waisted jeans and white sneakers for a casual everyday look. Linen trousers and woven accessories create a relaxed vacation-inspired style, while layering the shirt over a camisole or tank top makes it comfortable for everyday wear.
During cooler weather, wear it under a lightweight cardigan or denim jacket while allowing the colorful granny squares to remain the focal point of your outfit.
Care Instructions
Hand wash your crochet shirt using cool water and a mild detergent.
Do not wring or twist the fabric, as this may stretch the granny squares.
Gently press out excess water using a clean towel.
Lay the shirt flat to dry, reshaping each granny square while damp.
Store folded rather than hanging to help maintain its original shape.
Frequently Asked Questions
Is this shirt suitable for beginners?
Yes. Since the project is made from repeating granny squares joined together, it is an excellent beginner-friendly garment once you know the basic crochet stitches.
Can I make the shirt larger or smaller?
Absolutely. Simply add or remove granny squares to adjust both the width and length until you achieve your desired fit.
Which yarn works best?
Cotton yarn is highly recommended because it is breathable, lightweight, durable, and provides excellent stitch definition.
Can I use different granny square designs?
Yes. As long as every square finishes at the same dimensions, you can combine different granny square patterns to create a unique design.
Can I make this shirt with long sleeves?
Yes. Continue adding granny square rows until your sleeves reach the preferred length.
Conclusion
This Cozy Granny Square Crochet Pattern Shirt Tutorial is a fun and rewarding project that transforms simple granny squares into a beautiful handmade garment. Its relaxed construction, lightweight feel, and classic crochet design make it a versatile piece that you’ll enjoy wearing throughout the year.
Whether you’re making this shirt for yourself, as a thoughtful handmade gift, or to sell at craft fairs or online, the Cozy Granny Square Crochet Pattern Shirt Tutorial offers endless possibilities for customization. Experiment with different colors, sleeve lengths, edging styles, and layouts to create a crochet shirt that perfectly reflects your personal style.
Read our article on Crochet Shell Stitch Blouse Tutorial for more interesting designs.