Crochet can feel like a whole new language when you’re just starting out. So many crochet stitches, so many names, so many little hooks and loops! This guide is here to make it simple. Think of it as your one-stop library for every stitch you’ll ever need, explained in the easiest way possible.
Whether you’re picking up a hook for the very first time, or you already know the basics and want to try something new, this A–Z guide will walk you through it, stitch by stitch, step by step.
How to Use This Crochet Stitches Guide
It’s not necessary for you to go through this guide from beginning to end. Go to the stitch that interests you, and start from there. Everything is written in the easiest language possible, with no technical terms from the world of crochet used anywhere. For beginners, it is best to start with the “Basic Stitches” part first and then proceed.
One piece of advice for you before you begin: make sure your tension on the yarn is relaxed. The common problem among beginners is to tighten their yarn.
Categories of Crochet Stitches
Let’s discuss the 3 categories of crochet stitches:
Basic Stitches: Ideal for Beginners
Easy crochet stitches guide
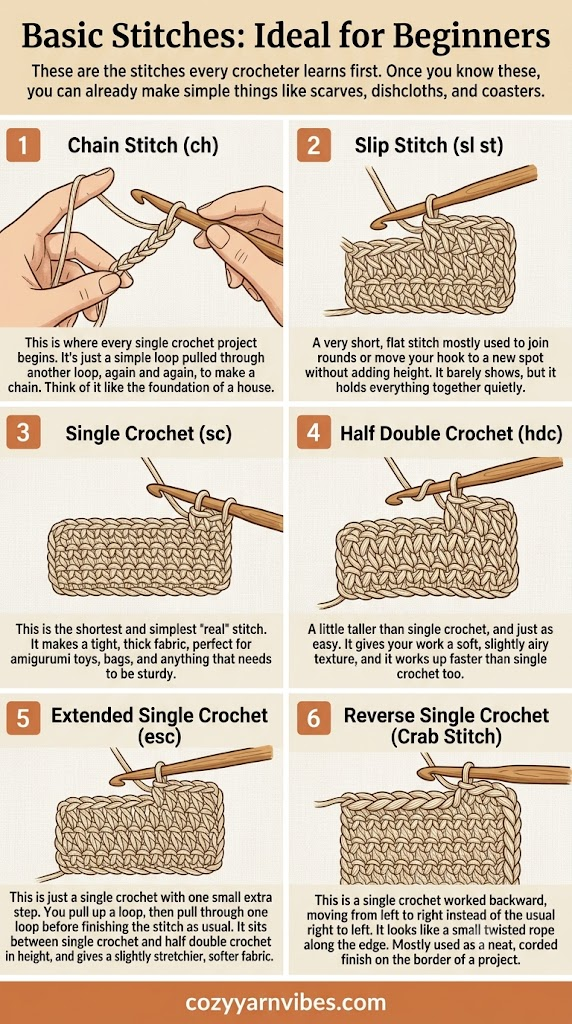
These are the very basic stitches learned by all crocheters. Once you learn these stitches, you can already make things such as scarves, dish cloths and coasters.
Chain Stitch (ch)
The beginning of every single crochet project is the chain stitch. It consists of a loop being pulled through another loop, repeatedly creating a chain. You could say that it is a foundation of your crocheted item, and without a foundation, nothing will happen further.
How to Make This Stitch
1. Make a slip knot and place it on your hook. 2. Yarn over and pull the yarn through the loop on your hook. 3. Repeat the yarn over and pull-through motion until you reach the desired chain length.
Where to Use This Stitch Creatively
Beyond the foundation row, a simple chain makes a lovely drawstring, strap, or decorative loop. Try a long chain as a tie for a baby bonnet or as the base for a soft, swingy fringe.
Slip Stitch (sl st)
A very short, flat stitch mostly used for joining rounds or moving the hook into a new position without adding any height. Invisible to the eye, it helps to put all stitches together.
How to Make This Stitch
1. Insert your hook into the indicated stitch or space. 2. Yarn over and pull through the stitch and the loop already on your hook. 3. Continue as directed, keeping the stitch flat and short.
Where to Use This Stitch Creatively
Because it sits so flat, the slip stitch is perfect for a subtle surface line that blends right into the fabric, and it’s the neatest way to join granny squares almost invisibly.
Single Crochet (sc)
This is the shortest and simplest stitch after the slip stitch. It creates a compact, dense fabric.
How to Make This Stitch
1. Insert your hook into the stitch, yarn over, and pull up a loop. You should have two loops on your hook. 2. Yarn over again and pull through both loops. 3. Repeat across the row or round.
Where to Use This Stitch Creatively
That dense, solid fabric is great for making amigurumi, bags and anything requiring solidity.
Half Double Crochet (hdc)
A slightly taller stitch than single crochet and equally easy. Half double crochet stitches provide a little bit of airy fabric, and they work up quicker than single crochets do.
How to Make This Stitch
1. Yarn over, insert your hook into the stitch, and pull up a loop. You should have three loops on your hook. 2. Yarn over and pull through all three loops at once. 3. Repeat across the row or round.
Where to Use This Stitch Creatively
The extra height and drape make it a favourite for cosy blankets, hats and quick-to-finish garments where you want warmth without the density of single crochet.
Extended Single Crochet (esc)
It is basically a single crochet stitch with an additional element of pulling up a loop, then pulling through one loop. This is taller than single crochet and shorter than half double crochet, and it also provides a slightly stretchable fabric.
How to Make This Stitch
1. Insert your hook into the stitch, yarn over, and pull up a loop. 2. Yarn over and pull through one loop, then yarn over and pull through both remaining loops. 3. Repeat across the row.
Where to Use This Stitch Creatively
That built-in stretch is handy for wearables that need a little give, like fitted hats, cowls and cuffs.
Reverse Single Crochet (Crab Stitch)
Single crochet worked backwards, from right to left rather than from left to right. This stitch looks like a small twisted rope sitting along the edge.
How to Make This Stitch
1. Insert your hook into the stitch directly behind your hook, working in the opposite direction. 2. Yarn over, pull up a loop, then yarn over and pull through both loops. 3. Continue working backward along the edge to create the twisted border.
Where to Use This Stitch Creatively
Mainly used as a neat, corded finish for the border of a project, like a bag opening or the edge of a blanket.
Intermediate Stitches: Adds Texture and Complexity
Once you’ve mastered the basics, these stitches will give your projects more height and texture.
Double Crochet (dc)
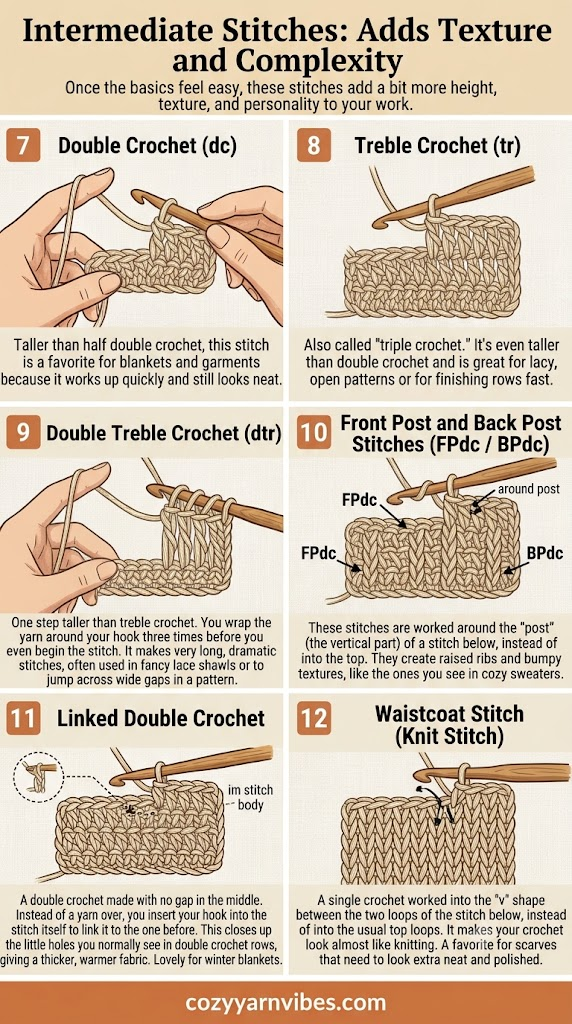
Taller than half double crochet, this stitch is quick to work up yet still looks neat.
How to Make This Stitch
1. Yarn over, insert your hook into the stitch, yarn over, and pull up a loop. You should have three loops on your hook. 2. Yarn over and pull through two loops, leaving two loops on the hook. 3. Yarn over and pull through the remaining two loops.
Where to Use This Stitch Creatively
One of the most common stitches for blankets and garments, since it builds fabric fast without sacrificing a neat finish.
Treble Crochet (tr)
Also known as “triple crochet,” this stitch is taller than the double crochet.
How to Make This Stitch
1. Yarn over twice, insert your hook into the stitch, yarn over, and pull up a loop. 2. Yarn over and pull through two loops, three separate times. 3. Continue until only one loop remains on your hook.
Where to Use This Stitch Creatively
Perfect for lace-like patterns or for finishing rows in record time, thanks to its extra height.
Double Treble Crochet (dtr)
Taller than treble crochet, this stitch requires you to wrap your yarn around the hook three times before starting the stitch itself.
How to Make This Stitch
1. Yarn over three times, insert your hook into the stitch, yarn over, and pull up a loop. 2. Yarn over and pull through two loops, four separate times. 3. Continue until one loop remains on your hook.
Where to Use This Stitch Creatively
Double treble crochet creates extra-long, dramatic stitches often used in ornamental lace shawls or to cross wide gaps in a design.
Front Post and Back Post Stitches (FPdc / BPdc)
These stitches are worked around the “post” of a previous stitch rather than its top. This technique is used to create ribbed and textured patterns.
How to Make This Stitch
Front Post Double Crochet (FPdc): 1. Yarn over and insert your hook from front to back, around the post of the indicated stitch. 2. Yarn over, pull up a loop, then complete the double crochet by pulling through two loops twice. 3. Repeat around the front posts as directed.
Back Post Double Crochet (BPdc): 1. Yarn over and insert your hook from back to front, around the post of the indicated stitch. 2. Yarn over, pull up a loop, then complete the double crochet by pulling through two loops twice. 3. Repeat around the back posts as directed.
Where to Use This Stitch Creatively
Alternating FPdc and BPdc columns builds a stretchy, defined rib, ideal for cuffs, hems, hats and any spot that needs a snugger, textured finish.
Linked Double Crochet
A double crochet made with no gap in the middle. Instead of a yarn over, you insert your hook into the stitch itself to link it to the one before. This closes up the little holes you normally see in double crochet rows, giving a thicker, warmer fabric.
How to Make This Stitch
1. Insert your hook into the horizontal bar or designated linking point of the previous double crochet, then insert it into the next stitch and pull up a loop. 2. Yarn over and pull through the first two loops. 3. Yarn over and pull through the remaining two loops.
Where to Use This Stitch Creatively
That extra-thick, gap-free fabric makes it lovely for winter blankets and anything meant to keep the cold out.
Waistcoat Stitch (Knit Stitch)
A single crochet worked into the “v” shape between the two loops of the stitch below, instead of into the usual top loops. It makes your crochet look almost like knitting.
How to Make This Stitch
1. Insert your hook through the center of the V at the front of the stitch, between the two vertical loops. 2. Yarn over and pull up a loop. 3. Yarn over and pull through both loops on your hook.
Where to Use This Stitch Creatively
A favourite for scarves that need to look extra neat and polished, since the knit-like texture reads as more refined than standard single crochet.
Spike Stitch
A stitch worked by inserting your hook into a row below the one you’re currently on, then pulling the loop all the way up to your working row. It creates a little raised “spike” that stands out from the rest of the fabric.
How to Make This Stitch
1. Insert your hook into a stitch several rows below the current row. 2. Yarn over and pull the loop up to the height of your working row. 3. Yarn over and pull through the loops to complete the stitch according to the pattern.
Where to Use This Stitch Creatively
Often used to make patterns like tiny flowers or zigzags in a different colour, so it’s a fun way to add a graphic pop without changing yarn every row.
Lace and Decorative Stitches: Perfect for Doilies and Embellishments
These stitches are all about the pretty gaps and delicate patterns. They’re what give doilies, shawls, and lacy tops their dreamy look.
Shell Stitch
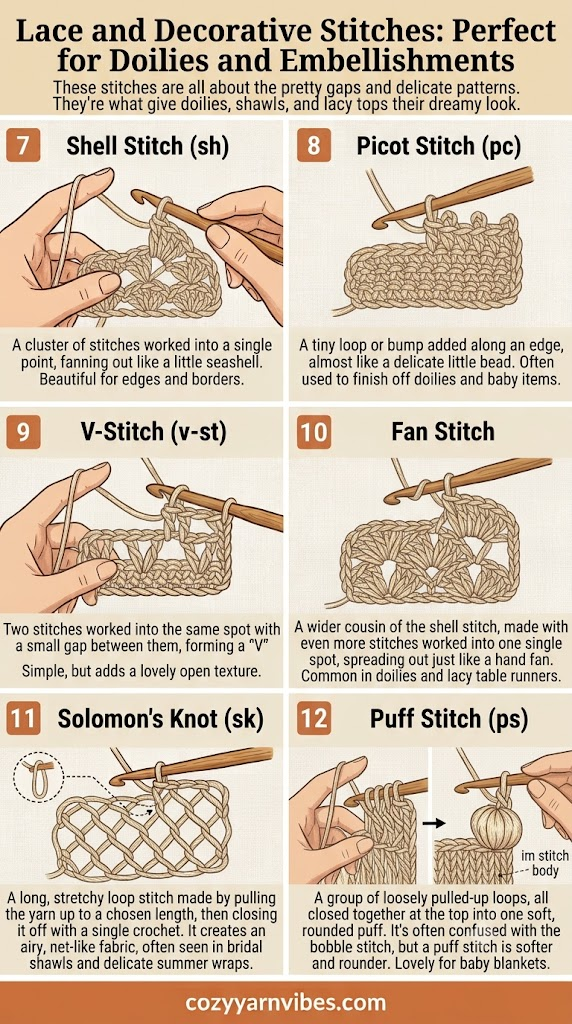
A cluster of stitches worked into a single point, fanning out like a little seashell.
How to Make This Stitch
1. Work several double crochet stitches into the same stitch or space, commonly five double crochets. 2. Skip the required stitches and work a single crochet or other separating stitch. 3. Repeat the shell and separating stitch pattern across the row.
Where to Use This Stitch Creatively
Beautiful for edges and borders, and equally lovely worked in rows for a scalloped, seashell-like fabric across a whole tote bag or blanket.
Picot Stitch
A tiny loop or bump added along an edge, almost like a delicate little bead.
How to Make This Stitch
1. Make the required number of chain stitches, usually three. 2. Insert your hook into the designated chain or stitch and make a slip stitch. 3. Continue working along the edge.
Where to Use This Stitch Creatively
Often used to finish off doilies and baby items, giving even a plain edge a delicate, beaded look.
V-Stitch
Two stitches worked into the same spot with a small gap between them, forming a “V” shape.
How to Make This Stitch
1. Work one double crochet into the indicated stitch or space. 2. Chain one, then work another double crochet into the same stitch or space. 3. Repeat the V-stitch pattern across the row.
Where to Use This Stitch Creatively
Simple, but it adds a lovely open texture, making it a great choice for lightweight summer tops, airy shawls and breathable baby blankets.
Fan Stitch
A wider cousin of the shell stitch, made with even more stitches worked into one single spot, spreading out just like a hand fan.
How to Make This Stitch
1. Work several stitches, usually five or more double crochets, into the same stitch or space. 2. Skip the required number of stitches before making the next fan. 3. Repeat across the row to create the wide fan pattern.
Where to Use This Stitch Creatively
Common in doilies and lacy table runners, where its wide spread creates a dramatic, elegant repeat.
Solomon’s Knot (Love Knot)
A long, stretchy loop stitch made by pulling the yarn up to a chosen length, then closing it off with a single crochet. It creates an airy, net-like fabric.
How to Make This Stitch
1. Pull up a long loop to the desired height, then yarn over and pull through the loop. 2. Insert your hook into the small loop created at the base and make a single crochet. 3. Repeat these elongated loops and connecting stitches to form the net-like fabric.
Where to Use This Stitch Creatively
Often seen in bridal shawls and delicate summer wraps, thanks to its romantic, cobweb-like drape.
Puff Stitch
A group of loosely pulled-up loops, all closed together at the top into one soft, rounded puff. It’s often confused with the bobble stitch, but a puff stitch is softer and rounder.
How to Make This Stitch
1. Yarn over, insert your hook into the stitch, and pull up a long loop. Repeat several times in the same stitch. 2. Once you have the required loops on your hook, yarn over and pull through all the loops. 3. Secure the top with a chain if your pattern requires it.
Where to Use This Stitch Creatively
Lovely for baby blankets, where its soft, rounded texture feels gentle against the skin.
Star Stitch
Made by pulling up several loops from a few stitches at once and closing them together, forming a shape that looks like a small five-pointed star.
How to Make This Stitch
1. Pull up loops from several consecutive stitches until you have the required number of loops on your hook. 2. Yarn over and pull through all the loops, then chain one to close the star. 3. Begin the next star by picking up loops from the previous star and the following stitches.
Where to Use This Stitch Creatively
Beautiful for shawls and eye-catching blankets, where the repeated star texture becomes the whole design.
Filet Mesh Stitch
A simple grid of chains and double crochets that creates neat open squares. Some squares are left open and some are filled in with extra stitches to form pictures or letters.
How to Make This Stitch
1. Work a double crochet, followed by the required chain stitches to create an open space. 2. Skip the indicated number of stitches and work another double crochet. 3. Repeat the chain-and-double-crochet pattern to create the mesh grid.
Where to Use This Stitch Creatively
This is the technique behind old-fashioned filet doilies and curtains, and it’s a fun way to spell out names or stitch simple pictures into a piece.
Advanced Stitches: Great for Creating Intricate Patterns
These are slightly more difficult stitches, but once mastered, will enable you to make fabric that is intricate and different from anything else.
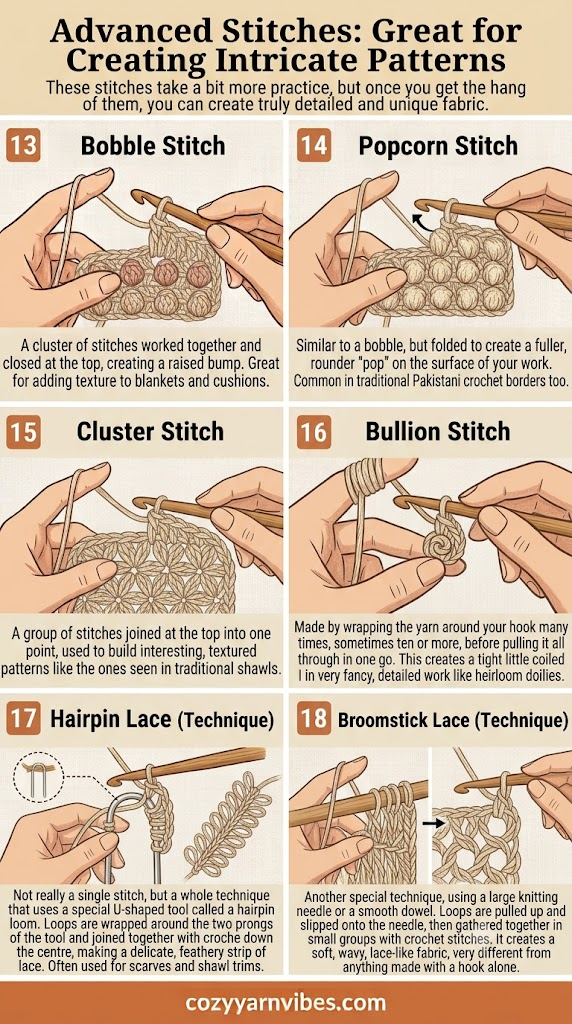
Bobble Stitch
A group of stitches made into a knot at the top which makes a bump.
How to Make This Stitch
1. Work several partial stitches into the same stitch, leaving the final loop of each stitch on your hook. 2. Yarn over and pull through all the loops to gather them into a rounded bump. 3. Secure the bobble with a chain if required by the pattern.
Where to Use This Stitch Creatively
Useful when you want to add texture to items such as blankets and pillows, scattered across the fabric or lined up in neat rows.
Popcorn Stitch
A little similar to the bobble stitch, but folded to create more of a rounded look.
How to Make This Stitch
1. Work the required number of double crochets into the same stitch or space. 2. Remove your hook from the working loop, insert it through the first double crochet, then pick up the working loop and pull it through. 3. Tighten the loop to bring the stitches together into a rounded popcorn.
Where to Use This Stitch Creatively
Also used in traditional Pakistani crochet borders, where its raised, rounded bumps add a distinctive decorative edge.
Cluster Stitch
A bunch of stitches made into a knot at the top to make some very intricate patterns.
How to Make This Stitch
1. Work several partial stitches into the same stitch or space, leaving the final loop of each stitch on your hook. 2. Yarn over and pull through all the loops to close the stitches together. 3. Secure with a chain if the pattern requires one.
Where to Use This Stitch Creatively
Just like those on traditional shawls, clusters build rich, intricate surface patterns that feel almost embroidered.
Bullion Stitch
The yarn is wrapped around the hook several times, even up to ten times, and then it is pulled through to make an intricate coil that is reminiscent of a little rose bud.
How to Make This Stitch
1. Wrap the yarn around your hook several times, according to the pattern. 2. Insert your hook into the indicated stitch, yarn over, and pull up a loop. 3. Carefully pull the loop through all the wraps on your hook.
Where to Use This Stitch Creatively
Used in very detailed embroidery, and its coiled, rosebud shape makes it a lovely way to stitch tiny flowers onto bags, cushions or the front of a garment.
Hairpin Lace
This is not actually a single stitch, but an entire technique done using a special U-shaped implement called a hairpin loom. The loops are wound around the two prongs of the loom and connected with crochet stitches down the middle, resulting in an airy and feathered strip of lace.
How to Make This Stitch
1. Wrap the yarn around the two sides of a hairpin loom and create loops on both sides. 2. Use a crochet hook to connect the loops down the center with crochet stitches. 3. Continue making and joining loops until the lace strip reaches the desired length.
Where to Use This Stitch Creatively
Frequently used for scarves and trim for shawls, where its feathery fringe adds movement and softness.
Broomstick Lace
Another specialised technique which makes use of a very long knitting needle or a dowel. The loops are made and slipped onto the needle and then are brought together in small clusters using crochet stitches.
How to Make This Stitch
1. Pull up a large loop and place it around a broomstick, dowel, or large knitting needle. 2. Repeat across the row until you have the required number of loops on the stick. 3. Remove groups of loops from the stick and work crochet stitches around them to form the lace pattern.
Where to Use This Stitch Creatively
It makes a soft, wavy, lacy fabric completely unlike anything made just with a hook, which makes it lovely for airy scarves, wraps and openwork blanket panels.
Tunisian Simple Stitch (Tss)
One of many stitches used in the whole Tunisian style of crochet, which is done using an elongated hook with a stopper at the end. The loops are picked up across a row and then are crocheted back off of the row, producing a fabric similar to both crochet and knitting.
How to Make This Stitch
1. Insert the Tunisian hook under the vertical bar of the next stitch and pull up a loop, leaving it on the hook. 2. Continue picking up loops across the row. 3. Work the return pass by yarning over and pulling through the required loops until one loop remains.
Where to Use This Stitch Creatively
Fabulous for baby blankets and pillows, thanks to its thick, plush, knit-like fabric.
Interlocking (Overlay) Crochet
A technique done using two different colours of yarn, worked in separate rounds which interlock. It makes an interesting, bold pattern which requires no colour changes within a row.
How to Make This Stitch
1. Work the first colour in the required mesh or base pattern, creating spaces for the second colour. 2. Work the second colour through selected front or back loops of the previous round to create the interlocking design. 3. Repeat the rounds and colour placement to build the overlay pattern.
Where to Use This Stitch Creatively
Very popular in modern designs of blankets, where the bold, layered colourwork becomes the main event.
Wiggle Stitch
An entertaining decorative stitch which is produced by alternating very tall and short stitches within a row, thus creating a “wiggle” effect in the fabric.
How to Make This Stitch
1. Create a base row or mesh using chain stitches and double crochets. 2. Work tall stitches and shorter stitches around or across the base row according to the pattern. 3. Repeat the alternating stitch heights to create the characteristic raised wiggle effect.
Where to Use This Stitch Creatively
Usually used as an accent stitch on rows of bags and cushion covers, where a playful wave of texture stands out against a plain background.
FAQs About Crochet Stitches
Which stitch should I learn first?
Start with the chain stitch, then move to single crochet. These two alone can already make simple projects like dishcloths.
Why does my crochet look uneven?
This usually happens because of tension. Try to keep your grip relaxed and consistent from stitch to stitch.
What’s the difference between UK and US crochet terms?
The names are different but the stitches are the same, just shifted by one level. For example, what’s called “double crochet” in the US is called “treble crochet” in the UK. Always check which terms a pattern is using before you start.
How long does it take to learn all these stitches?
Everyone learns at their own pace. Some people feel confident with the basics in a week, others take a month. There’s no “right” speed, just keep practicing a little each day.
What is the easiest stitch for a total beginner?
Single crochet, without a doubt. It’s short, forgiving, and doesn’t need much yarn to practice with. Most people can get comfortable with it in a single sitting.
Final Thoughts
Take your time with each crochet stitch. Crochet isn’t a race, it’s a slow, quiet kind of joy. Every stitch you make is one step closer to something beautiful made entirely by your own hands.
Begin your first project by using our detailed guide on how to make a seashell lace tote bag.
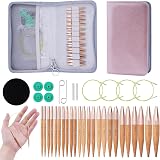
Mdoker 2″ Shortie Bamboo Circular Knitting Needles Set,Include 9inch&15inch | 12 Pairs Interchangeable Knitting Needles with Case,Circular Needles w/Flexible Cables,Ideal for Socks,Sleeves,US Size 2.5~11
$43.99 (as of September 29, 2026 13:44 GMT +00:00 – More infoProduct prices and availability are accurate as of the date/time indicated and are subject to change. Any price and availability information displayed on [relevant Amazon Site(s), as applicable] at the time of purchase will apply to the purchase of this product.)