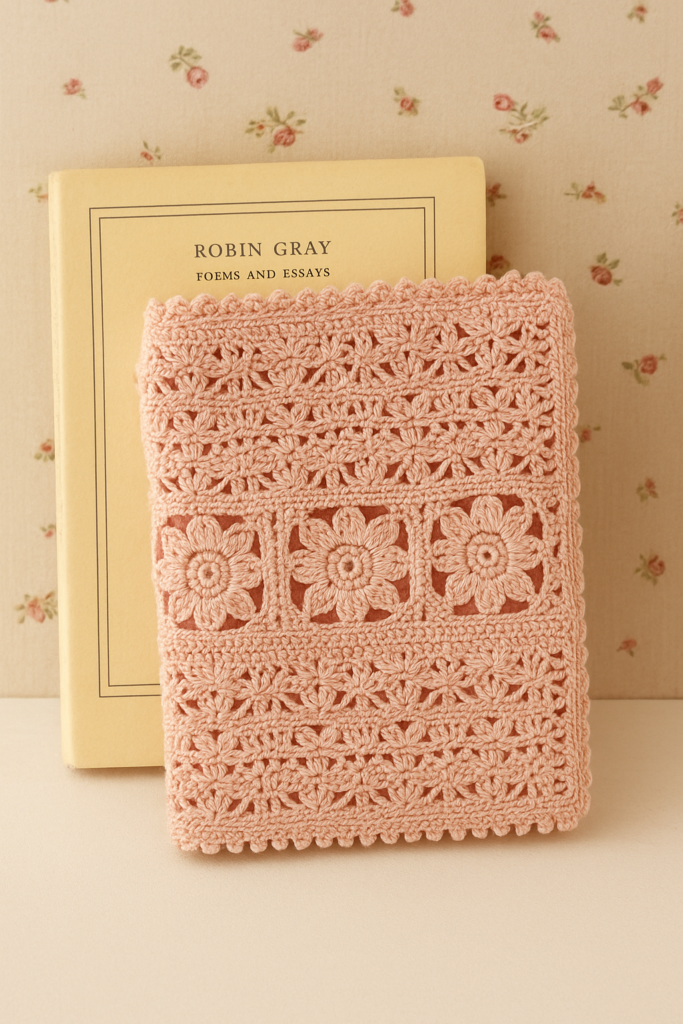
Protect your favorite reads in handmade elegance. This charming crochet book cover pattern features a blend of lacy shell stitches and floral granny squares. Perfect for gifting or cozy journaling sessions, it wraps your book in vintage-inspired charm with a snug, tailored fit.
✨ Project Overview
- Pattern Type: Crochet Book Cover
- Skill Level: Intermediate
- Size: Fits a book approximately 23cm x 13.5cm
- Techniques Used: Granny squares, lace shell stitch, seaming, and edging
- Best For: Journals, novels, planners, and gifting
🧶 Materials
- Yarn: Lace or light fingering weight cotton (suggested: 100% cotton)
- Hook: 2.0 mm (or size needed to obtain gauge)
- Yardage: Approx. 35g
- Other Tools: Yarn needle, scissors, stitch markers
🧵 Stitch Guide
- ch – chain
- sc – single crochet
- dc – double crochet
- sl st – slip stitch
- tr – treble crochet
- picot – chain 3, slip stitch into first ch
🔍 Pattern Sections Breakdown – Stitch-by-Stitch Guide

🟩 1. Floral Center Motifs (4 Squares)
These square motifs form the central design of the book cover. Each motif is worked separately, then joined.
✨ Stitch Details:
- Round 1:
- Magic ring.
- [ch 3 (counts as dc), 1 dc] × 8 sets (16 dc total).
- Join with sl st to the top of the first ch-3.
- Round 2 (Petals):
- ch 5 (counts as 1 tr + ch 1), 2 tr in next st, ch 1, 2 tr in next st… Repeat to make 8 petals.
- Each petal consists of 2 tr, ch 1, 2 tr, worked with ch-1 spaces in between.
- Round 3 (Square Shaping):
- Work into ch-1 spaces: (2 dc, ch 2, 2 dc) in corners.
- In the sides between corners: (2 dc) clusters.
- This starts to shape the flower into a square.
- Round 4-5:
- Continue building the square using dc clusters, increasing corner stitches as: (2 dc, ch 2, 2 dc).
- Side spaces: (3 dc) shells between corners.
📌 Repeat to make 4 identical motifs, then join them vertically (either with sl st or whip stitch) to form the central spine of the book cover.
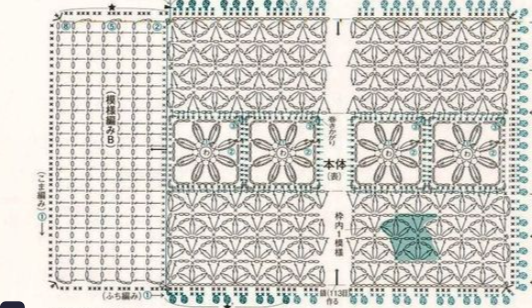
🟦 2. Side Lace Panels (Panel A – Left & Right of Motifs)
This section uses a repeating lace pattern of V-stitches and shell stitches, creating a soft, openwork look.
✨ Stitch Details (repeat row-based):
- Row 1 (foundation):
- Start with a base chain that aligns to chart (likely a multiple of 6 + 1).
- Sc in second ch from hook, ch 3, skip 2, sc in next ch repeat to end.
- Row 2 (shells & fans):
- Into each ch-3 space: [dc, ch 1, dc, ch 1, dc] = shell fan.
- Skip the scs between.
- Row 3:
- Sc into middle dc of previous row’s shell, ch 5, sc into next middle dc.
- Repeat Rows 2–3 until the panel matches the height of the motif strip.
- Finish with a dc border row to prepare for seaming.
📌 Make 2 panels and sew one on each side of the central motif strip.
🟥 3. Back Panel (Panel B)
This is a denser panel worked in simple shells to provide a solid, firm backing.
✨ Stitch Details:
- Row 1: Foundation chain (based on chart).
- Sc in 1st st, ch 3, skip 2 sts, sc — repeat across.
- Row 2:
- Work a dc shell into each ch space: (3 dc in each ch-3 space).
- This gives a semi-open, but thicker texture than the lace panels.
- Row 3 onward: Repeat shell pattern until desired height.
📌 This panel is sewn to the opposite side of the motif strip (acts as the book back).
⬛ 4. Side Flaps (Inside Pockets)
These are narrow rectangles that hold your book’s front and back covers inside.
✨ Stitch Details:
- Worked in sc or dense dc rows to ensure a tight fabric.
- Width approx. 5 cm (as per the chart).
- Height matches the book cover body.
📌 Make 2 flaps, fold inward on each end of the cover, and stitch only top and bottom edges, leaving the side open to slide in the book cover.
🌸 5. Edging (All Around)
A delicate picot border is added after assembly.
✨ Stitch Details:
- Work a round of sc evenly around all edges.
- Next round: [sc in next 2 sts, ch 3, sl st in first ch (picot)], repeat all around.
- Corners: (sc, ch 3, sl st in ch, sc) to maintain curve.
📌 This adds a decorative, feminine finish to the book cover.
Final Assembly Tips
- Block each piece before seaming for neatness.
- Seam side panels, then back panel to center strip.
- Fold in flaps and seam only their top/bottom.
- Finish with border edging.
- Insert your favorite book!
📸 Styling Ideas
- Use pastel shades for a soft vintage look or bold hues for a modern twist.
- Add a small crochet flower or button for extra decoration.
- This cover makes a perfect handmade gift for book lovers or journaling friends.

Herrémosla, la haré gracias por el patrón,